Service Layout
Service Layouts manage the Agent Desktop (Gadget) behavior. For example: which records should be queried in Dynamics 365 to identify a caller, or how phone numbers should to be translated.
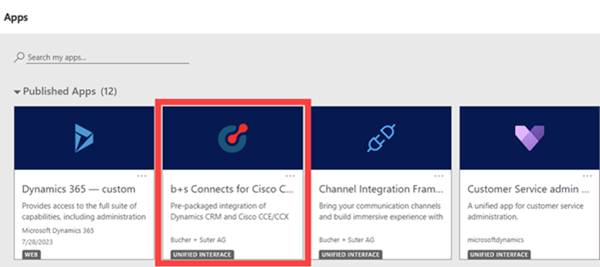
Step 1: Navigate to b+s Connects for Cisco Contact Center.
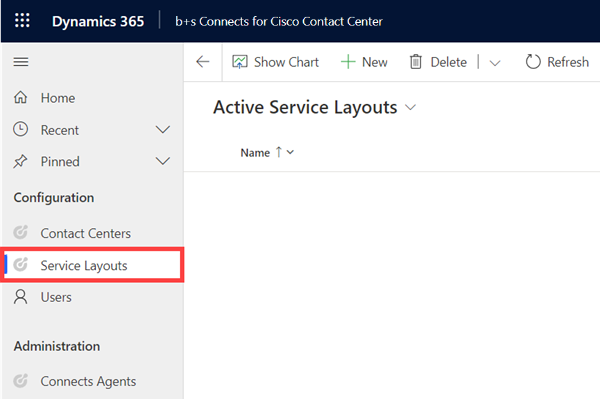
Step 2: Open "Service Layouts".
Step 3: From the list of Active Service Layouts, select and open the Service Layout for which a feature should be configured.
Settings
Step 1: Provide a Name. This name will be displayed in any related record.
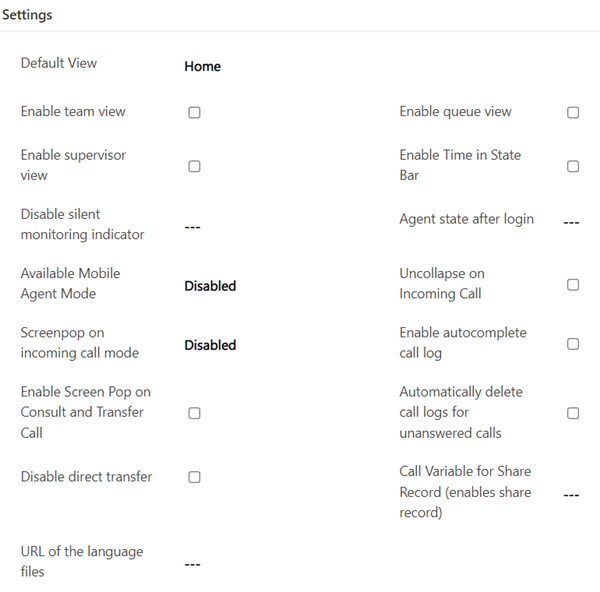
Step 2: Provide these settings:
| Setting | Description |
|---|---|
Default View | Sets the default view of the gadget. Possible values are: Home, Team View, Queue View, Supervisor View, Team Messages or Custom Integration View. By default it is set to Home. |
Enable team view | Enables or Disables the team view accessible from the navigation menu. More information can be found here. |
Enable queue view | Enables or Disables the queue view accessible from the navigation menu. More information can be found here. |
Enable supervisor view | Enables or Disables the supervisor view accessible from the navigation menu. More information can be found here. |
Enable Time in State Bar | Enables or Disables the agent state timers. |
Disable silent monitoring indicator | Enables or Disables visibility of the silent monitoring indicator icon for an agent. |
Agent state after login | Defines the agent state after the login. Possible values are ready, not_ready or the reason code of the not ready reason. |
Available Mobile Agent Mode | Disables or sets the available mobile agent modes. More information can be found here. |
Uncollapse on Incoming Call | Enables or Disables an automatic uncollapse for an incoming call. |
Screen pop on incoming call mode | Disables or sets the available screen pop mode for incoming calls. More information can be found here. |
Enable autocomplete call log | Enables or Disables automatic completion of the phone call log after the call ends. This corresponds to the "Mark Complete" menu item for a phone call record. |
Enable Screen Pop on Consult and Transfer Call | Enables or Disables the screen pop on consult and transfer calls. |
Automatically delete call logs for unanswered calls | Enables or Disables automatic deletion of phone call logs for calls that haven't been answered by the agent (e.g. RONA) |
Disable direct transfer | Enables or Disables the function to directly transfer a phone call to another agent. |
Call Variable for Share Record (enables share record) | Defines the name of the call variable to share a record (e.g user.ECCRecordShare). In order to have consistent phone call log handling, share record must be enabled. If undefined, share record will be disabled. |
URL of the language files | Defines the URL of the translation files for the languages. It must contain the placeholder {{locale}} for the language code ID.More information can be found here. |
Mobile Agent
The following options are available:
| Setting | Description |
|---|---|
| Disabled | Agents can't login with mobile agent |
| Agent Choose | The agent can login with a call-by-call or nailed connection |
| Call By Call | The agent can only login with a call-by-call connection |
| Nailed | The agent can only login with a nailed connection |
Make sure the mobile agent setting in the Service Layout matches the configuration in CCE.
Additionally to the above mentioned mobile agent modes, the agent still has the option to login as a "regular" agent.
Screen pop on incoming call mode
The following options are available:
| Setting | Description |
|---|---|
| Disabled | No record will be opened. |
| Activity | The phone call log will be opened. More information can be found here |
| Participant | A participant lookup will be done. If there's only one result the found record will be opened. More information can be found here |
| Case | A new case with the configured data pre-filled will be opened. More information can be found here |
Language Files
Step 1: Download the example language file.
Step 2: Change the locale in the file name to the BCP 47 code and change file extension to *.js.
Example:
bsconnects_language_de-DE.js.
Step 3: Change the values in the language file.
Step 4: Upload the file to Microsoft Dynamics and get it's URL. More information can be found here.
Step 5: Enter the URL in the field URL of the language files.
Example:
https://<yourorg>.crm<num>.dynamics.com/WebResources/<prefix>bsconnects_language_de-DE.js
Step 6: Remove the BCP 47 code in the URL.
Example:
https://<yourorg>.crm<num>.dynamics.com/WebResources/<prefix>bsconnects_language_de-DE.js
Step 7: Add the {{locale}} placeholder in place of the BCP 47 code.
Example:
https://<yourorg>.crm<num>.dynamics.com/WebResources/<prefix>bsconnects_language_{{locale}}.js

The gadget will get translated only if the uploaded language file matches the current crm language.
To learn how to configure your crm language go here.
Click-to-dial
The section click-to-dial allows the administrator to configure multiple dialing rules which are applied to the number stored in the CRM.

| Field | Description |
|---|---|
| Description | Descriptive name for the rule |
| Translation Rule | Please refer to Phone Number Translations for more information on the Translation Rule. |
To enable a non-standard field for click-to-dial, please refer to System Configuration
Set the phone number as the name on a phone call
When you use click-to-dial on a phone call record, the displayed name on the phone call will be the title by default (e.g. Call - 2020-11-16T16:13:30.079Z).
To display the phone number instead go to the Lookup Layout and add a configuration entry for the phonecall entity:
| Entity | Name | Subtitle1 | Subtitle2 | Home | Mobile | Work |
|---|---|---|---|---|---|---|
| phonecall | phonenumber | - | - | - | - | - |
Speed Dial Numbers
Scroll to the section "Speed Dial Numbers" and define the list of Speed Dial numbers. Each Speed Dial number has a description, number and a type.
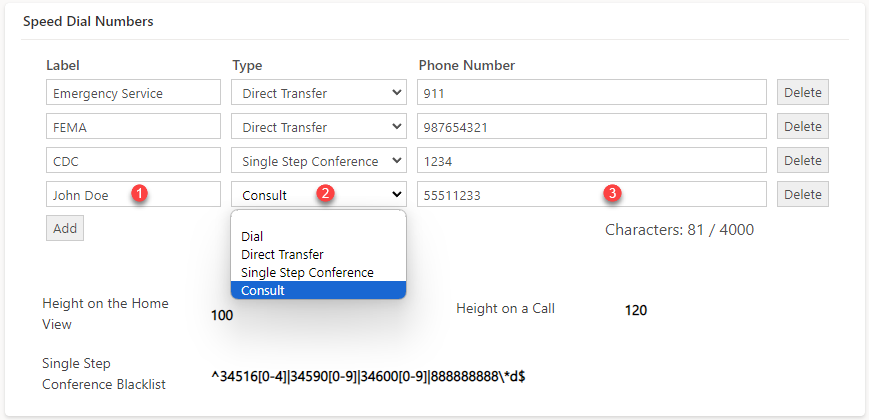
Step 1: Provide a dial button label name. The description should help the agent pick the right number.
Step 2: Select a call type from the dropdown list. Below is a brief explanation of the available types and their function.
| Type | Function |
|---|---|
| Dial | Initiates a call to the configured number |
| Direct Transfer | Transfers the work item (call) to the configured number |
| Single Step Conference | Initiates a consultation call to the configured number and completes the conference as soon as the consulted party answers the call |
| Consult | Initiates a consultation call to the configured number |
Step 3: Provide a phone number. The number will be dialed after the Speed Dial button is clicked.
Speed Dial Card Height
Configure the maximum height of the Speed Dial Card. Supported units are:
mm, in, px, pt, pc, em, ex, ch, rem, vw, vh, vmin, vmax or %.
If the provided value doesn't include a unit definition, the default is px.
For details on each unit please refer to this page.
The card will not be higher than the provided value. If the height of the card is exceeded, the content will become scrollable.
| Field | Function |
|---|---|
| Height on the Home View | Maximum height of the card visible on the home view |
| Height on a call | Maximum height of the card displayed on a call |
Single Step Conference Blacklist
Configure numbers and ranges for which the Single Step Conference should not be completed automatically (like for an IVR). This field expects a regular expression.
Example:
Block CTI Ports 345900-345909 and all numbers (Route Pattern) starting with 888888888: ^34590[0-9]|888888888\d*$
This field is required if you want to allow agents to Single Step Conference other agents via a CCE/CCX queue.
Directory Lookup
The directory lookup uses the input of the dialing field and searches in the configured fields of a Microsoft Dynamics entity. You can set filter rules on Microsoft Dynamics selected entities by using OData filters syntax.
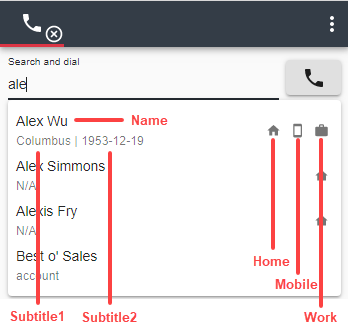
The found results are shown with the name and the telephone numbers for home, mobile and work. The corresponding fields are configured in the lookup layout configuration.
Directory numbers can also be included in the search. For a full description refer to Directory Number.
Configuration
Step 1: Provide these settings:
| Setting | Description |
|---|---|
Min. length of characters to search | Sets the minimal length of characters that must be entered to start the search. Default: 2 |
Delay between typing and searching | Sets the delay in milliseconds after typing to start the search. Default: 300 |
Step 2: Select an entity from the dropdown field. The provided options are the logical names of the entities.
Step 3: Insert a filter rule. Use OData syntax for filters and apply one or more lookup parameters to it.
For more information about OData filters please visit: http://docs.oasis-open.org/odata/odata/v4.01/cs01/part2-url-conventions/odata-v4.01-cs01-part2-url-conventions.html#_Toc505773218
The lookup parameter for the entered string is '{searchText}'
Example:
If you would like to search for the entered text in the fields "telephone1" and "fullname", the rule should be:
contains(fullname, '{searchText}') or contains(telephone1, '{searchText}')
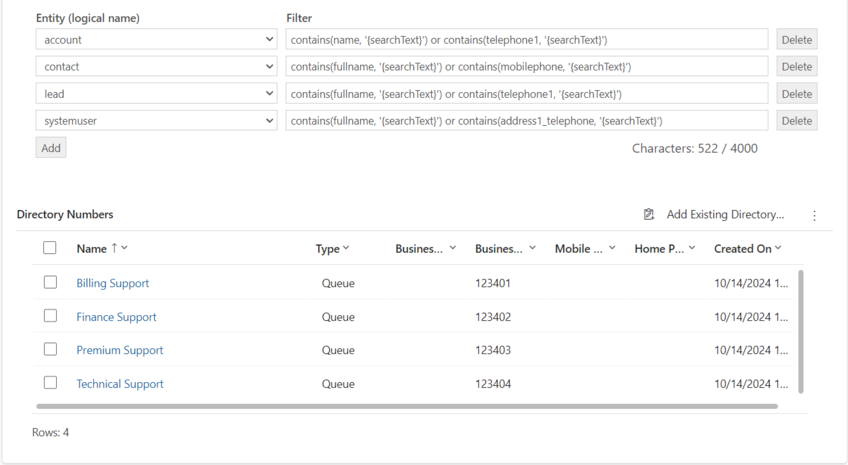
Directory numbers
Step 1: Click on Add Existing Directory Numbers.

Step 2: Search for and select the desired Directory Numbers.
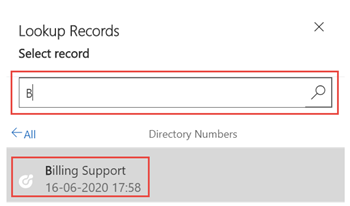
Step 3: Click Add.
The lookup results are limited to 30 directory numbers.
Refer to Directory Number for more information.
Participant Lookup
If BAAccountNumber is available and referenced in the participant lookup, rules without {BAAccountNumber} will not be used for the lookup.
Step 1: Set rules to adjust the phone number (ANI) for the lookup in the crm.
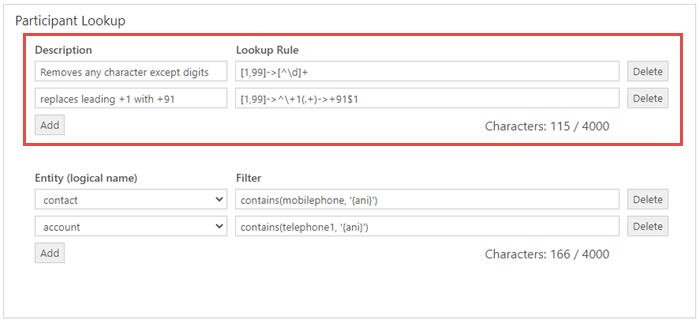
| Field | Description |
|---|---|
| Description | Descriptive name for the rule. |
| Translation Rule | Please refer to Phone Number Translations for more information on the Translation Rule. |
Step 2: Select an entity from the dropdown field and enter a filter rule.
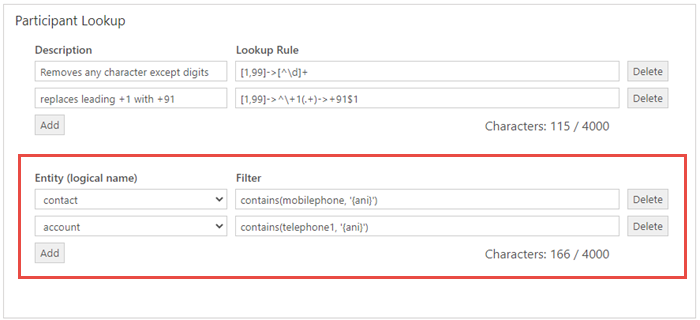
| Field | Description |
|---|---|
| Entity | The provided options are the logical names of the entities. |
| Filter | Use OData syntax for filters and apply one or more lookup parameters to them. |
For more information about OData filters please visit: http://docs.oasis-open.org/odata/odata/v4.01/cs01/part2-url-conventions/odata-v4.01-cs01-part2-url-conventions.html#_Toc505773218
Available lookup parameters are:
{ani}: Automatic Number Identification{callVariables<1-10>}: The contents of all call variables{user.<Your Variable>}: The contents of all expanded call context variables{BAAccountNumber}: The content of the Outbound Option account number variable. More information on the handling of this variable can be found here.
Each field of an entity has a type (e.g string, guid). Please make sure that for string attributes the lookup parameter is surrounded by an apostrophe ('), and for non-string attributes (e.g. accountid) no apostrophes are used.
For string attributes the value empty is used if the variable contains no data and for non-string attributes the value null is used.
Examples:
| Rule | Description |
|---|---|
telephone1 eq '{ani}' | telephone1 is equal to ani |
telephone1 eq '{user.ean}' | telephone1 is equal to ean |
contactid eq {BAAccountNumber} | contactid is equal to the guid stored in BAAccountNumber |
telephone1 eq '{ani}' or telephone1 eq '{user.ean}' | telephone1 is equal to ani or ean |
mobilephone eq '{ani}' and contactid ne {BAAccountNumber} | mobilephone is equal to ani and contactid not equal to the BAAccountNumber |
contains(telephone1, '{callVariable3}') | telephone1 contains the Peripheral Variable 3 |
Lookup Layout
Each row in the Lookup Layout defines which fields of a CRM record are mapped to which part of the UI, you can add and remove entries for each entity type.

The following graphics depict how and where the fields will be shown on the b+s Connects for Microsoft Dynamics gadget. If Subtitle1 and Subtitle2 are not configured the entity name will be displayed - e.g. contact, account, lead.
Click-to-dial and participant lookup:
Directory lookup:
Create new record links
Links are shown on the Create tab and can either point to a target within the CRM or to an external URI.
Step 1: Go to the Create new record links section.

Step 2: Add a new entry.
Each entry consists of a Link Name and corresponding data (Form data or URI).
Link Name is the text shown on the user interface, it should help the agent pick the right "create action" during a call. The create tab is hidden on the user interface when there are no links configured.
For links pointing to a CRM resource: right column defines the entity to open and the fields which should be pre-filled with values. Further information can be found in chapter Links pointing to CRM records.
For external links: right column contains the URI. Further information can be found in chapter Links pointing to external URIs.
Links pointing to CRM records
This field has the following format:
entity=<LogicalName>&<Attribute1>={<Data>}
LogicalName: Dynamics 365 entity logical name.
AttributeN: Attribute of the entity which should be prepopulated with data.
Data: Information retrieved from the current call or from the participant lookup if there's exactly one match.
Examples:
| Form data or URI | Description |
|---|---|
entity=contact&telephone1={ani}&mobilephone={callVariable1} | Open a contact and pre-populate content of callVariable1 to mobilephone field. |
entity=incident&title={callVariable1}&customerid={id}&customeridtype=account&customeridname={name} | Open an incident and pre-populate content of callVariable1 into title field and set found participant as customer. |
Please refer to Possible Values for more information on available call variables. A list of available participant variables can be found in chapter Participant data.
Links pointing to external URIs
If the data in the Form data or URI column does not start with entity=, it is considered an external URI. Any URI scheme supported by the browser can be provided.
Examples are: https://www.google.com/search?q={name}, mailto:info@example.com
Please refer to Possible Values for more information on available call variables. A list of available participant variables can be found in chapter Participant data.
Participant data
| Value | Description |
|---|---|
| id | Unique identifier of the participant record |
| name | PrimaryNameAttribute of a CRM record or as configured in the Lookup Layout |
| subtitle1, subtitle2 | Additional field data retrieved from the participant record as configured in the Lookup Layout |
Call data
Items routed over a script in a Cisco Contact Center environment can be enriched with call data. This data consists of the ten call variables, ECC variables, and additional data such as call type, queue name or outbound option variables. Entries can be added or removed. The first field contains the label that will be displayed and the second is the name of the call variable.
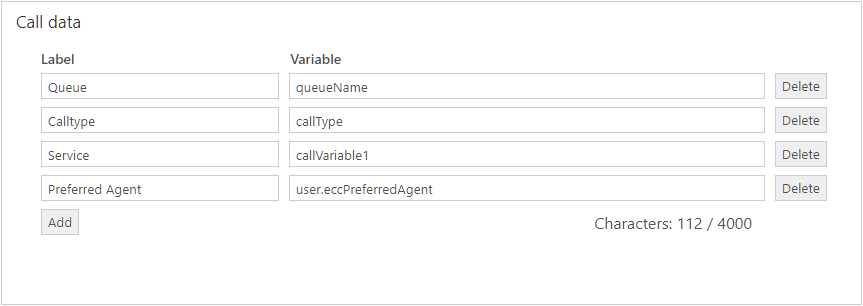
In the gadget, the configuration should appear as it does below. Notice that the label Preferred Agent is not displayed. This is is either because the ECC variable user.eccPreferredAgent does not exist or is empty.
Empty or non-existent variables will never be displayed.
Possible Variables
The following variables can be displayed:
| Value | Description |
|---|---|
| callVariable1 | Cisco Contact Center call variable 1 |
| ... | |
| callVariable10 | Cisco Contact Center call variable 10 |
| user.eccVariableName | Cisco Contact Center expanded call context variable. The name is dependent on the ECC variable name. An ECC variable can be either a scalar variable or an array element. Array elements are accessed individually by using [] (e.g. user.eccVariableName[0] for the first element in the array) |
| callType | Cisco Finesse Call Type |
| DNIS | Cisco Finesse DNIS |
| dialedNumber | Cisco Finesse Dialed number |
| number | Cisco Finesse ANI. Number is displayed like it is received from Finesse |
| outboundClassification | Cisco Finesse Outbound classification |
| callKeyCallId | Cisco Finesse Call Key Call ID -> Router call Key (CCE only) |
| callKeyPrefix | Cisco Finesse Call Key Prefix -> Router call Key Day (CCE only) |
| mediaId | Cisco Finesse Media ID |
| queueName | Cisco Finesse Queue Name |
| queueNumber | Cisco Finesse Queue Number |
| wrapUpReason | Cisco Finesse Wrap-Up Reason |
| BACampaign | Outbound Option campaign to which the call belongs |
| BAAccountNumber | Customer account number available in the import file |
| BAResponse | Multi-purpose placeholder for sending data |
| BAStatus | Indicates mode and direction of the Outbound Option Dialer initiated call |
| BADialedListID | Unique key identifying a specific customer record within the Dialing List |
| BATimeZone | Indicates the GMT offset, in minutes, for the customer’s time zone and is used to obtain the customer’s local time |
| BABuddyName | Contains the customer’s first and last name separated by a comma, if available in the import file |
| BACustomerNumber | Contains the dialed customer phone number (UCCX only) |
| totalHoldCount (*) | Amount of times the call was already in hold state |
| totalHoldTime (*) | Amount of seconds the call was already in hold state |
| workitemid | ID of the call |
Refer to the Cisco Finesse documentation for more information about these variables.
Variables marked with (*) can only be used to display on UI. Other variables in the table can also be used for other purposes as described in chapters like Create new record links, Create New Case, Phone Call log.
Phone Call Log
This configuration section defines the data which should be saved to the phonecall record. Refer to Phonecall record handling for more information.
Map CTI data and call notes to phone call fields
CTI data can be populated in a phone call record upon creation/update.
Step 1: Navigate to the Service Layout configuration and go to the Phone Call Log section.
Step 2: Provide these settings per field:
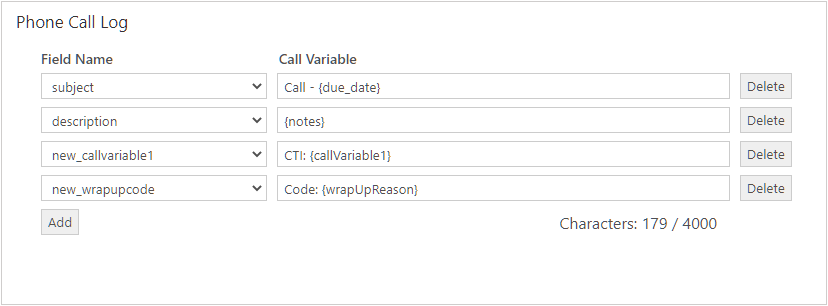
| Field | Description |
|---|---|
Field Name | Field of the phone call log to populate data into. |
Call Variable | Text and variables to be populated. Please refer to the chapter Available Variables. |
The Service Layout requires you to configure the {notes} variable for exactly one field without any additional text. Please make sure that a mapped field has enough space to store the value.
Examples
| Field Name | Call Variable |
|---|---|
| subject | Call - {due_date_cti} |
| description | {notes} |
| cr12_callrecordingurl | {callrecordingurl} |
The list of available fields is limited to type "String" and "Memo" and they must be writable (FieldPermission IsValidForUpdate=true and IsValidForCreate=true).
When mapping CTI Data to phone call fields, both existing fields and newly created custom fields may be chosen. When configuring existing fields, data that is already stored will be overwritten by b+s Connects depending on the configuration.
Available Variables
Available call variables are outlined in Possible Values.
In addition to these, the following variables are available:
| Value | Description |
|---|---|
| callrecordingurl | URL of the recorded phone call. |
| due_date | The date of call establishment as string provided from Cisco Finesse (UTC). For example 2019-08-13T14:10:12.074Z. |
| due_date_cti | The date of call establishment as string provided from Cisco Finesse as local time of the server. For example 2019-08-13T16:10:12.074+02:00. |
| notes | Content of the call notes. |
Queue Thresholds
The following configurations can be made to customize the thresholds:
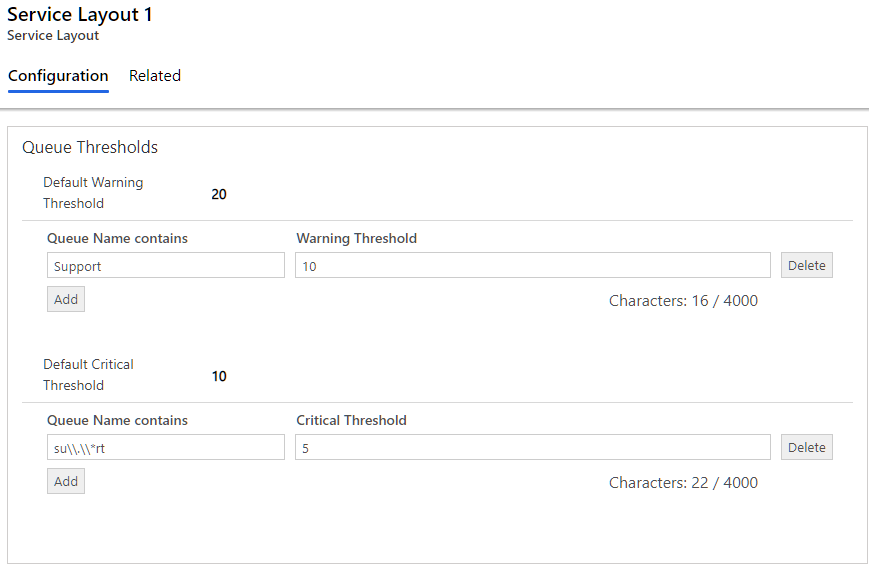
| Field | Description |
|---|---|
| Default Warning Threshold | Sets the value for the number of items in queue to warn the agent. A queue that exceeds this threshold is displayed in yellow. |
| Default Critical Threshold | Sets the value for the number of items in queue where the agent is warned again. A queue that exceeds this threshold is displayed in red. |
| Queue Name contains | A regular expression to define the affected queues. Further information can be found here. |
| Warning Threshold | Sets the Warning Threshold for the defined queues. |
| Critical Threshold | Sets the Critical Threshold for the defined queues. |
Note: If the Critical Threshold is lower than or equal to the Warning Threshold, the Warning threshold will never be displayed.
How to select specific queues
To simplify huge deployments the provided values in the fields "Queue Name contains" are interpreted as regex literals in a contains clause.
| Example | Description |
|---|---|
^Billing Support$ | Will set a threshold on all queues with a name equal to Billing Support or billing support. |
Support | Will set a threshold on all queues which contain Support or support in their name. For example: Billing support and Technical Support. |
su.*rt | Will escape the regex characters . and * and therefore match queues which contain su.*rt in the name field, but will not match support or surt. |
Keep in mind that the queue name provided in the Service Layout configuration refers to the "Peripheral Name" field of a Skill Group in UCCE deployments.
A good way to start is by reading the RegEx document from the MDN web docs.
Create New Case
When screen pop on incoming call mode is set to Case, a form to create a new case will be opened when there's an incoming call. It is possible to pre-fill data in this form.
If a case is already assigned to the Regarding field of the phonecall record, the screen pop will open this case. More information can be found in Automatic assignment to a phonecall.
Step 1: Go to the Create New Case section.
Step 2: Select the field you want to pre-fill with a value.
Step 3: Enter text and/or variables to store in the field. Variables have to be in curly brackets. e.g. {name}, {callVariable1}.
You can use variables retrieved from the current call or from the participant lookup (only if there is exactly one match). For more information on available variables please refer to Possible Values and Participant data.
The available fields to pre-fill data are limited to type String and Memo. Also the fields must be writable (FieldPermission IsValidForUpdate=true and IsValidForCreate=true).
When screen pop on incoming call mode is set to Case and there is exactly one match, the found record is pre-filled to the Customer field of the case (incident).
Automatic assignment to a phonecall
To assign a case (incident) automatically to a phonecall record please follow these instructions.
Step 1: Add a new column to the Cases.
| Field | Value |
|---|---|
| Display Name | CTI Reference ID |
| Name | ctireferenceid |
Step 2: Go to the Create New Case section in the Service Layout.
Step 3: Select the created field and enter {workitemid} for the value.
Step 4: Save the Service Layout.
Step 5: Create a Cloud Flow to assign the Case to the Phonecall automatically.
Federation
Federation allows a synchronization between the Cisco reason code states and Dynamics presence status.
| Field | Description |
|---|---|
| Presence Status While Talking | Sets the agent into the configured presence status after the agent accepts a call and is in a talking state. An active Presence text must be set for this functionality. Please see presence configuration for more information about Dynamics presences |
| Not Ready Reason Code While Busy | Sets the agent into the configured Cisco not ready reason code if the agent switches to a presence with a Base status of Busy or Busy - DND. This can be triggered by a manual presence status switch or by an automatic one e.g. the agent accepts a chat task. Set it to -2 if no reasons are configured for the voice channel on Cisco Finesse. If there are already reasons configured, make sure to set a valid reason code from an existing Not Ready reason. |
This example sets the agent in the presence status Do not disturb if a phone call is accepted and it will set the agent to Cisco reason code 1 if he or she switches to a Busy or Busy - DND base status presence.
Please see these charts, to see which presence and state automation is possible.
Custom Integrations
Step 1: Click on Add Existing Custom Integration.
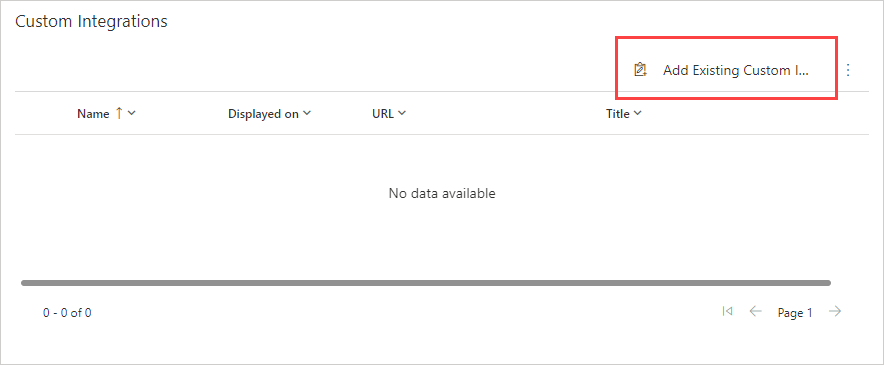
Step 2: Search for and select the desired Custom Integrations.
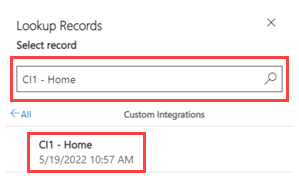
Step 3: Click Add.
Refer to Custom Integration for more information.
Logs
Define the location and limits for log uploads.
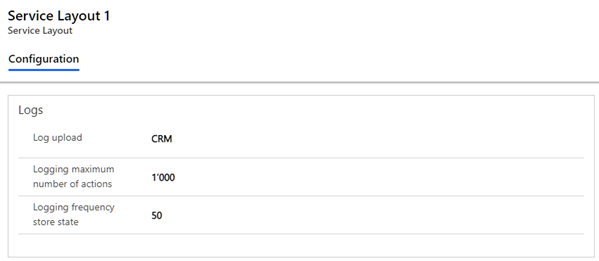
| Name | Description |
|---|---|
| Log upload | Enable/Disable log upload and log storage location. Disabled: no logs can be uploaded CRM: logs are stored on the CRM Finesse: logs are stored on the Finesse server Default: Disabled |
| Logging maximum number of actions | Defines the number of entries in the log file. Default: 1000 |
| Logging frequency store state | Defines the number of entries that are deleted when the maximum is exceeded. Default: 50 |
More information can be found here
Call Recording
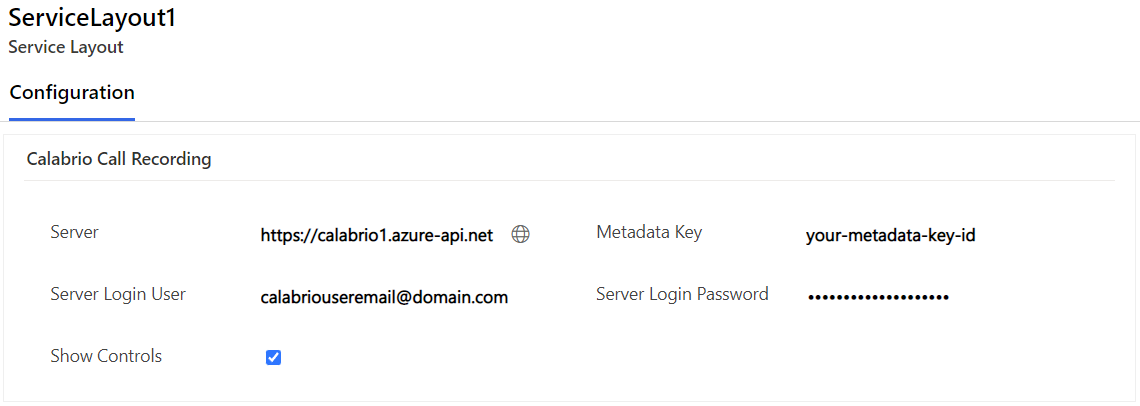
Define call recording settings.
| Field | Description |
|---|---|
| Server | The URL from where the Calabrio system can be accessed. Go here for more details. |
| Metadata Key | The Dynamics ID of the current phone call can be written into a metadata field of the corresponding call recording on the Calabrio server. This configuration value is the 'Metadata Key' of the field as created in Calabrio's 'Metadata Manager' settings. |
| Server Login User | The API User's Calabrio username used to login to Calabrio. |
| Server Login Password | The API User's Calabrio password used to login to Calabrio |
| Show Controls | Enable or disable the call controls in an active call. |
Save the call recording URL to the phone call
In order to save the call recording URL to the phone call record, you need to add a column of type String or URL to the Table Phonecall. A tutorial on how to add columns to a table can be found here.
Then you need to assign the variable {callrecordingurl} in the Service Layout to the newly created column. Further information can be found here.
Assigned Users
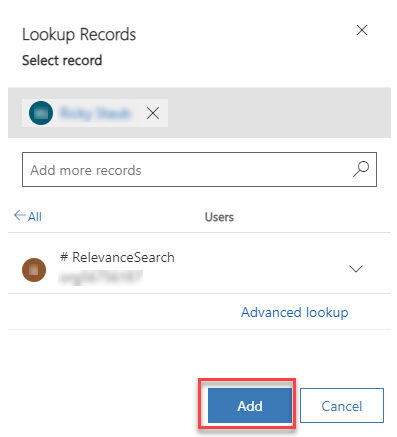
The assigned users list allows Admins to see who is using this Service Layout. They can also add existing users here.

Select one or more users and click "Add".
Remove Users
To remove users, you need to select them, click on the three dots, then on "Flow".

Select "Remove Users from Service Layout".

Then accept the popup to remove the selected users.
