Configure Webex Connect
1. Create Custom Integrations
Create custom Integrations to be able to send/receive Messages to/from your Salesforce Org.
1a. Custom Node
- In your Webex Connect setup navigate to
Assetsand thenIntegrations. - Click
Add Integrationand thenCustom Node - Assign the custom node a Name and a Description (for example, Bucher Suter Partner Messaging). In the Node Category field, select Custom Category and provide a name for the category.
- To enable mTLS for requests sent from Webex Connect to the b+s Salesforce REST Service, ensure that mTLS is enabled in your Salesforce org.
Authorization request
This Request is used to generate an access token.
Use the Consumer Key and Consumer Secret of the connected app created during package installation.
Request Name: Generate access tokenType: POSTResource URL: https://$(SalesforceDomain).my.salesforce.com/services/oauth2/token- Click
Parse Variables, the variables will be listed below theResource URLfield - Configure the SalesforceDomain Parameter
Parameter: SalesforceDomainParameter Value Type: DynamicField NameSalesforceDomain
- Click
Add Newbutton inURL ParameterssectionParameter: grant_typeParameter Value Type: StaticParameter Value: client_credentials
- Click
Add Newbutton inURL ParameterssectionParameter: client_idParameter Value Type: DynamicParameter Value: client_id
- Click
Add Newbutton inURL ParameterssectionParameter: client_secretParameter Value Type: DynamicParameter Value: client_secret
- In the
Responsesection configure the Node EventsNode Event: SuccessBody: HTTP StatusCondition: equalsValue: 200Node Edge: Success
- Configure data to be returned in flow session
- Set Response Type to
JSON(application\json) - Click
Add Newbutton Parameter Name: AccessTokenBody: BodyResponse Path: $.access_token
- Set Response Type to
Web Chat Message request
This Request is used to send the customer message to Salesforce.
Request Name: Web Chat MessageType: POSTResource URL: https://$(SalesforceDomain).my.salesforce.com/services/apexrest/cnxbyoott/interactions/v1/message- Click
Parse Variables, the variables will be listed below theResource URLfield- Configure the SalesforceDomain Parameter
Parameter: SalesforceDomainParameter Value Type: DynamicField NameSalesforceDomain
- Configure the SalesforceDomain Parameter
- In
Headerssection- Click
Add Newbutton Parameter: AuthorizationParameter Value Type: DynamicParameter Value: authorization
- Click
- In the
Bodysection- Set the body type to
JSON (application/json) - add Body
- Set the body type to
{
    "channelAddressIdentifier": "$(ChannelAddressIdentifier)",
    "endUserClientIdentifier": "$(UserId)",
    "deliveryChannel": "appmessaging",
    "appId": "$(AppId)",
    "threadId": "$(ThreadId)",
    "message": $(Message)
}
Click
Parsebutton and configure the Body parametersParameter: ChannelAddressIdentifierParameter Value Type: DynamicField NameChannelAddressIdentifierParameter: UserIdParameter Value Type: DynamicField NameUserIdParameter: AppIdParameter Value Type: DynamicField NameAppIdParameter: ThreadIdParameter Value Type: DynamicField NameThreadIdParameter: MessageParameter Value Type: DynamicField NameMessage
In the
Responsesection configure the Node EventsNode Event: SuccessBody: HTTP StatusCondition: equalsValue: 200Node Edge: SuccessNode Event: UnAuthorizedBody: HTTP StatusCondition: equalsValue: 401Node Edge: Error
Configure data to be returned in flow session
- Set Response Type to
JSON(application\json) - Click
Add Newbutton Parameter Name: idBody: BodyResponse Path: $.message.workItemIds[0]
- Set Response Type to
Additional Parameters
To send additional parameters to Salesforce, you can extend the body payload, e.g. ctiParam1, ctiParam2, ctiParam3. The additionalPramas object is stored in the custom field WxAdditionalParams__c of the Messaging Session record in Salesforce.
{
    "channelAddressIdentifier": "$(ChannelAddressIdentifier)",
    "endUserClientIdentifier": "$(UserId)",
    "deliveryChannel": "appmessaging",
    "appId": "$(AppId)",
    "threadId": "$(ThreadId)",
    "additionalParams": {
        "ctiParam1": "$(CtiParam1)",
        "ctiParam2": "$(CtiParam2)",
        "ctiParam3": "$(CtiParam3)"
    },
    "message": $(Message)
}
Activate mTLS for Web Chat Message request
To activate mTLS on this custom node, update the port in the Resource URL to 8443. The Resource URL should be formatted as: https://$(SalesforceDomain).my.salesforce.com:8443/services/apexrest/cnxbyoott/interactions/v1/message.
Enable the Security Configuration section to upload a Key Store Certificates and activate TLS 1.2 for this node.
Web Chat Attachments request
This Request is used to send the attachments to Salesforce.
Request Name: Web Chat AttachmentsType: POSTResource URL: https://$(SalesforceDomain).my.salesforce.com/services/apexrest/cnxbyoott/interactions/v1/attachments- Click
Parse Variables, the variables will be listed below theResource URLfield- Configure the SalesforceDomain Parameter
Parameter: SalesforceDomainParameter Value Type: DynamicField NameSalesforceDomain
- Configure the SalesforceDomain Parameter
- In
Headerssection- Click
Add Newbutton Parameter: AuthorizationParameter Value Type: DynamicParameter Value: authorization
- Click
- In the
Bodysection- Set the body type to
JSON (application/json) - add Body
- Set the body type to
{
    "channelAddressIdentifier": "$(ChannelAddressIdentifier)",
    "endUserClientIdentifier": "$(UserId)",
    "deliveryChannel": "appmessaging",
    "appId": "$(AppId)",
    "threadId": "$(ThreadId)",
    "attachments": $(Attachment)
}
Click
Parsebutton and configure the Body parametersParameter: ChannelAddressIdentifierParameter Value Type: DynamicField NameChannelAddressIdentifierParameter: UserIdParameter Value Type: DynamicField NameUserIdParameter: AppIdParameter Value Type: DynamicField NameAppIdParameter: AttachmentParameter Value Type: DynamicField NameAttachmentParameter: ThreadIdParameter Value Type: DynamicField NameThreadId
In the
Responsesection configure the Node EventsNode Event: SuccessBody: HTTP StatusCondition: equalsValue: 200Node Edge: SuccessNode Event: UnAuthorizedBody: HTTP StatusCondition: equalsValue: 401Node Edge: Error
Activate mTLS for Web Chat Attachments request
To activate mTLS on this custom node, update the port in the Resource URL to 8443. The Resource URL should be formatted as: https://$(SalesforceDomain).my.salesforce.com:8443/services/apexrest/cnxbyoott/interactions/v1/attachments.
Enable the Security Configuration section to upload a Key Store Certificates and activate TLS 1.2 for this node.
Web Chat typing indicator request
This Request is used to send the Typing Indicator request to Salesforce.
Request Name: Web Chat Typing IndicatorType: POSTResource URL: https://$(SalesforceDomain).my.salesforce.com/services/apexrest/cnxbyoott/interactions/v1/TypingStartedIndicator- Click
Parse Variables, the variables will be listed below theResource URLfield- Configure the SalesforceDomain Parameter
Parameter: SalesforceDomainParameter Value Type: DynamicField NameSalesforceDomain
- Configure the SalesforceDomain Parameter
- In
Headerssection- Click
Add Newbutton Parameter: AuthorizationParameter Value Type: DynamicParameter Value: authorization
- Click
- In the
Bodysection- Set the body type to
JSON (application/json) - add Body
- Set the body type to
{
    "channelAddressIdentifier": "$(ChannelAddressIdentifier)",
    "endUserClientIdentifier": "$(UserId)",
    "deliveryChannel": "appmessaging",
    "appId": "$(AppId)",
    "threadId": "$(ThreadId)"
}
Click
Parsebutton and configure the Body parametersParameter: ChannelAddressIdentifierParameter Value Type: DynamicField NameChannelAddressIdentifierParameter: UserIdParameter Value Type: DynamicField NameUserIdParameter: AppIdParameter Value Type: DynamicField NameAppIdParameter: ThreadIdParameter Value Type: DynamicField NameThreadId
In the
Responsesection configure the Node EventsNode Event: SuccessBody: HTTP StatusCondition: equalsValue: 200Node Edge: SuccessNode Event: UnAuthorizedBody: HTTP StatusCondition: equalsValue: 401Node Edge: Error
Activate mTLS for Web Chat typing indicator request
To activate mTLS on this custom node, update the port in the Resource URL to 8443. The Resource URL should be formatted as: https://$(SalesforceDomain).my.salesforce.com:8443/services/apexrest/cnxbyoott/interactions/v1/TypingStartedIndicator.
Enable the Security Configuration section to upload a Key Store Certificates and activate TLS 1.2 for this node.
1b. Custom Events
Overview
b+s Partner Messaging for Webex Connect forwards the following events triggered by Agent actions in Salesforce:
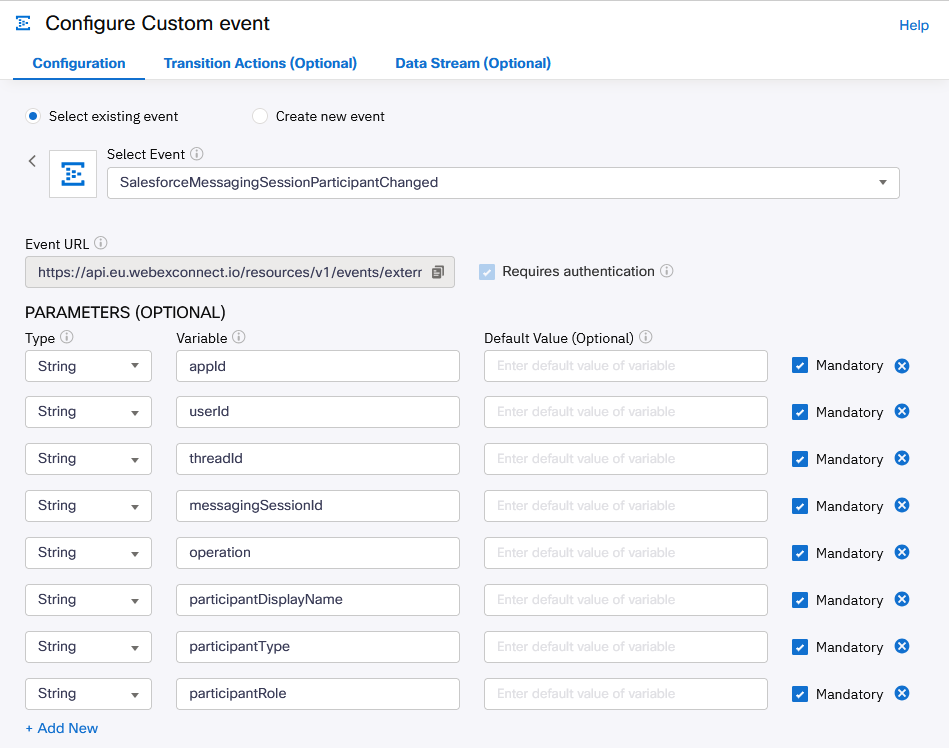
Participant Changed
The
Participant Changedevent is triggered when the number of participants on the Salesforce side changes, e.g. when an Agent enters or leaves a chat.In addition to the defined Event Id, the following parameters are included in the payload:
- appId
- userId
- threadId
- messagingSessionId
- operation (
add|remove) - participantDisplayName (the added/removed participant's display name as defined in Salesforce)
- participantType* (
agent|chatbot) - participantRole (
Agent|Chatbot|Supervisor)
* in case of supervisor, type is
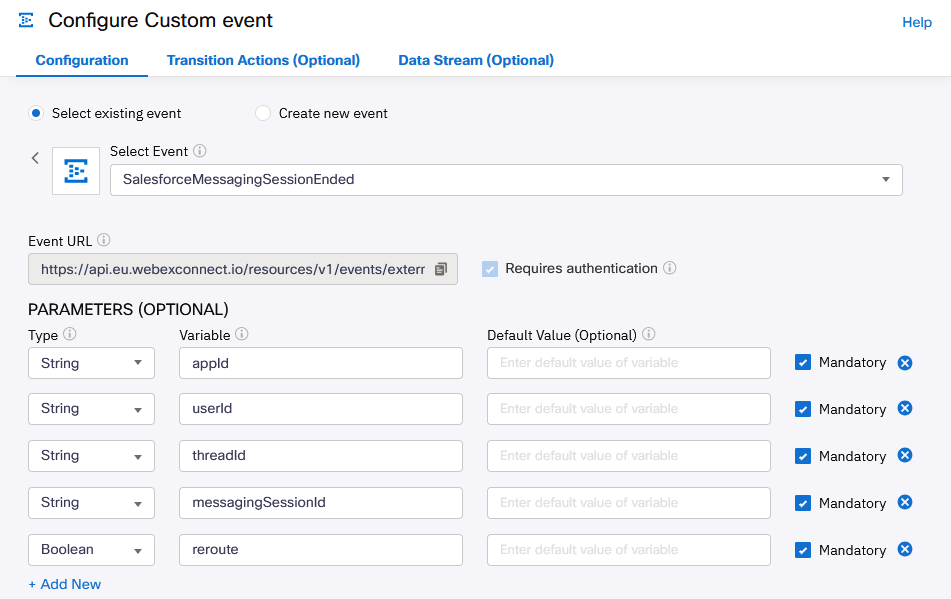
agentEnd Chat
The
End Chatevent is triggered when the Salesforce Agent leaves a chat.In addition to the defined Event Id, the following parameters are included in the payload:
- appId
- userId
- threadId
- messagingSessionId
- reroute* (
true|false) - endChatReason* (
none|ended|inactive)
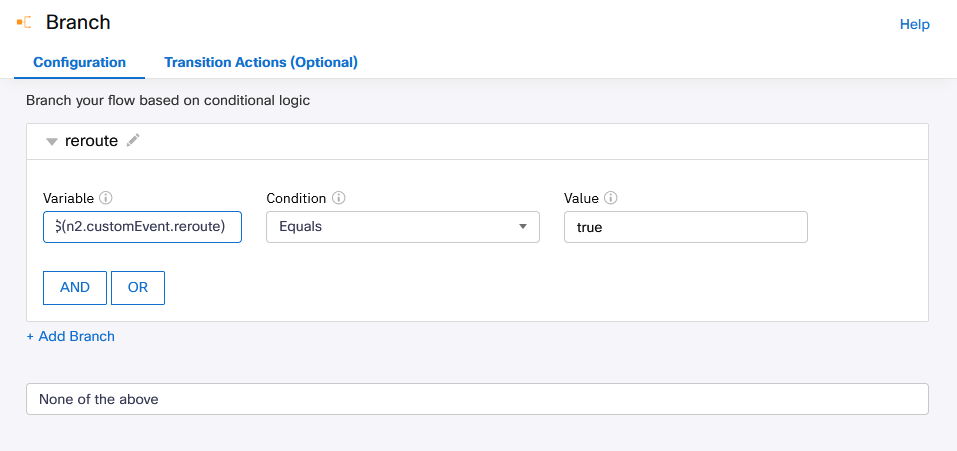
*
rerouteandendChatReasonparameter's values explained:reroutetrue: Chat will be rerouted automatically to an available Salesforce Agent.false: Chat is ended and will not be rerouted.
endChatReasonnone: Chat is not ended.ended: The chat is ended by the Agent (or automatically by Salesforce). If the Customer sends a new message, a new Chat will be created in Salesforce and routed to an available Agent.inactive: The chat is set as inactive by the Agent or automatically by Salesforce. The same Chat will be re-routed to an available Agent as soon as the Customer sends a message.
Configuration
Perform these steps for the two Custom Events Participant Changed and End Chat:
- In your Webex Connect setup navigate to
Assetsand thenIntegrations. - Click
Add Integrationand thenCustom Event - Give the custom node a
Name. - Add all parameters described in section 'Overview' and mark them all as mandatory
- After the Custom Event is created, take a note of the associated Integration ID. This ID is also known as Event Id and a Salesforce Administrator might ask you about these IDs in order to complete Salesforce configuration.
2. Configure Webex Connect Service
2a. Disable preconfigured Rule
- Open your Service
- Navigate to the
Rulestab - disable to preconfigured rule
2b. Generate JWT Authentication credentials
In order to access the Webex Connect APIs Salesforce need a Service ID and a Service Secret.
- Open your Service
- Navigate to the
APItab - Set
Auth Typeto JWT Token - create Authentication Credential
- Make a note of the service ID and the service secret. Your Salesforce administrator will need these keys together with your Webex tenant to complete the configuration in Salesforce.
3. Flow setup #1: Webex to Salesforce
The sample flow serves to illustrate how the use of custom nodes is intended. This Flow is used to forward messages from the the end-customer's chat widget to Salesforce. Please adapt the flow to the use case in your company.
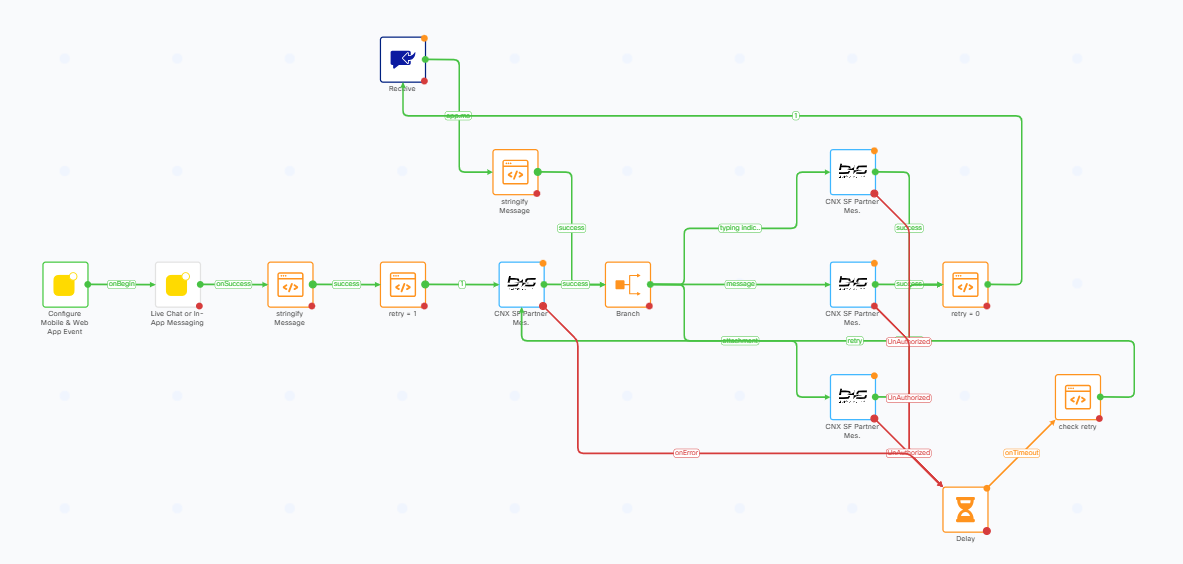
Configure Mobile & Web App Event
Flow Condition
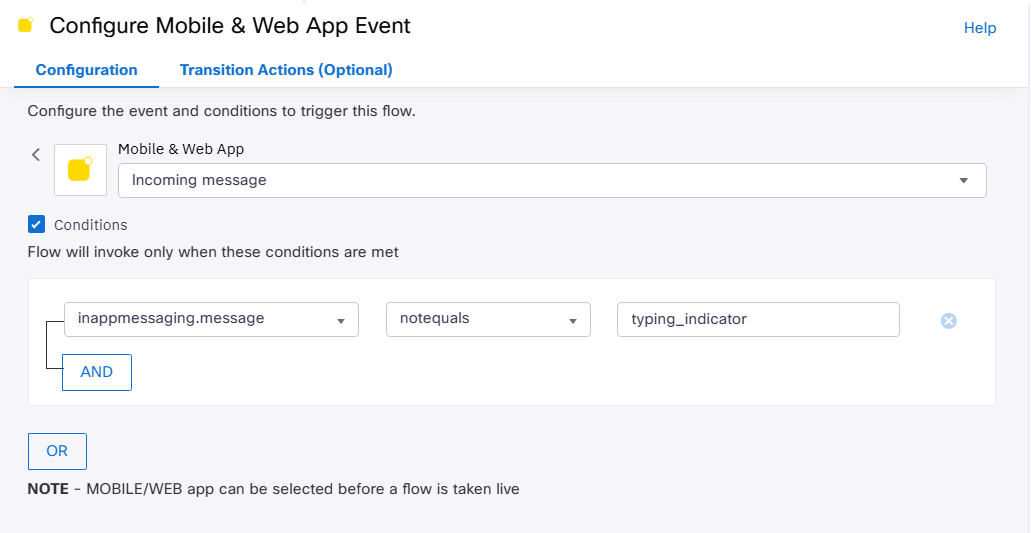
It is recommended to filter out typing_indicator messages so that the first customer message starts the flow session.
Transition Actions
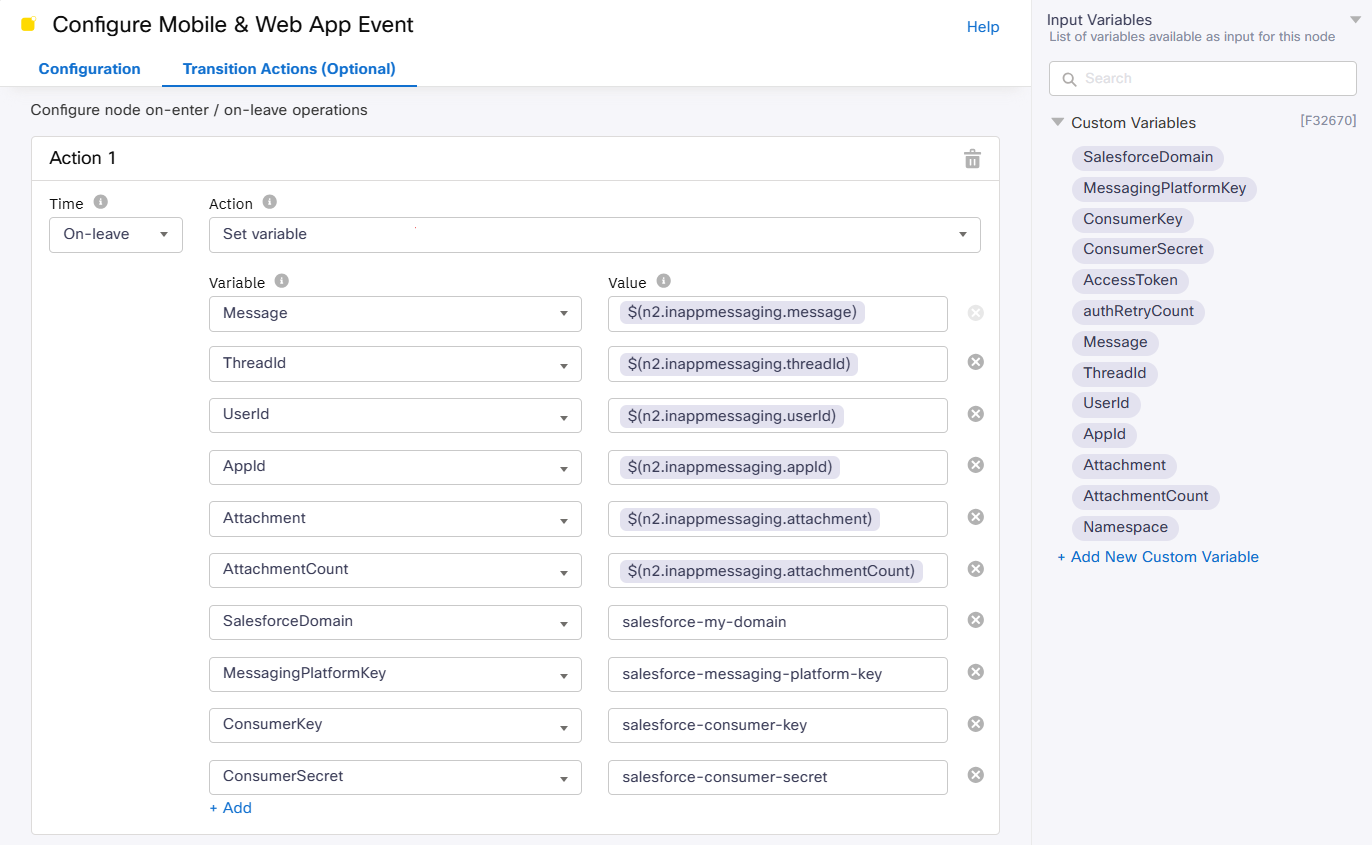
Use the Nodes Transaction Actions to set Custom Variables as shown on the printscreen. These variables are used to configure the Custom Nodes in the flow.
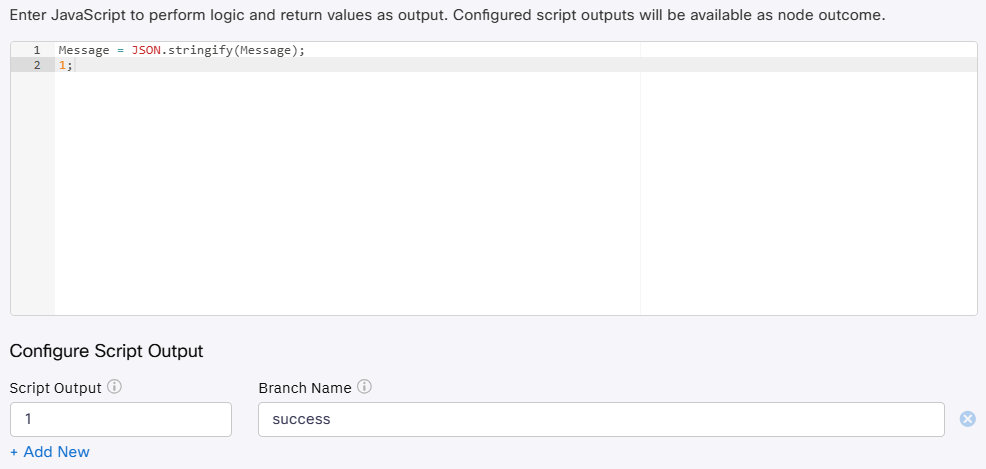
Stringify Message
This node converts the message sent by the customer into a string to ensure a valid JSON body in the request sent to Salesforce.
Live Chat / in-App Messaging
This node sends a greeting message to the customer.
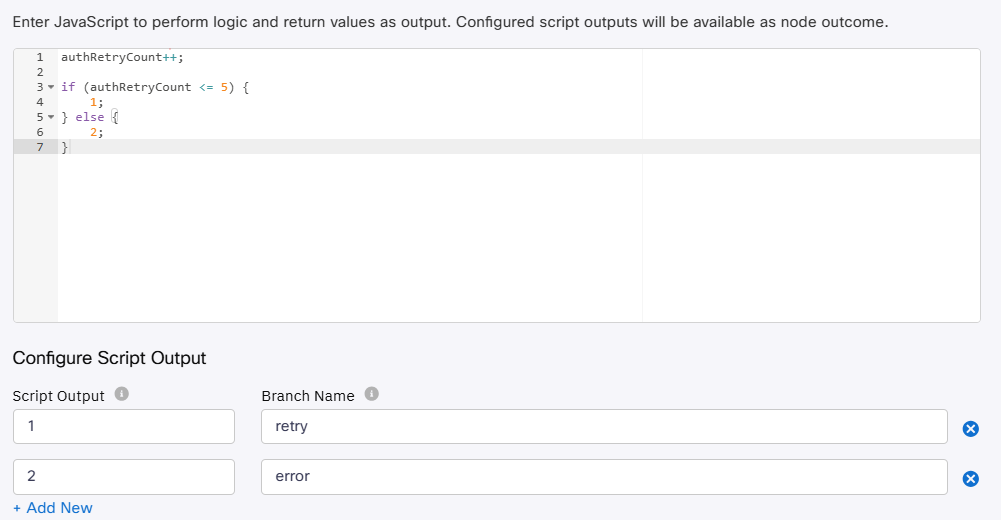
Authentication retry
The retry nodes are used to configure how often the flow attempts to fetch an access token in the event of an error.

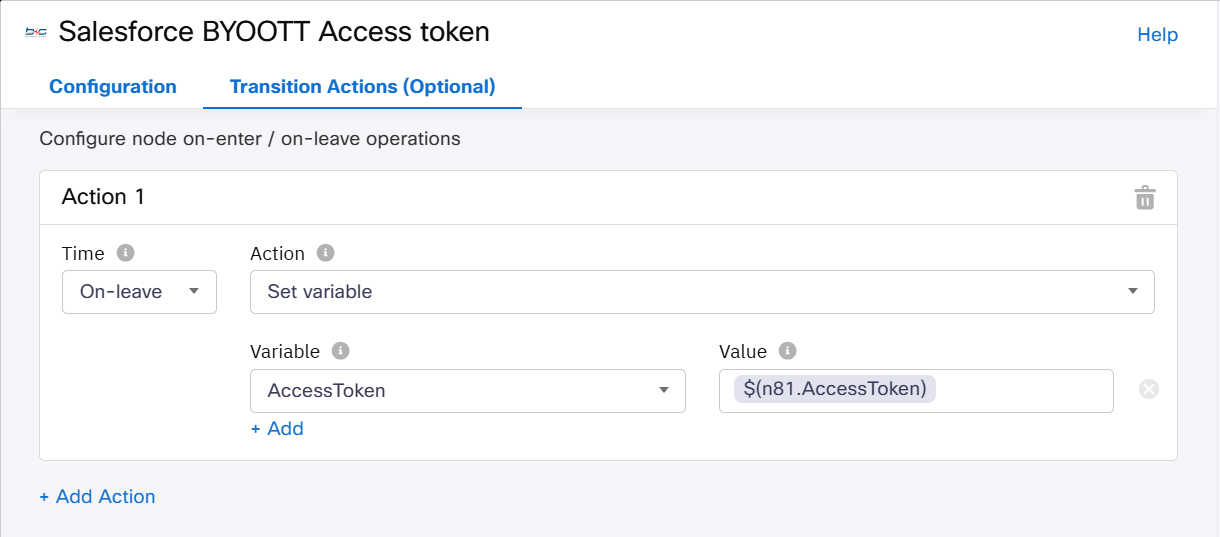
Bucher Suter BYOOTT Access token
Configuration

Transition Actions
Store the generated Access token into the AccessToken Custom Variable
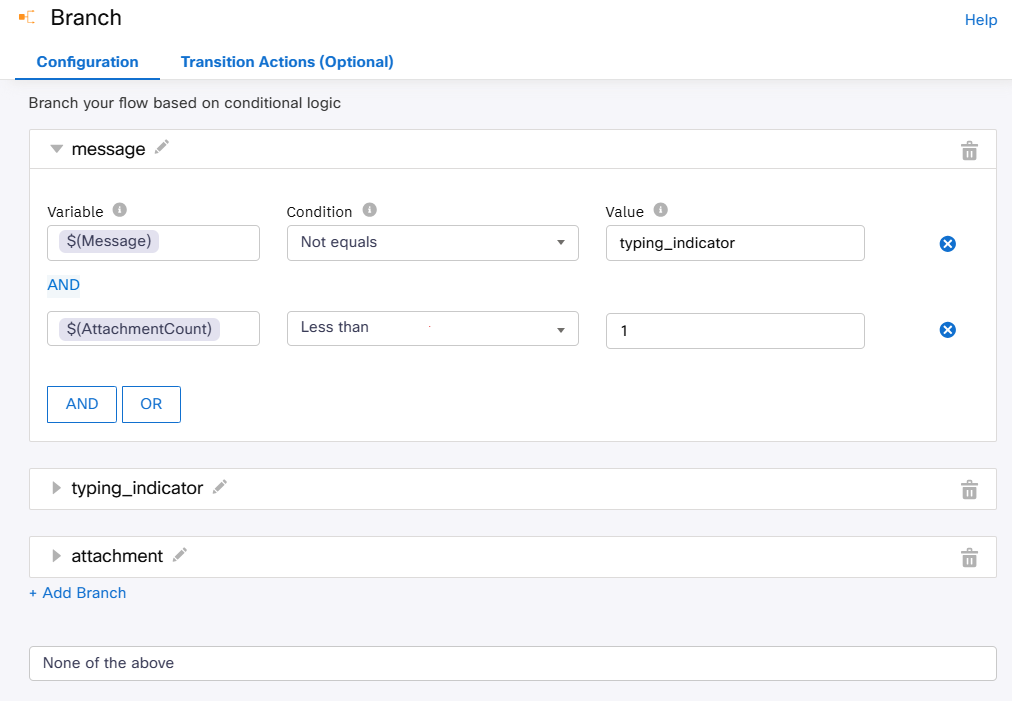
Branch
The branch node is used to assign the message to the corresponding custom request.
Configuration
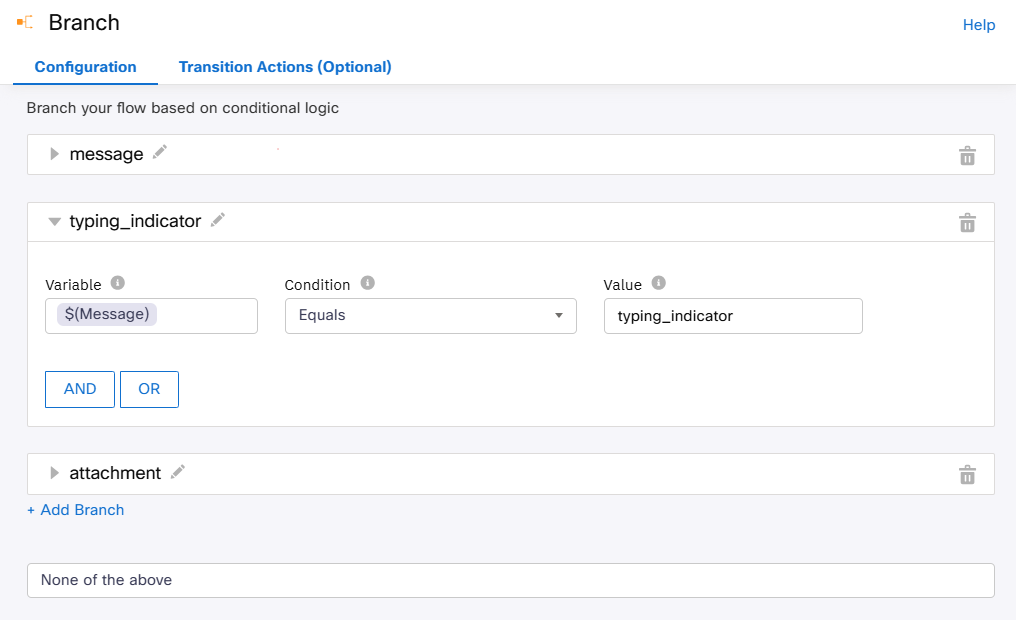

Bucher Suter BYOOTT typing ind.
Configuration

Bucher Suter BYOOTT message
Configuration
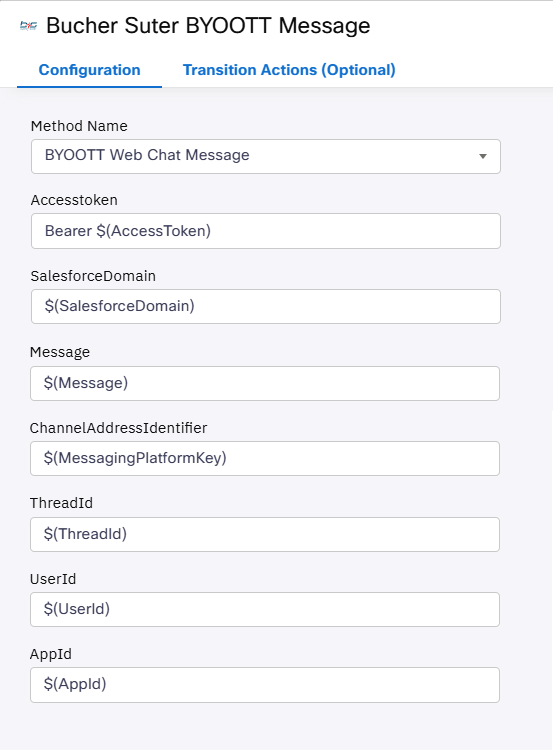
Additional Parameters
If you have configured additional parameters to be passed to Salesforce in your custom node for web chat messages, assign the values in the configuration form
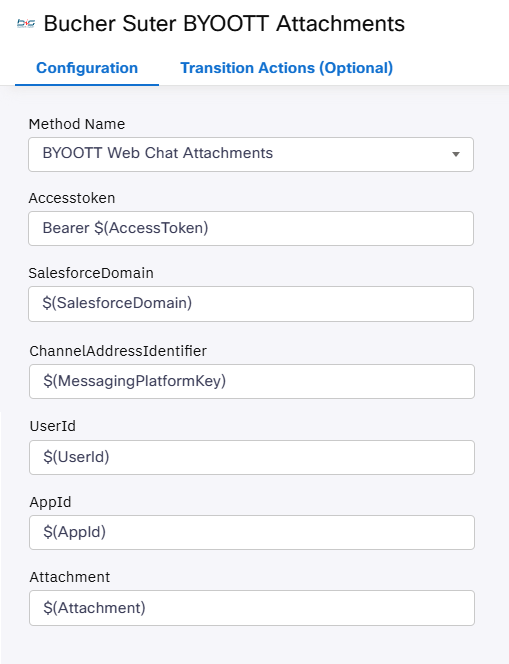
Bucher Suter BYOOTT Attachments
Configuration
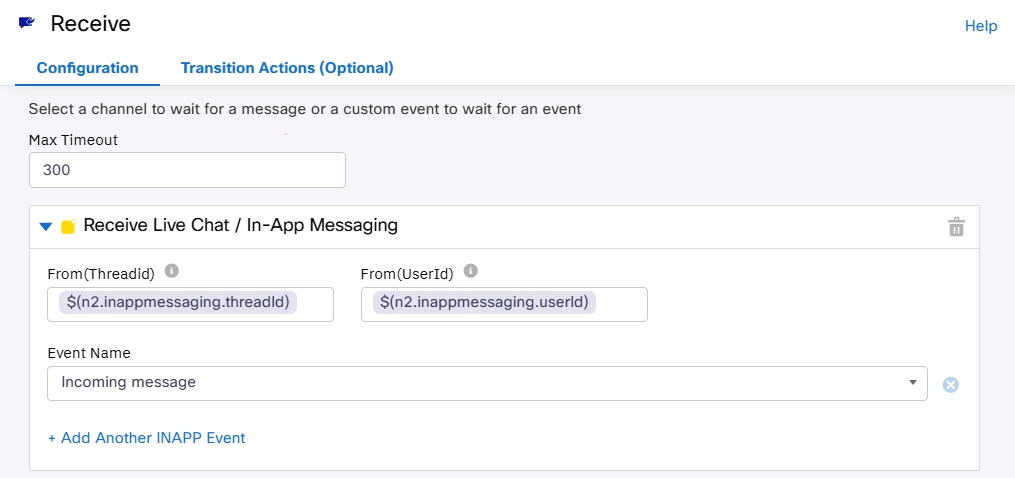
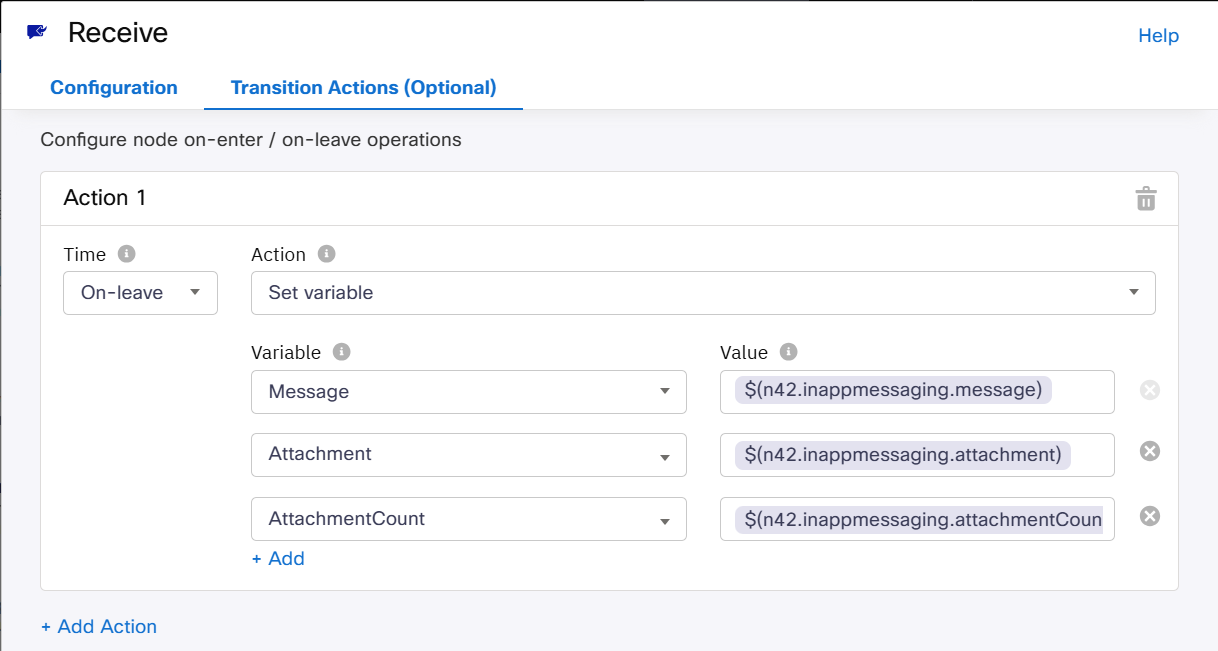
Receive
The Receive node is used to keep the customer session alive and stores the new messages from the customer.
Configuration
Transition Actions
Delay
This node is used to delay the generation of the access token retry. e.g. 1 second
4. Flow setup #2: Salesforce to Webex (Custom-Event triggered)
Messages by Salesforce Agents to a customer are sent to Webex API directly and don't require a Webex Connect Flow. However a flow is needed for the case when
one of these Custom Events is triggered:
- Participant changed
- Chat is ended
4a. Participant Changed
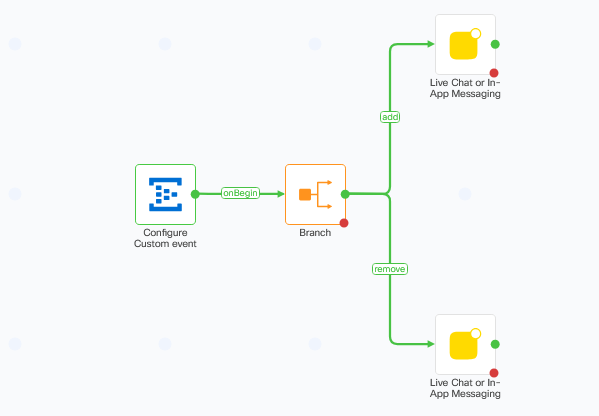
Configure Custom Event
This is the entrypoint for the flow. It is triggered by a custom event sent by b+s resp. Salesforce.
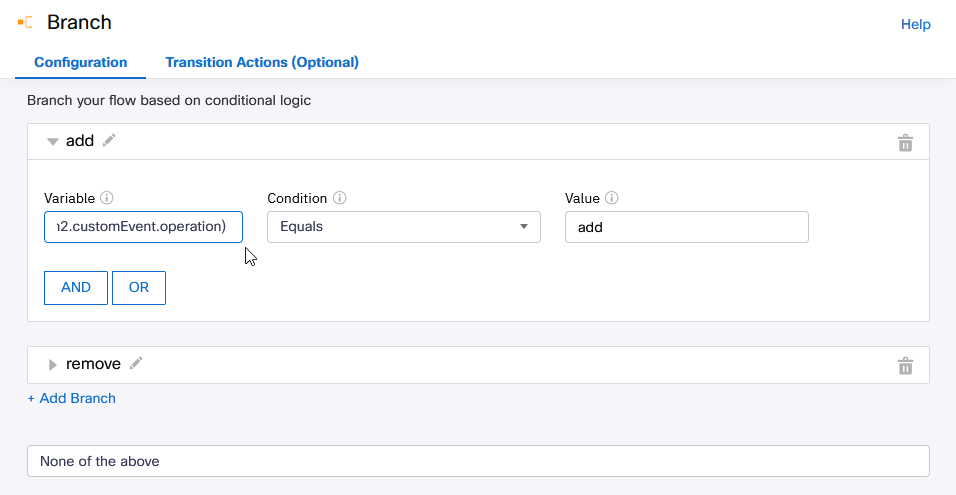
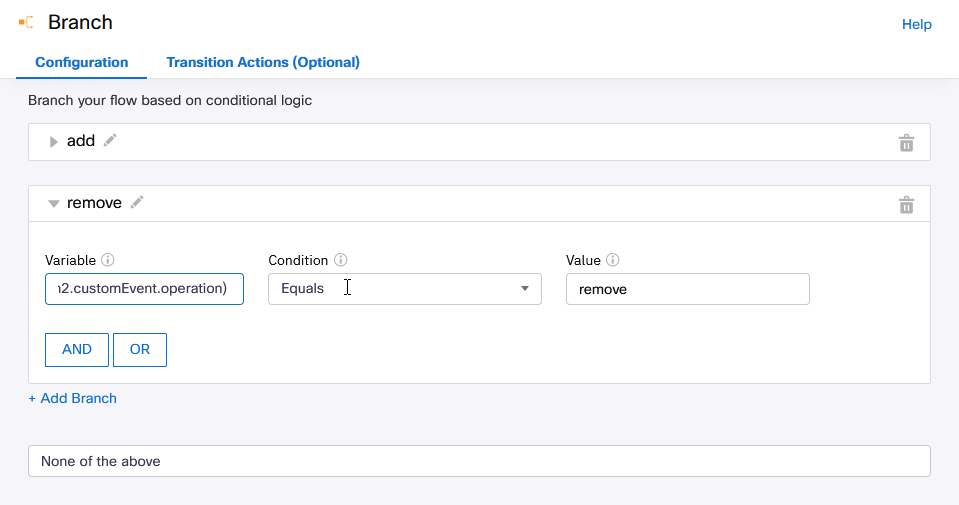
Branch
The branch node is used to decide which message is sent to the Webex Connect Chat Widget.
Live Chat / in-App Messaging
This node sends a message to the customer. The content of the message depends on the outcome of the previous Branch node.
4b. Chat Ended
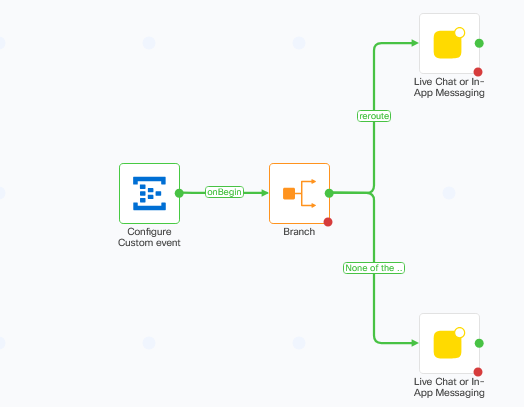
Configure Custom Event
This is the entrypoint for the flow. It is triggered by a custom event sent by b+s resp. Salesforce.
Branch
The branch node is used to decide which message is sent to the Webex Connect Chat Widget.
Live Chat / in-App Messaging
This node sends a message to the customer. The content of the message depends on the outcome of the previous Branch node.