Realtime View as Custom Toolbar
CRM Admin and Cisco CC Admin roles are required to perform the installation and configuration of the b+s Realtime View
Introduction
This document provides the information needed to install, configure, and manage the Bucher+Suter (b+s) Connects for Salesforce Realtime View as Custom Toolbar.
The b+s Realtime View displays real time information on team members and queue statistics from the team and skill groups that the currently logged in agent belongs to.
There are two views provided. One showing the list of all team members and their states as well as the time since the last state change and a button to call them. Please check the CCE Agent Team List notes for more information on how to configure Teams.
The second view provides a list of the skill-group-based call queues, showing how many calls are in the queue and what the maximum queue wait time is, as well as the number of active agents and calls. If configured, a button can also be displayed to allow a call to the queue to be made. Please, check the CCE Skill Group Explorer and Agent Explorer notes for more information on how to configure Skill Groups.
The Queue view is not available for CCX deployments.
Installation
Adding the b+s Realtime View
The b+s Realtime View (non LWC) can be loaded as a Custom Toolbar in the CTI Integration or in Classic as a Custom Console Component.
If you want to load the RealtimeView as Utility Item or Custom Lightning Component, check the guide
Adding as Custom Toolbar
To use the b+s Realtime View in a Custom Toolbar as part of the b+s Connects for Salesforce solution, follow these steps:
- In the b+s Configuration | Integrations | Custom Toolbars add a new entry.
- In the URL Dropdown select
Add-On. - In the Lookup Box select
Realtime View. - If you want to show both the Team and Queue view, the recommended height is >
300. - Configure the Realtime View Toolbar: See Section Realtime View Configuration for details.
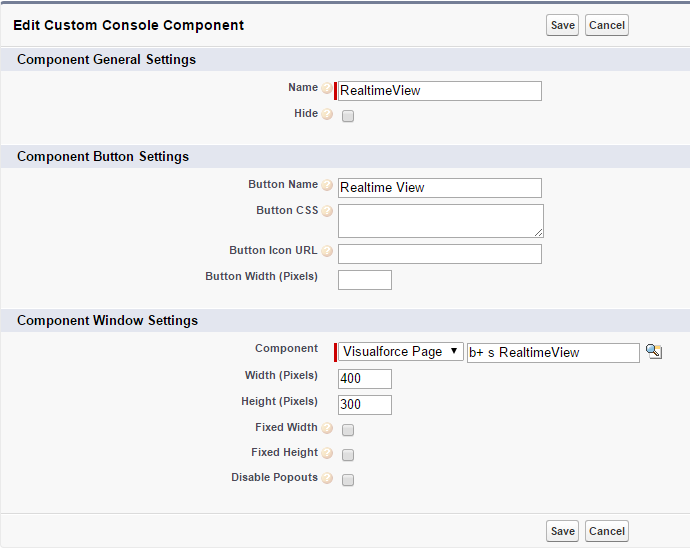
Adding as Custom Console Component
To use the b+s Realtime View as a custom console component in Salesforce, follow these steps:
- Click Setup | Customize | Console | Custom Console Components
- Click the Button New to create a new component
Details for the custom console component
- Click Setup | Create | Apps
- Edit the App to be shown as the component
- In section Choose Console Components, choose the previously created component and move it to the Selected Items
- Click Save
Configuration
Configuring Cisco Finesse
Enable Team API Access
A new configuration property enableTeamAPIAccessForAllusers is added in Finesse 12.6(1) ES 01 and CCX 12.5(1) SU2 ES03 / SU3 for enabling the Team API access for all agents and supervisors. When you enable this property, all agents and supervisors will be able to access information of all the teams without any restriction.
Note: The property enableTeamAPIAccessForAllusers is not documented in Cisco official UCCX/Finesse documentation. Starting with CCX 12.5(1) SU2 ES03 and CCX 12.5(1) SU3 this property must also be enabled for CCX.
If this property is disabled, only administrator and supervisors can access the Team API. Supervisors can access the information of the teams that they are asigned to and Administrators can access all the teams. By default this property is disabled.
Use the following command to enable this configuration property:
utils finesse set_property webservices enableTeamAPIAccessForAllusers true
On confirmation, restart the CiscoFinesse Tomcat service for the changes to take effect.
Queue Statistics
The Queue Statistics option is disabled by default as part of Cisco Finesse fresh installation (Unified CCE only). After performing a system upgrade, during switch-version the queue statistics polling will be disabled by default.
Use the following CLI commands to enable the queue statistics polling:
utils finesse queue_statistics enable
A warning page appears that states Enabling queue statistics may impact performance.
On confirmation, restart the CiscoFinesse Tomcat services.
Configuring Realtime Toolbar
The configuration for the Realtime Toolbar can be found under b+s Configuration | Integrations | Realtime View Settings
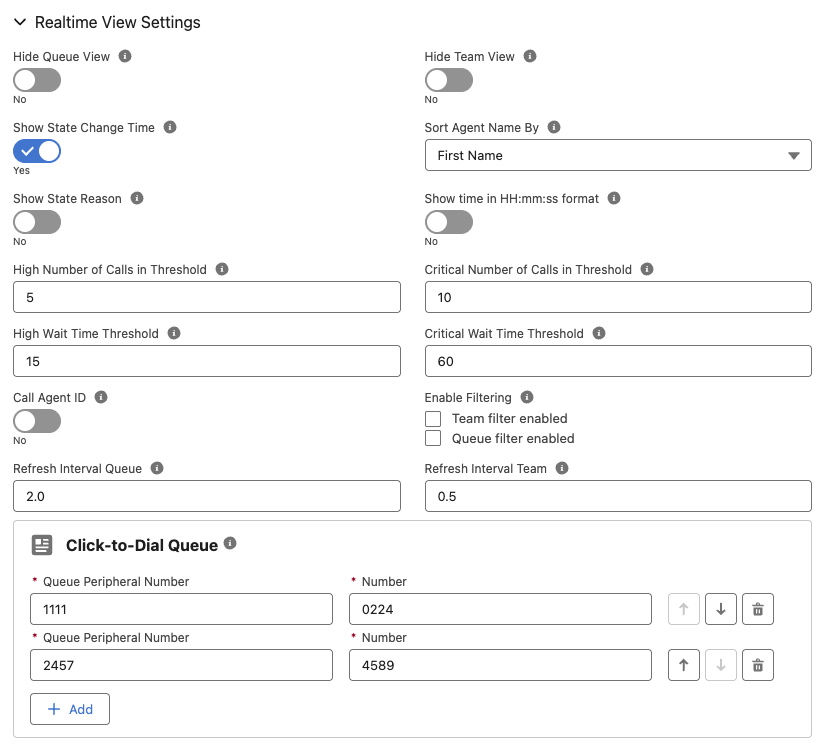
The following settings can be configured for the b+s Realtime View:
Hide Queue View
If this option is set to true, the queue view will not be shown in the b+s Realtime View.
Values: true, false
Default: false
Note: For CCX deployments the queue view is not available. We therefore recommend setting this parameter to true for CCX deployments.
Hide Team View
If this option is set to true, the team view will not be shown in the b+s Realtime View.
Values: true, false
Default: false
Show State Change Time
With this option it is possible to choose whether to display the "time of the last agent state" column in the team view.
Values: true, false
Default: true
Sort Agent Name By
Sort the agents by first or last name.
Values: Last Name, First Name
Default: First Name
Show State Reason
This option allows to choose whether to display the column showing the reason for the agent's last state in the team view.
Values: true, false
Default: false
Show time in HH:mm:ss format
This option allows to choose the time display format. When enabled, the time is shown in HH:mm:ss format. When disabled, it is displayed in a simplified format such as Xd Yh Zm.
Values: true, false
Default: false
High Number of Calls in Threshold
If the number of calls in a queue is equal or greater than this value, the queue is highlighted yellow in the view.
Values: <Number>
Default: 5
Critical Number of Calls in Threshold
If the number of calls in a queue is equal to or greater than this value, the queue is highlighted red in the view.
Values: <Number>
Default: 10
High Wait Time Threshold
If the time for the longest call in a queue is equal to or higher than this value (seconds), the queue gets highlighted yellow in the view.
Values: <Number>
Default: 15
Critical Wait Time Threshold
If the time for the longest call in a queue is equal to or higher than this value (seconds), the queue is highlighted red in the view.
Values: <Number>
Default: 60
Call Agent ID
When this option is set to true, the Dial button in the team section dials the agent ID instead of the agent extension.
Values: true, false
Default: false
Enable Filtering
This option will enable / disable the filters for the Team and the Queue View. The configuration is bitmask based:
Values: <Number>
Default: 0
0 = Both filters disabled
1 = Team filter enabled
2 = Queue filter enabled
3 = Both filters enabled
Refresh Interval Queue
This option will overwrite the QueueView update interval. In a normal Environment it does not need to be overwritten.
Value: <Number> (seconds)
Default: 2
Refresh Interval Team
This option will overwrite the TeamView update interval. In a normal Environment it does not need to be overwritten.
Value: <Number> (seconds)
Default: 0.5
Click-to-Dial Queue
This option allows linking a queue to a click-to-dial number. If a valid configuration exists, a button will appear on the right in the queues list to allow the execution of the click-to-dial action for that particular queue.
Values: queue peripheral number | number
Default: none
Clickjack Protection
To enable the b+s Realtime View as Custom Toolbar in Salesforce with the setting
Clickjack protection for customer Visualforce pages with headers disabled
enabled, the domain from which the toolbar content is served must be added to the trusted domains list.
Please follow the instructions in the Configuration page.