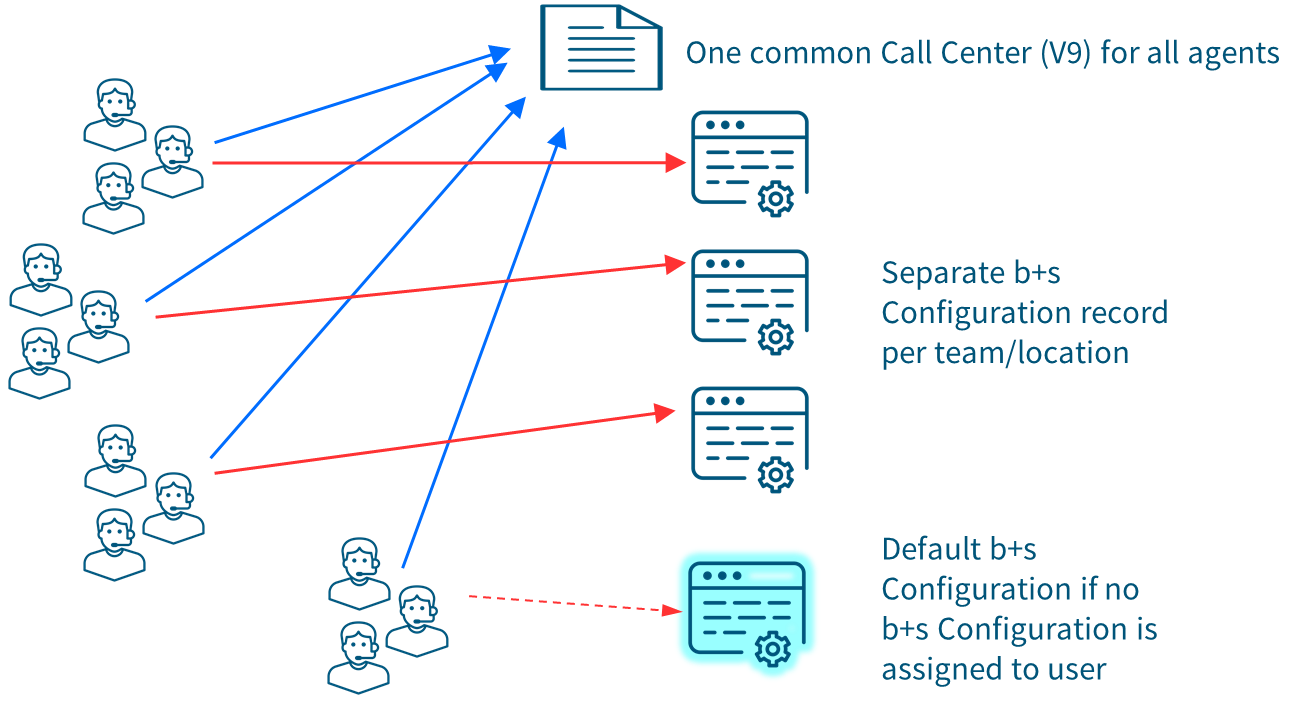
Configuration
A complete configuration includes:
- Softphone Layout
- Salesforce Call Center
- Lightning Utility bar
- b+s Configuration
b+s Configuration overview
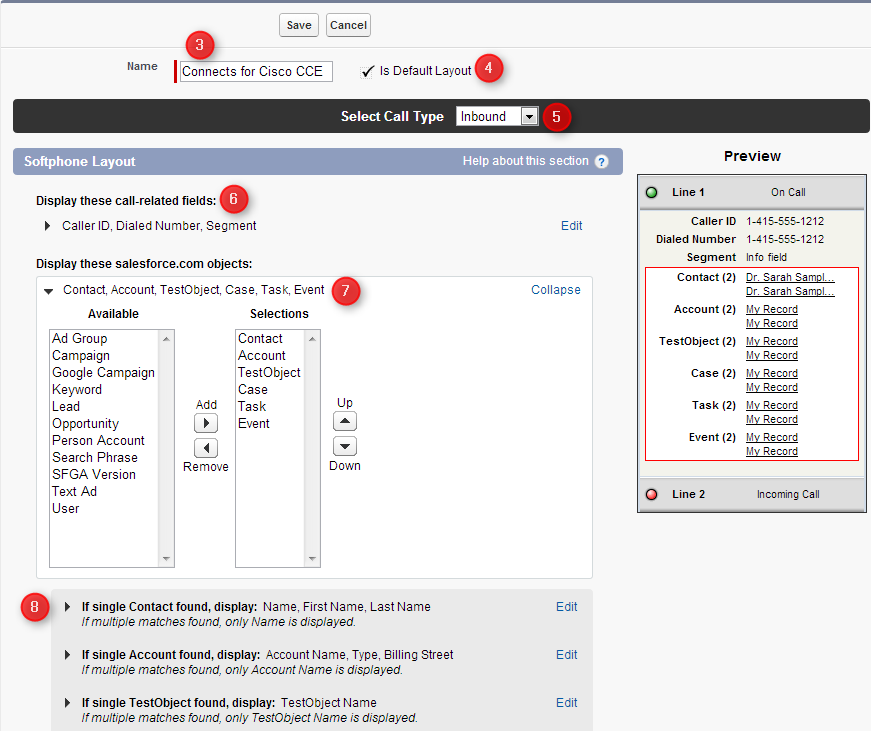
Create a Softphone Layout
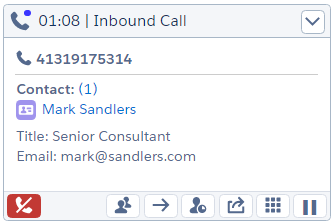
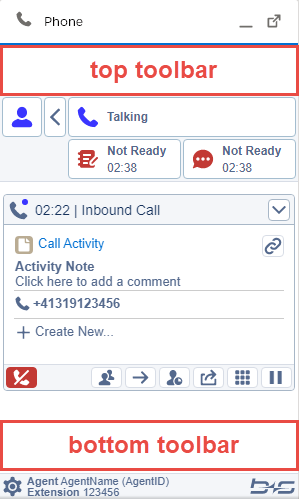
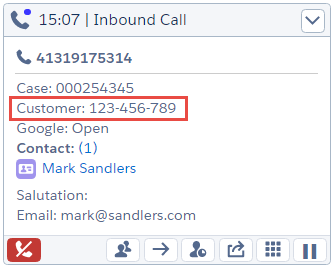
The Softphone Layout defines displayed information on incoming calls. If no contact is found, the call may be displayed as shown in the below example. Clicking on the link on the contact name pops the contact.
Sample Call Popup
Configure the Softphone Layout
- Click Setup | Feature Settings | Service | Call Center | Softphone Layouts
- Click New
- Enter a title (e.g. Connects for Cisco Contact Center Layout)
- Check the option Is Default Layout
- Select the Call Type Inbound
- The settings in section "Display these call-related fields" are not used. Instead of these settings, it is possible to configure which Peripheral Variables should be displayed in the b+s Configuration (see section Call Data Display).
- In section "Display these salesforce.com objects", define which objects should be searched and displayed if found.
- Configure in the sections "If single … found…" which fields should be displayed if exactly one object of this type was found.
- Repeat Steps 5-8 for the other Call Types Internal and Outbound
Due to a known bug in Salesforce, entities with an API Name that exceeds 40 characters cause the OpenCTI Search function to fail. Make sure that Objects used in the Softphone layout do not have an API Name longer than 40 characters or contain fields with the same characteristics (ref).
Configure the Softphone Layout
For Inbound calls, it is possible to define whether found records should popup automatically, if one or multiple matching records are found.
Configure Popup Settings in Softphone Layout

The "Person Account" Salesforce object can be configured, but it will not show up in the ANI lookup results. Add the Account object to the softphone layout instead. It will also find "Person Account" objects. Note that with this configuration, not only "Person Account" objects will be found but Account objects will be found as well.
Salesforce Call Center
After successful installation, it is necessary to configure the Finesse server URL in the Call Center Settings.
There is a prepared Call Center: Connects for Cisco Contact Center V9
For multiple Finesse servers or for multiple different Call Center Settings, it is possible to open the settings entry and use the Clone button to make a copy of the entry.
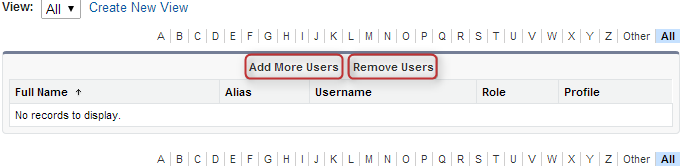
Assign Users to Salesforce Call Center
- Navigate to: Setup | Feature Settings | Service | Call Center | Call Centers
- Open the Call Center by clicking on the Name
- Click Manage Call Center Users at the bottom of the page
Call Center - Manage Call Center Users

- Use the Add More Users or Remove Users to manage your Call Center users
Call Center – Add/Remove Users
Edit Connects for Cisco Contact Center Settings
This chapter serves solely as an explanation of the Call Center fields.
InternalName
Unique internal identifier for the Call Center
Display Name
Name of the Call Center as displayed in Salesforce
Default CallCenter
Technical field for Lightning Setup Flow –do not change
Default: true
Use CTI API
Technical field for CRM –do not change
Default: true
Salesforce CTI Version
Technical field for CRM –do not change
Default: 4.0
Connects Gadget URL A
URL to the Softphone Visualforce page. –do not change.
Default: /apex/cnx__MainPage
Connects Gadget URL B
This field is not needed for the current deployment – leave this field empty.
Default: empty
Request Timeout
This field is not needed for the current deployment – leave this field empty.
Default: empty
Softphone Height
Initial Softphone height. This value gets overridden by the b+s Configuration (see section Appearance) – do not change.
Default: 500
Softphone Width
Initial Softphone width. This value gets overridden by the b+s Configuration (see section Appearance) – do not change.
Default: 300
Salesforce Compatibility Mode
Determines where the softphone is visible – do not change
Default: Classic_and_Lightning
Lightning Utility Bar
To configure the phone for the Lightning Utility Bar perform the following steps:
In the Lightning Utility Bar two changes need to be executed.
- Enable Softphone. This is needed for the Softphone to be visible to agents.
- Add b+s Configuration. This is needed to configure the b+s Connects for Salesforce.
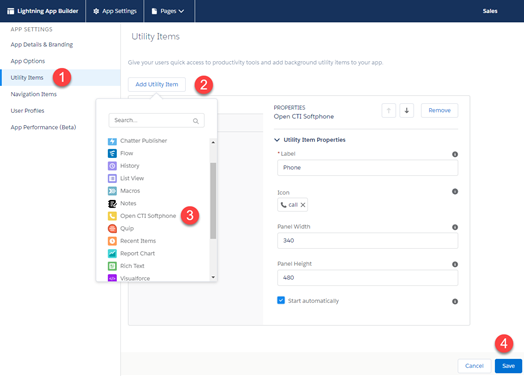
Enable Softphone in the Lightning Utility Bar
To configure the phone for the Lightning Utility Bar perform the following steps:
- Enter Setup | Apps | App Manager
- Select the Quick Action Edit on the App you want to include the Softphone
- Under App Settings | Utility Items, click the Add Utility Item button.
- Use the search box to write softphone or select directly Open CTI Softphone in the list of Standard available utilities
- Leave the default values and check the Start Automatically checkbox.
- Click on Save to save the configuration
Configure Lightning Utility Bar
Add b+s Configurations to the App
This is a prerequisite to configure b+s Configurations.
In Lightning App Builder
- Open the tab Navigation Items
- Add b+s Configurations to Selected Items
- Click Save
b+s Configuration
Update Page Layouts
This step only applies to updates from a b+s Connects for Salesforce Version 5.x.x or above. If you installed the package for the first time or updated it from Version 4.x.x you can skip this chapter.
Please refer to Upgrade Guide - Update Page Layouts for more information.
Previous configuration changes
Assign package license to users
All user who edit the b+s Configurations, including user with Salesforce System Administrator profile, require a b+s Connects package license (see Assign package license to users).
Assign Permission Set
- Navigate to: Setup | Users | Permission Sets | b+s Configuration Editor | Manage Assignments
- Assign the users who need to edit the b+s Configurations
Page Layout Assignment
- Navigate to: Setup | Object Manager | b+s Configuration | Record Types
- Click on Page Layout Assignment | Edit Assignment
- Assign Page Layouts to the Record Types with the same name
- Select from Page Layout To Use drop down list the page Layout
- Select in Record Types table the column with the same name as the selected Page Layout Type

- Repeat this for all Page Layout / Record Types
- Voice Only
- Salesforce Omni-Channel
- Cisco Universal Queue
- Cisco Universal Queue (Legacy)
- Model S
- Click Save
Open the b+s Configuration Edit View
- Open App launcher
- Select b+s Configurations from All Items list (despite Salesforce's pre-installed objects are displayed in alphabetical order, the b+s Configurations object can be found at the end of the objects list)
- Select the List View | Show all to see the preconfigured Default Configuration
- Open by clicking on the name
- Click Edit
Default Configuration
If agents have no assigned b+s Configuration, the default b+s Configuration
is used. Any configuration can be set as default by clicking
the + Set as Default button visible in edit mode (top right corner).
To assign an agent to a specific b+s Configuration see section Assign Users to b+s Configuration
Global - General
b+s Configuration Name
Name of the b+s Configuration
Example: Default Configuration
Description
Description of the b+s Configuration
Example: Use this configuration as default configuration
Global - Appearance
Softphone Height
Height of the softphone
Example: 500
Softphone Width
Width of the softphone
Example: 300
Enable HTML5 Desktop Notifications
If enabled, notifications will be displayed for incoming tasks.

Desktop notifications are only supported in Chromium browsers.
To receive Desktop notifications, they must be enabled in both the operating system and browser settings.
Notifications must be enabled manually on every desktop:
- Click the gear in the footer of the gadget.
- Click Open pop up to activate notifications
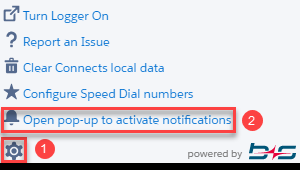
- In the pop up, click on the Allow button

- Close the pop up

Display Team Message
This dropdown defines when the team message section in the Agent gadget should be displayed.
- Never
- Always
- On message received: The team message section is only shown when the Agent has at least one active team message
Shown Team Message Lines
This dropdown defines how many lines of the team message are displayed in the minimized view.
- Header: In the minimized state, only the name of the Supervisor and the send time gets displayed.
- One Line: The header, and the first row of the message gets displayed.
- Two Lines: The header, and the first two row of the message gets displayed.
- Three Lines: The header, and the first two row of the message gets displayed.
Call Item Height (px)
This textbox is used to set the height of the call items in px.
Default: 180
Call Item Behavior
When the call item content exceeds the configured call item height, the content of the call item will be scrollable. When activating one of the checkboxes the selected part of the call item will always be fully visible.
- Make Call Activity Section sticky
- Make Create New Section sticky
The following image shows an call item that exceeds the defined height. Only the Call data is scrollable, because the Create New and Activity Sections are sticky.
Enable Redial Button
If enabled, the redial button is shown next to the dial field.

Default: enabled
By clicking on the redial button a list opens with the last outbound calls. Clicking on this list calls the selected number or opens the selected Salesforce record.
Redial List Size
This field sets the amount of saved outbound calls for the redial dropdown.
Default: 20
This field is only available when the Enable Redial Button is enabled.
Global - Deployment
Deployment Type
Select the current deployment type. Possible deployment types:
- Voice-Only
- Salesforce Omni-Channel
- Cisco Universal Queue
Note 1: Depending on the license the shown deployment types can vary.
Note 2: Depending on the deployment type Configuration sections and fields can be displayed or hidden.
Global - Finesse
Finesse URL A
URL of the primary Finesse Server.
Format: https://<Finesse Server A>:<Port>
Default Finesse API port: 8445.
Example: finesse01.local will be https://finesse01.local:8445
In order to use a custom port to connect to a Finesse server, set the Finesse server URL and port in the b+s Configuration record in use.
In versions of Finesse greater than or equal to 12.6, the configured port is used for Notifications as well. For older versions or Finesse, port 7443 is used.
Finesse Version 12.5(1) SU ES1, behaves like version 12.6 with regard to port configuration.
In VPN-Less deployments, use the proxy URL and port instead of the Finesse URL.
Finesse URL B
URL of the standby Finesse Server
See field Finesse Server URL A for more information.
Finesse Server Timeout
The duration in milliseconds the Connects Gadget will try to connect to a Finesse server. If the time expires, a failover to the other Finesse server will be triggered.
Minimum value is 30000
Default: 60000
Finesse SSO Frame URL
For deployments with SSO enabled
Relative path to the Finesse SSO Frame /3rdpartygadget/files/Connects/V_MAJOR_MINOR_PATCH/finesseSSOFrame.html
The relative path has to start with /
In VPN Less deployments, the SSO Frame URL will load from the configured Finesse Port. For Non VPN Less deployments, it will be loaded from the 8445 port.
Other deployments: Leave this field empty
Global - Additional Settings
Enable Issue Report
If Enabled, the Send Report Issue item will be shown in agent's Softphone Settings menu.
Flags
This field can be used to enable special features, which are not part of the normal gadget behavior.
Available Keys:
ApplyLookupRulesToOOCallbackNumber: Applies the voice configuration lookup rules to all outbound option callback numbers.
POPOUTABLE: Activates the Salesforce Classic Console component functionality to pop out the softphone into a browser window. To use this method, multi-monitor components must be turned on. This feature is only available in Salesforce Classic.
Default: empty
This is a non-case-sensitive list of the flags to be enabled, separated by semicolons
Issue Report URL
With this field it is possible to specify an URL that is executed after the agent uploads log files to the Finesse server to report an issue. The URL can contain the placeholder {message} that will be replaced with additional information such as comments added by the agent into the text field.
This URL can be used, for example, to popup a mail window with a mailto-URL, to insert a case in Salesforce or to open an apex page in Salesforce or even a third party web page. Please see the samples below for more information.
Default URL to open a mail window:
mailto:support@mycompany.com?subject=Connects%20issue%20report&body={message}
Sample URL to insert a case in Salesforce:
sfdc://500/e?cas14=Connects%20issue%20report&cas15={message}
Sample URL to open an apex page:
sfdc://apex/MyApexPage?subject=Connects%20issue%20report&description={message}
Sample URL to open a third party web page:
https://server/mypage.html?subject=Connects%20issue%20report&description={message}
The URL must be URL encoded. For example, it must contain %20 instead of spaces, etc.
For relative URLs within Salesforce add the sfdc:// prefix.
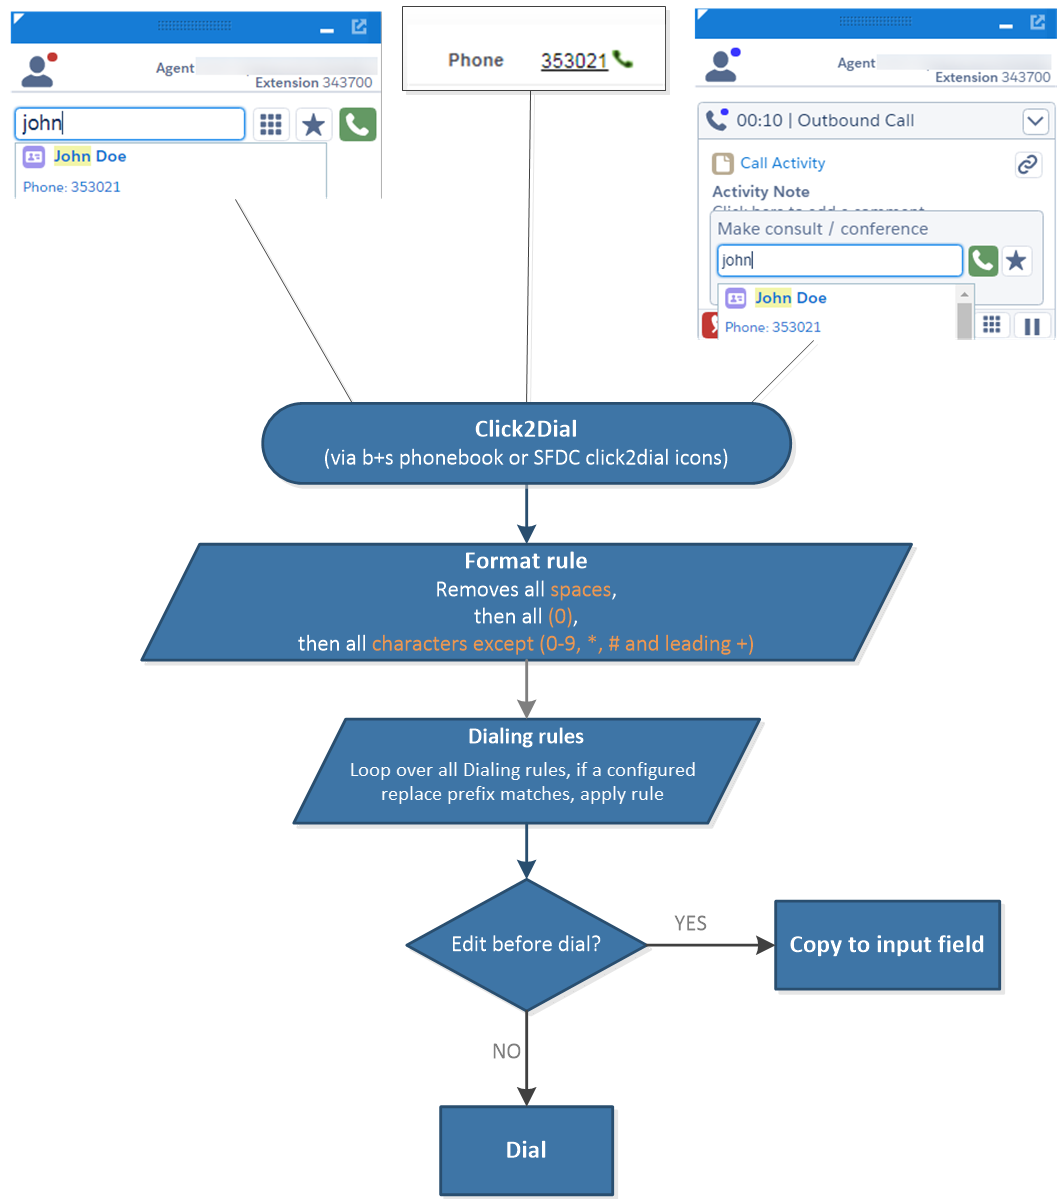
Voice - Dialing and Lookup Rules
Dialing Rules
Dialing rules can be used to convert phone numbers stored in Salesforce to a dialable format.
Examples:
Replace leading "+" with "00"
Search Pattern:
+Replacement:
00Replace leading "+" if number is exactly 5 digits long
Search Pattern:
+????Replacement:
00Add "+4131917" to the number if it is exactly 4 digits long
Search Pattern:
????Replacement:
+4131917Prepend "0" to the number
Search Pattern:
Replacement:
0Remove "0" from the number
Search Pattern:
0Replacement:
The rules will be applied to the number one after another until one rule matches.
Dial Number from Salesforce database
Dial number manually
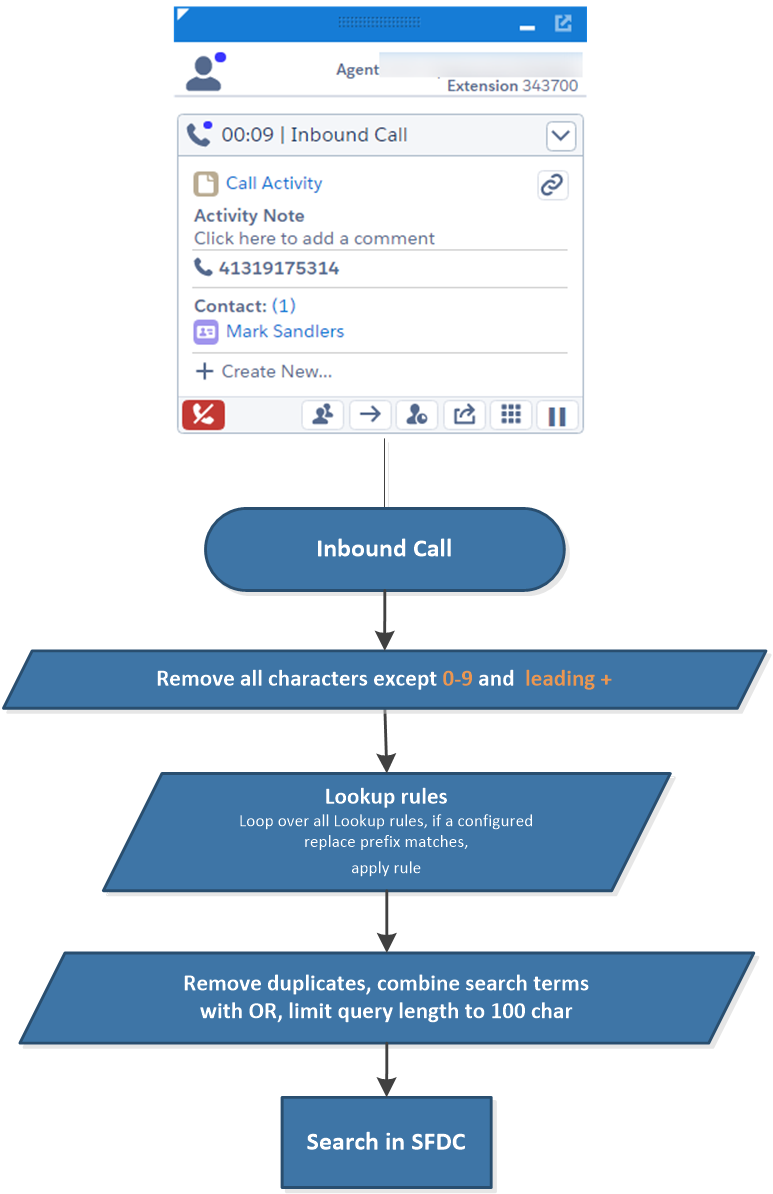
Lookup Rules
Lookup rules will be used to match customer phone numbers to CRM records.
Examples:
Replace leading "+" with "00"
Search Pattern:
+Replacement:
00Replace leading "+" if number is exactly 5 digits long
Search Pattern:
+????Replacement:
00Add "+4131917" to the number if it is exactly 4 digits long
Search Pattern:
????Replacement:
+4131917Add "0" to the number
Search Pattern:
Replacement:
0Remove "0" from the number
Search Pattern:
0Replacement:
Replace numbers that start with "41" with "+41" OR "0041". This means the incoming number "41 31 917 52 00" will match "+41 31 917 52 00" or "0041 31 917 52 00".
Search Pattern:
41Replacement:
+41,0041
The rules will be applied until one of the rules matches.
Salesforce only allows searches of numbers with length > 2
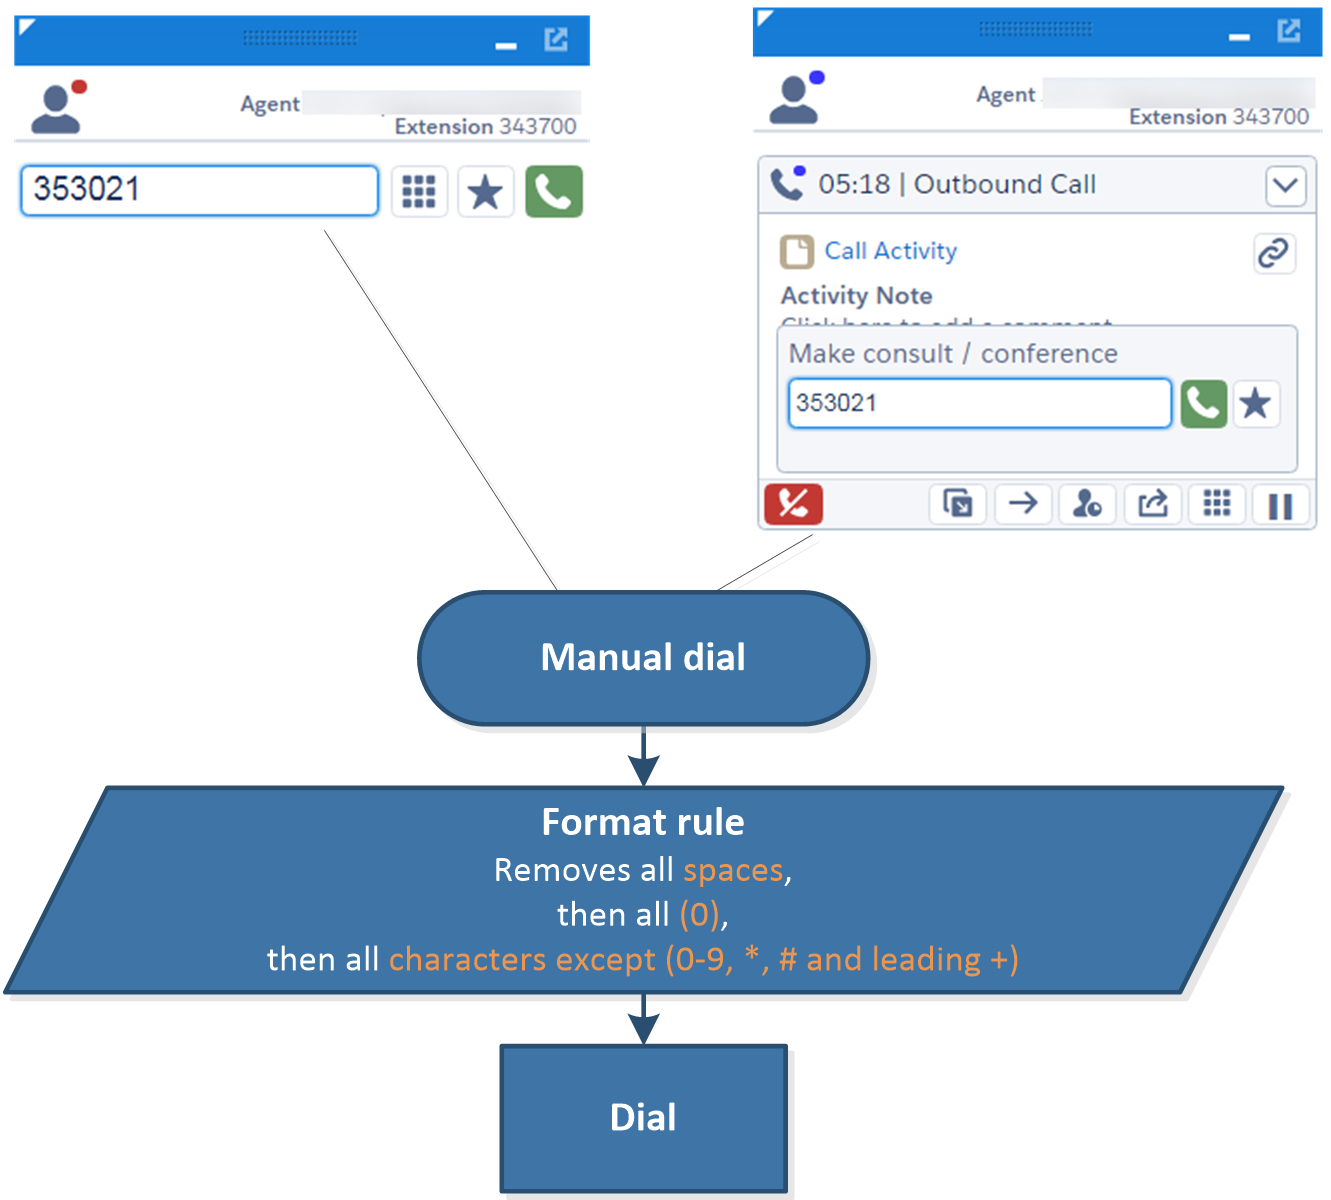
Format rules
By default, a pre-defined set of format rules is applied to phone numbers before being dialed or, in case of inbound calls, before being searched for allowed related records in Salesforce.
Standard rules for outbound calls
The following characters are removed from the dialed phone number:
- All spaces
- All
(0) - All other characters except
0-9digits,*,#and leading+
Standard rules for inbound calls
The following characters are removed from the phone number:
- All characters except
0-9digits and leading+
Overwrite Format Rules using a Regular Expression string
The aforementioned rules can be overwritten by enabling the Overwrite Format Rules checkbox in the b+s Configuration
in use and setting a valid regular expression in the adjacent field Format Rule RegEx.
The characters that match with the provided regular expression will be removed from the tested string.
An empty Format Rule RegEx field means that no character will be removed.
The standard Format rules for outbound calls can be translated to the following regular expression string:
/\(\s*0\s*\)|^[^+0-9*#]|(?c;=.)[^0-9*#]/g
The standard Format rules for inbound calls can be translated to the following regular expression string:
/^[^+0-9]|(?<=.)[^0-9]/g
When used in the Format Rule RegEx field, it behaves exactly as the standard Format rules and can be used
as a starting point to build the custom required expression.
The standard Format Rules can be overwritten for both outbound (under Dialing Rules)
and Inbound (under Lookup Rules) calls.
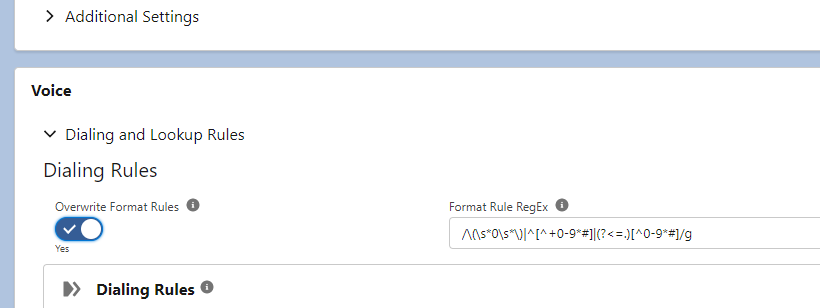
Warning! Overwriting the standard Format Rules using an incomplete RegExp string may lead to unexpected errors or calls not being routed correctly. Please use with caution.
Examples of custom Regular Expression usage for specific use cases:
- Allow use of all lowercase letters and capital letters from A to F in dialed numbers:
Add the ranges to the excluded character to match/\(\s*0\s*\)|^[^+0-9A-Fa-z*#]|(?<=.)[^0-9A-Fa-z*#]/g - Do not allow the # character in dialed numbers
Remove the # from the string/\(\s*0\s*\)|^[^+0-9*]|(?<=.)[^0-9*]/g
Internal Number Format RegEx
Use this configuration key to define the format for internal numbers.
Examples:
^\+123456if internal number start with +123456^\d{4,6}$if internal numbers are 4 to 6 digits long
Note:
- There is a separate softphone layout for internal calls
- There is no call activity created for internal calls
Default: empty
If no value is provided, no call will be labeled as internal.
Edit Number On Click-to-Dial
Opens the number in the Make Call bar instead of calling directly.
Default: no
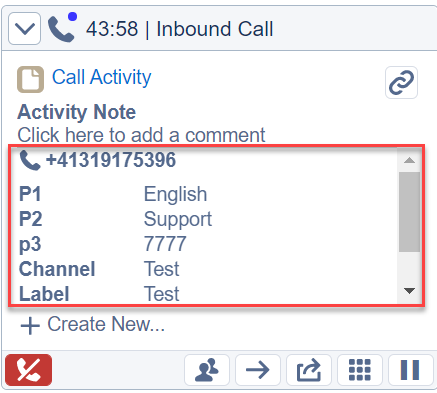
Voice - Call Data Display
The Call Data Display configuration gives you the ability to add information stored in call data to the task on the agent gadget.
Label
A label shown beneath the Variable
Variable
Variable show in the task on the agent gadget.
Example Variable: {ANI} (gets replaced with the phone number)
Example Variable: {PV3} (gets replaced with Peripheral Variable 3)
Example Variable: {ECCVarName} (gets replaced with the ECC Variable specified)
In both fields Label and Variable variables (e.g. {ANI}) get replaced with the call data.
Voice - Mobile Agent
Enable Mobile Agent Support
If Enabled, the user logs in as a mobile agent
Force Mobile Agent Connection
Choses the Mobile Agent mode.
Voice - New Record URLs
A New Record link is displayed on incoming calls. This configuration setting is used for enabling and configuring this link.

Notes:
Placeholders (e.g. {ANI}) will be replaced with the respective values (ANI) of the call. In Classic Console, con10 is the target field ID within the create contact form (003). In Lightning, field API Names are used instead.
This New Contact link is only visible for Inbound calls but not for Outbound or Internal calls.
After creating a flow in Process Automation | Flows, you can get the URL in View Details and Versions. You can assign the placeholders to the Flow Variable Resources.
Label
Label for the entry. For standard objects, the Label is optional.
URL
Standard Object Example
- URL:
003/e?Phone={ANI}(Lightning) - URL:
003/e?con10={ANI}(Classic console)
Custom Object Example
- URL:
apex/newUserForm?ani={ANI}
Flow Example
- URL:
/flow/context/flowName?variable1={ANI}&variable2={DNS}
CRM Lookup Example
These placeholders are only replaced after the CRM lookup (search and screen pop) has been completed.
It is possible to pass the IDs of related records to the Create New Record URLs.
With the placeholder {Found<EntityType>} the ID of the related record will be passed if exactly one record of the entity type is related. If zero or multiple related records are found, the placeholder will be replaced with an empty string.
The following placeholders are possible to be configured:
- {FoundContact}: will be replaced with the ID of the related Contact record.
- URL:
001/e?ParentId={FoundContact}
- URL:
- {FoundAccount}: will be replaced with the ID of the related Account record.
- URL:
001/e?ParentId={FoundAccount}
- URL:
- {FoundLead}: will be replaced with the ID of the related Lead record.
- URL:
001/e?ParentId={FoundLead}
- URL:
- {FoundCase}: will be replaced with the ID of the related Case record.
- URL:
001/e?ParentId={FoundCase}
- URL:
- {Found<Object API Name>}: will be replaced with the ID of the related record (usally a custom object record).
- URL:
001/e?ParentId={FoundMyCustomObject}
- URL:
- {FoundRecordsList}: all related Record IDs will be passed in the CSV format (e.g.
0033N00000TyDy1QAF, 0033N00000TxMJ2QAN, 0013N00000bDswRQAS).- URL:
/flow/cnx/MyFlow?RecordIds={FoundRecordsList}
- URL:
Voice - Call Log
Call Log Type
Call Log Type
Show Call Log Comment Field
If set to Yes, the call activity section is extended with an activity note field. Entered text will be stored in the comments field of the corresponding call activity record.
Call Log Variable Mapping
Specifies fields to be filled in, in new call logs.
Multiple field-value rows can be created using the "Add" button.
For each row, select a field from the Field API Name list, which corresponds to an existing and accessible Task and Activity object field, then define the value that will be set when the Call Log is created.
When a field defined in the mapping is deleted from the Activity object, its corresponding row is highlighted in red and will prompt an error message when the b+s Connects Configuration record is being saved.
As of version 5.8, the Field API Name list does not include Salesforce-System fields and
some other b+s Connects fields which should not be re-mapped:
- cnxUniqueIdc
- CallDurationInSeconds
- CompletedDateTime
- IsRecurrence
- TaskSubtype
Even if not visible in the Field API Name list of fields, any non-System field can always be manipulated outside the b+s Connects Configuration record pages using any of the available Salesforce automation processes.
Type fieldSalesforce introduced the TaskSubType field in version 16 (~2018), which is used
to internally define the type of a Task record, to display the correct icon in
Lightning Experience and for reporting purposes.
This field is now a freely editable picklist field, but it is hidden by default for all profiles (including System Administrators).
(ref)
If the task's Type field is visible to the agent's user (or profile) that creates
the Call Activity, the b+s
Connects for Salesforce gadget automatically stores the value Call in the Type field.
This is done to maintain legacy implementations. The field can be freely overridden at
any point in time without causing any malfunctioning of the b+s Connects for Salesforce
gadget.
Voice - Search
Search and Screen Pop Variable
The expression that is searched for in the Salesforce database on inbound calls.
The search for outbound calls is not configurable and always uses the DNIS.
Examples:
{PV1}{user.myECCVar}{user.myECCArr[5]}
Notes:
The Search and Screen Pop feature overrides the standard CRM lookup. In which case the Lookup Rules will not be applied.
If no value is provided, the ANI is used as the search parameter on inbound calls.
Salesforce only allows searches of numbers with length > 2
Additional Search Parameters
The Additional Search Parameters field is used to pass parameters to the opened search page or a custom Visualforce page for inbound calls or to trigger a Lightning Flow.
Configure Popup Settings in Softphone Layout to select the desired behavior of the page when matching the configured criteria.
Search page or custom Visualforce page:
The values are passed in form of Key1=Value1&Key2=Value2
In Classic mode, Key is the target field ID associated with the page/object configured in Softphone Layout to which the parameter is passed. In Lightning, field API Names are used instead.
See section Placeholders used in some parameters for a list of possible placeholders that can be inserted here.
For backward compatibility also {0} can be used here in the Additional search parameters as placeholder instead of {ANI}.
Example Classic: con15={ANI}&con18={PV1} (when opening contact)
Example Lightning: Phone={ANI}&Description={PV1}(when opening contact)
Example VisualForce Page: Key1={ANI}&Key2={PV1}
Default: empty
If call type is internal or outbound, no screen pops occur.
Lightning Flow:
The values are passed in the form FlowInVar1,Type1,Value1;FlowInVar2,Type2,Value2;... where FlowInVar corresponds to the input variable name of the flow name, Type to the type of the flow variable and Value to the value.
Currently, Type only supports String.
The Value can contain the same placeholders as the ones described in section Placeholders used in some parameters.
Example: phoneVar,String,{ANI};lastName,String,{PV2}
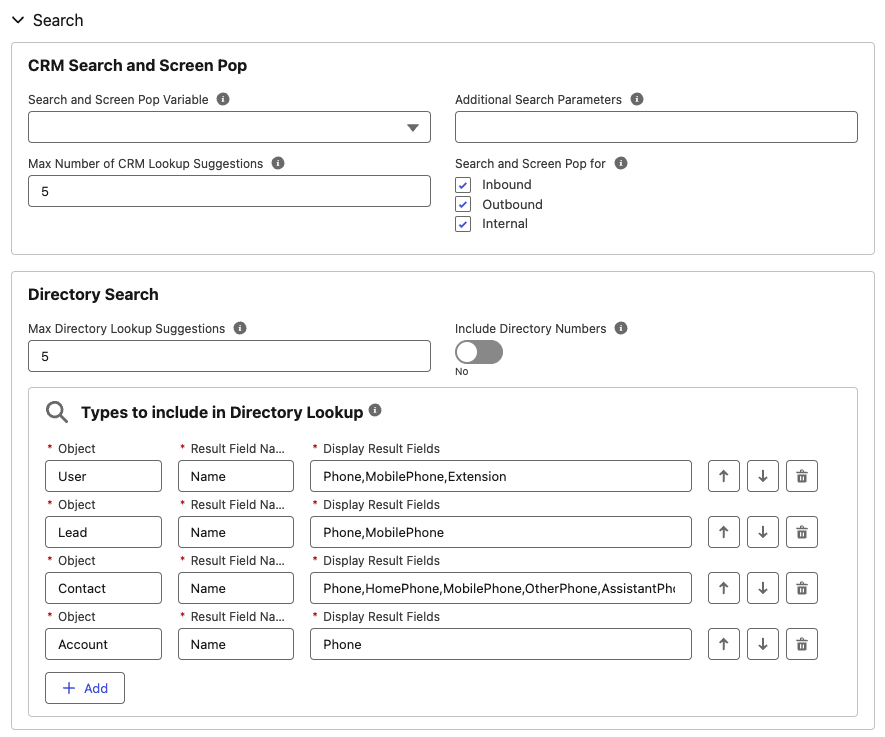
Max Number of CRM Lookup Suggestions
Specify the max number of lookup entries shown on the call work item.
Default: 5
Search and Screen Pop for
Defines for which calls a search and screen pop using the softphone layout should be performed.
Default: Inbound, Outbound, Internal
Max Directory Lookup Suggestions
Specify the max number of lookup entries shown on the Make Call Dropdown.
Default: 5
Include Directory Numbers
If enabled, the Directory Numbers are included in the Directory Lookup.
Types to include in Directory Lookup
Defines the types to include in the Directory Lookup. The Object, Result Field Name, and Display Result Fields must specify the API names of the object to search and the fields to display.
- The Object field supports standard and custom object API names. The agent has to have access to the Object to search.
- The Result Field Name defines the field used as the record name in search results.
- The Display Result Fields specify the fields shown in the results. It supports Phone and Text fields.
The search is performed across all Name and Phone fields of the configured objects, depending on whether the search parameter introduced by the Agent is a text string or a phone number.
Default:
| Object | Result Field Name | Display Result Fields |
|---|---|---|
| User | Name | Phone,MobilePhone,Extension |
| Lead | Name | Phone,MobilePhone |
| Contact | Name | Phone,HomePhone,MobilePhone,OtherPhone,AssistantPhone |
| Account | Name | Phone |
Only records accessible to the Agent are returned as search results.
Voice - Screen Pop
The Screen Pop functionality automatically pops useful information on the Agent's screen when a specific event is triggered (e.g. a call is answered). With b+s Connects for Salesforce, the Screen Pop functionality can be configured to open external URLs, Salesforce relative URLs (e.g. a Visualforce pages) or Record pages by their Id, trigger a Flow or search for a given string and display the results.
Multiple Screen Pops can be defined with their own configuration.
The Screen Pop actions configured in this section are triggered in addition to the ones set in the Softphone Layout in use.
Channel
Cisco Channel
- Voice
- Chat
- Case
Direction
Direction of the call
- Inbound
- Outbound *
- Internal *
* Only available for Voice channel
Event
Specifies when the Screen Pop is triggered.
| Event Name | Description |
|---|---|
| Item Created | Triggered as soon as the item is presented to the agent in b+s Connects for Salesforce |
| Item Accepted | Triggered after the agent accepts an item |
| Item Wrap Up * | Triggered when items go into wrap up state |
| Item Ended | Triggered after the item has ended |
| Search and Screen Pop Result Received | Triggered after b+s Connects for Salesforce receives the result from the CRM lookup. When this event has been fired, the IDs of the related entities can be passed to the screen pop target. With the placeholder {Found<EntityType>}, the ID of the related record will be passed if exactly one record of the entity type is related. If zero or multiple related records are found, the placeholder will be replaced with an empty string. |
| Campaign Call * | Triggered when the item receives campaign call OOData |
| Call Log Created * | Triggered as soon as the activity is created in Salesforce |
* Only available for Voice channel
Screen-pop Type and Parameter
Defines type of Screen Pop and parameter format supported. Please refer to the Placeholders used in some parameters section to find a full description on the available placeholders.
| Screen-pop Type | Description | Parameter format example |
|---|---|---|
| CRM URL | Relative link to Salesforce Page | /apex/visualforcePageName |
| EXTERNAL URL | External link | https://google.com |
| FLOW (screen-flow only) | Flow settings. Must be valid JSON format. | See examples below (*) |
| RECORD | Salesforce ID | 01U000001cmsUu |
| SEARCH | Search string | John Doe |
(*)
{"flowApiName": "<flowApiName>", "flowArgs": [{"name": "<varName>", "type": "String", "value": "<value>"}]}
Example:
{"flowApiName": "Validate_Customer", "flowArgs": [{"name": "varPhone", "type": "String", "value": "{ANI}"}, {"name": "varCustomerId", "type": "String", "value": "{PV3}"}]}
Voice - Sales Engagement
The Sales Engagement integration enables an agent to work with Sales Cadences and set the call disposition for the call.
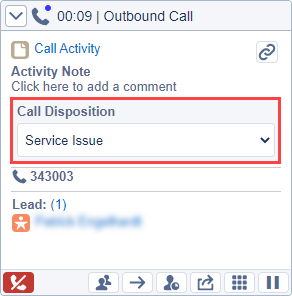
The available values for the call dispositions are taken directly from the Sales Engagement configuration.
You need to enable Salesforce Call Log in order to use Sales Engagement within the softphone.
There is an optional setting in the Sales Engagement settings named Always Show Salesforce Log a Call Window which breaks
the implementation of Sales Engagement in the gadget, when enabled. Make sure this feature is disabled.
Copy Call Disposition to Wrap-Up Reason
If enabled, the call disposition is set as the Wrap-Up reason whenever the agent selects it.
Require Call Disposition
You need to set Work mode on outgoing to Required in the Admin Workstation Agent Desk Settings for this feature to work.
If enabled, agents are not able to switch back to Ready or Not Ready until they have selected a call disposition.
Enabling this setting will hide the Default Call Disposition field.
Default Call Disposition
The value in this field will be selected as the default call disposition at the beginning of the call.
Voice - Additional Voice Settings
Variable for Record Sharing
The peripheral variable (1-10) or ECC variable that is used to transport shared record information to the consulted agent.
Default: PV10 (Range: PV1-PV10)
For ECC variable use user.ECCVariableName
Campaign Account Number URL
This field is used to add a reference to a campaign management tool.
In outbound campaigns the URL specified in this field is displayed to the agents as a link or it can be configured to execute an automatic screen pop.
An outbound call will be displayed as follows:
In the configuration, the placeholder {BAAccountNumber} will be replaced with the ECC Variable BAAccountNumber to construct a valid URL.
See section Placeholders used in some parameters for a list of other possible placeholders that can be also inserted here.
For backward compatibility {0} can be used here in the Campaign account number URL as a placeholder instead of {BAAccountNumber}.
Default: empty
Usage: SalesforceObject Ids
The default behavior with this configuration value set to empty is to create a link for a SalesforceObject ID or just display the content of BAAccountNumber ECC
Variable, if it does not contain such an ID. If the content of the BAAccountNumber ECC Variable is 15 characters long it is assumed to be a Salesforce Object ID. Any other values with any other length are shown as normal text lines on the call. To get default behavior but with automatic screen pop enabled, simply set this configuration value to ap:1.
External Links
https://google.com/?q={BAAccountNumber} or ap:1;https://google.com/?q={BAAccountNumber}
VisualForce Pages
/apex/CampaignMgm?id={BAAccountNumber} or ap:1;/apex/CampaignMgm?id={BAAccountNumber}
The configuration key for External Links and Visualforce Pages can be appended with ap:1; to execute an automatic screen pop of the constructed URL.
Automatic screen pops are only supported in Salesforce Service Cloud Console.
Show Supervisor Monitoring to Agent
If set to yes, an agent sees an eye icon if they are being supervised. The telephone extension of the monitoring supervisor is accessible as a tooltip when you place the mouse over the eye icon.
Default: yes
Automatically display Wrap-up dropdown
If set to yes, the Wrap-up dropdown is automatically displayed when Wrap-up state is entered.
Default: no
Allow Dropping of all Participants
If set to yes, any participant can be dropped from a conference call. If set to no, only monitored extensions are allowed to be dropped.
Default: no
In order for this setting to work, DropAnyPartyEnabled needs to be activated:
Cisco Contact Center Gateway Deployment Guide for Cisco Unified ICM/CCE 12.6(1)
WCCAI Tenant
Set the tenant to connect to in order to receive voice transcripts powered by WCCAI.
Default: empty
Disabled Voice Actions
This list of checkboxes can be used to disable specific action buttons.
Default: all unchecked
Click To Dial: Disables the Click-to-dial feature for phone fields in SalesforceClose Preview Outbound Call: Disables the button to Close a preview outbound callConference Call: Disables the Conference call featureConsult Transfer: Disables the Transfer while being in a consult callDialpad: Hides the dial padEnd Call On Hold: Disables the end call button for a call that is on holdReject Preview Outbound Call: Disables the the button to Reject a preview outbound callSingle Step Transfer: Disables the Single-step transfer featureSpeed Dial Buttons: Disables the Speed-dial buttons
Media Configuration Activation
To activate this section, set Global | Deployment Type to Salesforce Omni-Channel (see section Deployment Type).
Follow Omni-Channel Session
This setting is available for Salesforce Omni-Channel and Cisco Universal Queue deployments.
Each agent can be logged in to only one Omni-Channel session at a time. For example, if an agent is logged in to Omni-Channel on one browser tab, they can’t log in to a second Omni-Channel instance on another tab or window. If they open a second tab or window, they must be logged out of one of the sessions.
Salesforce introduced 3 settings to determine the behavior of Omni-Channel session when a new tab or window is opened, please refer to the official documentation to learn about the new settings.
- This feature is not available for Ext-MCAL (legacy media) deployments!
- Although the gadget follows the Omni-Channel session, Cisco tasks that were already active before the switch will lose the reference to their Omni work item tab and thus render out of sync. A button will be displayed on these Cisco tasks to manually close them, when the agent is done working.
Salesforce Omni-Channel
Hide Omni-Channel Work Item
If set to yes the SFDC Omni-Channel items displayed in the gadget will hide when accepted.
Default: no
Switch to Talking State on Reserved
If set to yes the state will be switched to the talking state when an incoming call is received.
If set to no the state will be switched when the call is answered.
Default: yes
Service Presence Status While Talking
Use this configuration key to define the status the agent automatically will switch to, during a call.
Service Presence Online Status
Use this configuration key to define the states which will be displayed as Online in the gadget. They are specified with the SFDC Omni-Channel Service Presence Status API name.
If no value is provided, no online states options will be displayed in the Connects Omni-Channel channel.
Service Presence Busy Status
Use this configuration key to define the states which will be displayed as Online in the gadget. They are specified with the SFDC Omni-Channel Service Presence API name.
If no value is provided, no online states options will be displayed in Omni-Channel button.
Set Voice Channel in Not Ready Type
Define the threshold type used to set Voice channel to Not Ready.
Values:
DisabledPrimary Capacity UnitsPrimary Capacity Percentage
Default: Disabled
Count Offered Chats to Set Voice Not Ready
If set to yes offered chats will be considered for the "Chats to set voice Not Ready" limit.
If set to no only the accepted chats are counted.
Default: Yes
Units To Set Voice Not Ready
Specifies the number of primary (not interruptible) capacity units that, when reached or exceeded by the agent's active primary workload, will automatically set the Voice channel to Not Ready. When the agent’s primary workload drops below this unit threshold, the Voice channel will return to its previous state.
Default: 0
0 means disabled
Percentage To Set Voice Not Ready
Specifies the percentage of an agent’s total primary (not interruptible) capacity that, when reached or exceeded by their active primary workload, will automatically set the Voice channel to Not Ready. When the agent’s primary workload drops below this percentage threshold, the Voice channel will return to its previous state.
Default: 0
0 means disabled
Not Ready Reason Code
Specify the Not Ready Reason Code which will be set in Voice channel if the threshold limit is reached. This code has to be numerical and no System Reason codes can be used. In order to configure it, please refer to the Cisco Finesse Administrator guide.
Default: ReasonCode
If set to 0 or left empty, the default Not Ready Reason will be set
Media - Agent Work Layout
Defines the information to show in a presented Salesforce Omni-Channel task.
Object API Name
Must be a Salesforce API name
Sample Configuration: Case
Field API Names
Field API names separated by commas
Sample Configuration: Subject,Priority,Status,CaseNumber
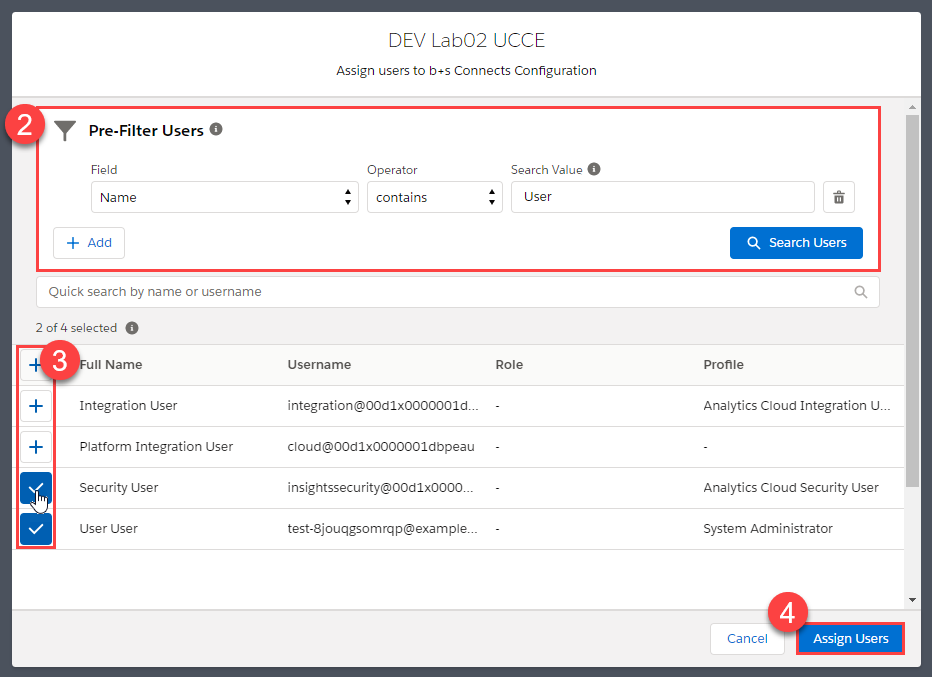
Assign Users to b+s Configuration
Add users to the current b+s Configuration.
If an agent does not have a b+s Configuration assigned, the "default" configuration record is used. (b+s Configuration with flag "Is Default")
b+s Configuration Assignment
The b+s Configuration Assignment object holds the relation between any user and a b+s Configuration. These objects can be created from the related assignment list table at the bottom of the details page of any b+s Configuration.
Assign user to b+s Configuration
- Find the assigned users list at the bottom of the detail page and click New
- Use the pre-filter with up to 5 conditions to narrow down the list of users in the list
- Select all users that you whish to assign to the b+s Configuration
- Click Assign Users to store your selection

Remove user assignment from an b+s Configuration
- Find the assigned users list at the bottom of the detail page
- Click on Delete link on the row of the User to remove
Do not edit an existing assignment. If you want to reassign a user, create a new entry. The old assignment gets deleted automatically.
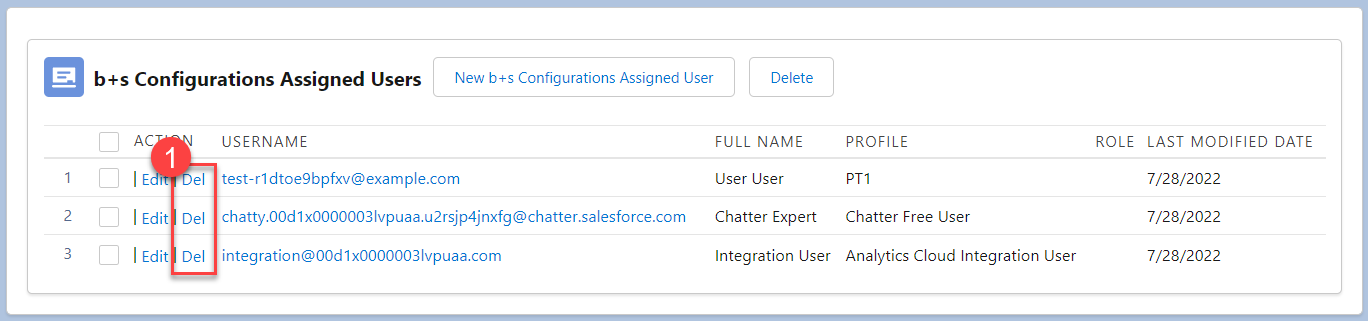
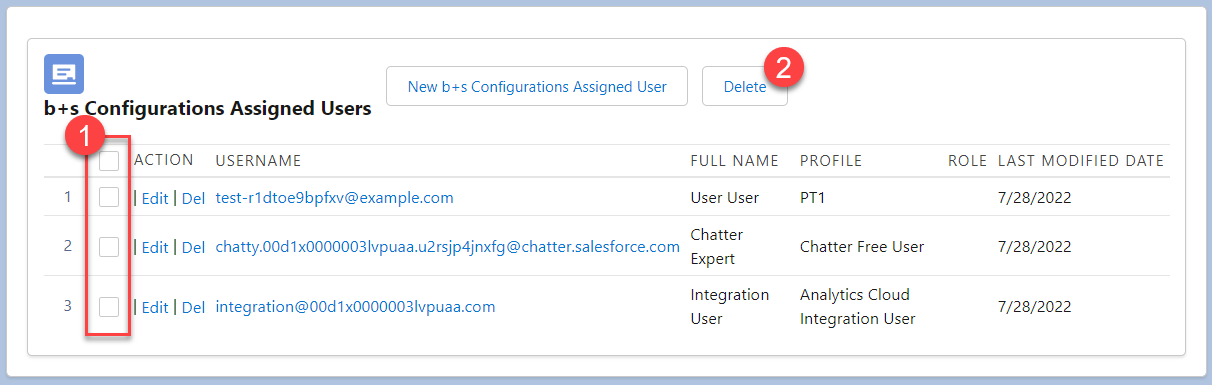
Bulk Remove user assignments from a b+s Configuration
- Select the users you want to remove from the b+s Configuration
- Click Delete
- Click Remove Users in the frame that pops up
Clickjack Protection in Lightning Experience
In order to use Enable clickjack protection for Visualforce pages with headers disabled while working with the softphone in Lightning Experience, you need to whitelist the domains the softphone and custom toolbars are loaded from, in addition to the Salesforce instance url.
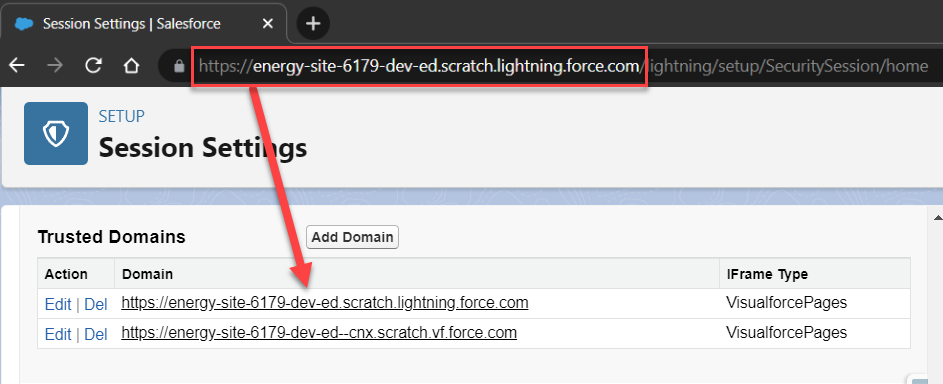
These settings and the Trusted Domains list can be found under Setup | Security | Session Settings
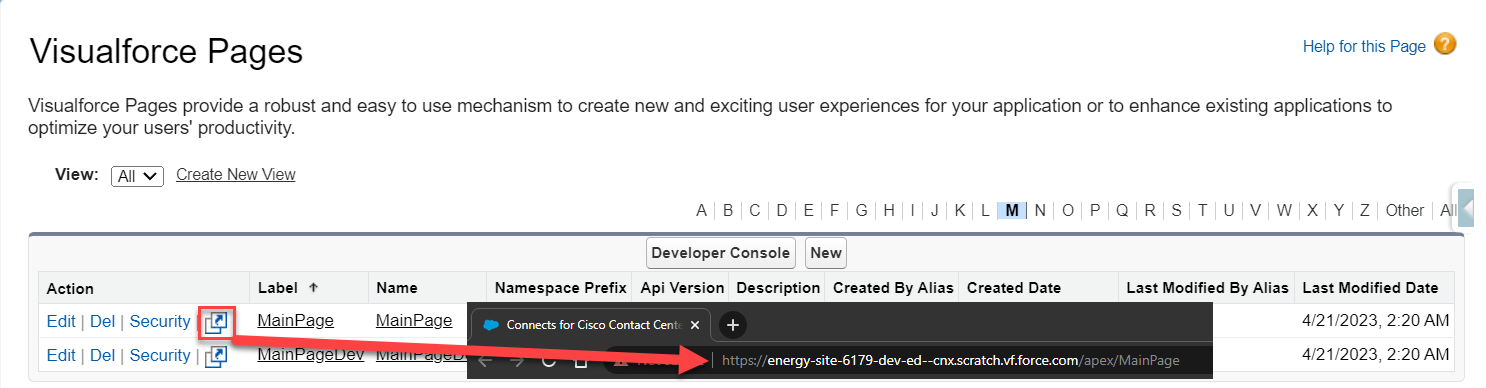
To retrieve the correct Visualforce domain, navigate to Setup | Custom Code | Visualforce Pages
and click on the Preview button for "MainPage". Salesforce may automatically redirect to a different URL, depending on
the Salesforce ORG's configuration. Copy the URL and add it to the Trusted Domains for Inline Frames list selecting "Visualforce Pages" as IFrame Type.
Example: MyDomainName--cnx.vf.force.com
To get the Salesforce Instance domain, copy the URL displayed in the browser URL bar and add it to the Trusted Domains for Inline Frames List list
selecting "Visualforce Pages" as IFrame Type.
Example: MyDomainName.lightning.force.com
If you don’t have a My Domain deployed in your org, your URL format is different. If you have a My Domain deployed and enhanced domains aren’t enabled in your org, your URL format is different. If enhanced domains aren’t enabled, the Stabilize URLs in Visualforce, Experience Builder, Site.com studio, and content files My Domain setting also affects this format. For details, see My Domain URL Formats in Salesforce Help.
Clickjack Protection and Trusted Domains settings for Lightning Experience

Media (Salesforce Omni-Channel)
Salesforce Omni-Channel is a comprehensive customer service solution that lets your call center route any type of incoming work item, including cases, chats or leads to the most qualified, available agents in your organization.
Salesforce Omni-Channel is completely integrated in the b+s Connects product. The gadget is prepared to manage incoming work items, to handle agent work states, and to interact with the CTI whichever work is received.
In order to configure the Omni-Channel Federation in the gadget, first configure it in Salesforce, following the Omni-Channel for Administrators guide provided by Salesforce. Once it is set up in Salesforce, configure the Call Center configuration accordingly.
In order to complete the Salesforce Omni-Channel configuration, follow the steps described here.
Integrations
The Connects Finesse Gadget can optionally host Custom Components as Custom Toolbars. These can be Salesforce Visualforce pages or external web pages. Salesforce Visualforce pages can use the Integration API of b+s Connects for Salesforce – CCE/CCX Edition.
Configure Integration API in Lightning
Enable Integration API
If set to yes, the Connects Integration API is enabled for use in Salesforce Lightning.
If you do not use integrations inside Salesforce Lightning, you should keep this setting on no to reduce browser workload.
Default: no
The integrations that come with the b+s Connects for Salesforce package also require this setting to be set to Yes if you want to integrate them inside your Salesforce Lightning user interface.
Configure Messaging Channel
Configure the name of the Messaging Channel that should be used with Integration API. The format should be <YOURMESSAGINGCHANNEL__c>.
After version 5.15, due to Salesforce Security Review requirements, the cnx__ConnectsIntegrationAPI__c LMC shipped with the package is deprecated.
Custom Toolbars
The b+s Connects Agent Gadget can optionally host Custom Components as Custom Toolbars.
This settings can be found in the b+s Configuration in the Integrations panel.
These Custom Components can be Visualforce pages, Lightning Aura apps or external web pages.
The initial size of the toolbars is configurable and can be set in the Configuration record section as described below or dynamically defined from within the Visualforce page used as Custom Toolbar.
To use the Integration API to handle events without displaying any visible elements, it is possible to configure a toolbar with initial height parameter set to 0.
Security settings about clickjack protection in Lightning Experience can be found under the Clickjack Protection In Lightning Experience section of the Documentation.
Custom Toolbar Positions
Integrations Section "Custom Toolbars"
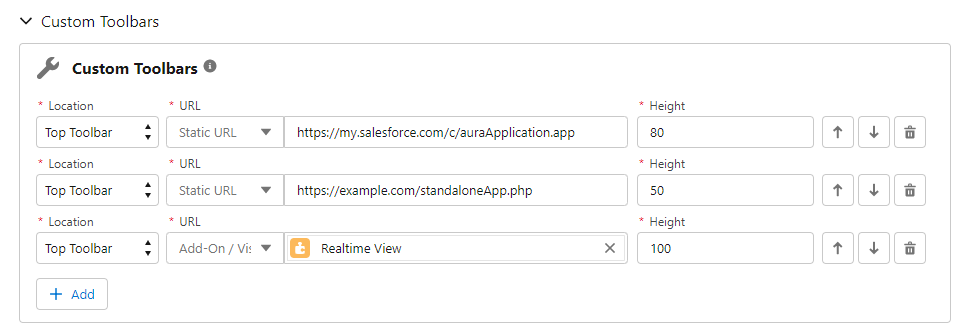
Location
Defines if the toolbar should be inserted in the top or bottom regions of the gadget.
Default: Top Toolbar
URL (Required)
The URL to the integration. Select from the list the type of the URL between Static URL and Add-On / Visualforce Page.
When Static URL URL type is selected, the adjacent field accepts an absolute path to a standalone integration.
Examples:
https://mydomain--c.vf.force.com/apex/myVisualforcePagehttps://example.com/standaloneApp.phphttps://my.salesforce.com/c/auraApp.app
When Add-On / Visualforce Page is selected, a list composed of available b+s Add-Ons and available Visualforce Pages existing in the Org is displayed.
Start typing in the field to filter the required Add-On(s) or Visualforce Page(s).
If more than 1000 Visualforce Pages exist in the Org, only the first 1000 items obtained from Salesforce are present in the list and an informative message is displayed
to the CRM Admin at the bottom of the Custom Toolbar section.
In order to add a Visualforce Page not present in the list as a Custom Toolbar, it must be added as Static URL with absolute path (https://instance.../apex/vfPage)
Height (Required)
The initial height of the toolbar in pixels (or 0 for invisible)
Example: 50
Default: empty
Add-Ons
b+s Connects for Salesforce has built-in Add-Ons. In order to use one or more of these Add-Ons, Bucher + Suter must unlock them for your Salesforce Org. In order to get access to b+s Add-Ons, please contact your b+s Connects for Salesforce vendor.
The following Add-Ons are available:
An unlocked Add-On can be enabled in the b+s Configuration integrations section in the Custom Toolbars section.
- Add a new Custom Toolbar and select Add-On / Visualforce Page in the
URLDropdown. - All available Add-Ons and Visualforce Pages are displayed in the adjacent field.
- After selecting an Add-On, a new configuration section will appear in the
Integrationspanel. All configurations related to the Add-On can be done in this section.
Integration Settings
With these configuration values you can enter specific settings for custom components.
Identifier
Identifier of a custom component
Example: Component1
Settings
The custom component can request the setting string that belongs to its specific identifier by using the Integration API.
The identifier and the format of how the settings must be entered into the settings field must be specified by the developer of the component. See the documentation of the component for details.
Example: property1=true;property2=1
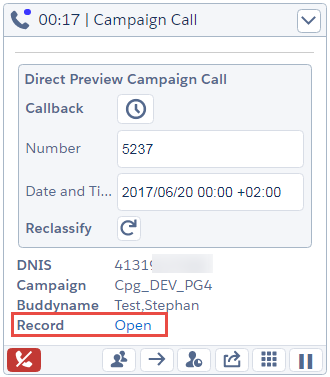
Outbound Campaign Call
The format of the .csv-file for the Cisco Dialer depends on the Outbound Option Import Rule in the CCE configuration.
For the following Import Rule:

Example of the format in the file:
[Salesforce Id],[Phone01],[Phone02],[First name],[Last name]
The agent gadget displays the values of the first and last name as Buddyname and the Salesforce ID as "Open" link as shown in the following picture:
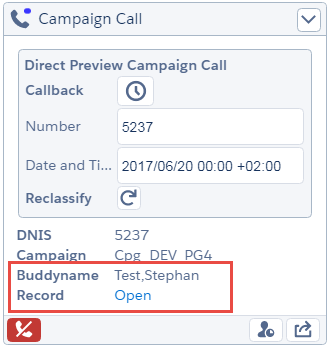
A valid open link must have a Salesforce ID with the length of 15 characters.
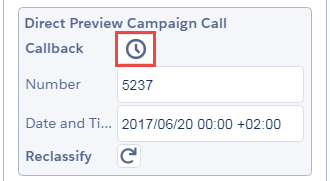
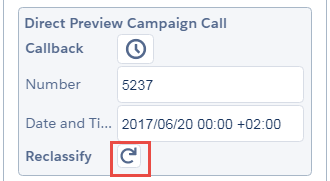
Callback
This feature allows the agent who receives a Campaign call, to schedule a callback. The phone number can be changed and the Date and Time can be set according to the new scheduling. Once the values are properly filled in, the agent will have to save the new values in the Callback icon, indicated in the following figure:
Callback set up
Once the callback is scheduled, the Callback icon will change to the one that will allow the cancellation of the callback schedule. While this icon is present, it indicates that the callback is correctly saved and ready to be scheduled.
Call reclassification
This feature allows the agent who receives a Direct Preview Campaign call, to reclassify the current call to one of the following values provided by Cisco: Voice, Answering Machine, Fax, Invalid Number.
When the call is accepted, the Reclassify button is available and a dropdown with the reclassify values appear after clicking on the reclassify button.
Call reclassification
Proxy Rules
Salesforce users who use b+s Connects for Salesforce – CCE/CCX Edition need access to the following web resources:
https://c.na1.visual.force.com/support/api/*
https://c.na1.visual.force.com/support/console/*
Please make sure that the www-proxy allows the users to access these web resources.
Flows
With Salesforce Summer '18 a new automation feature known as Flows was introduced. Please refer to Salesforce Cloud Flow Designer Guide for a complete description and instructions on how to deploy a Flow.
In order to pass parameters when triggering a flow, configure the Call Center setting Additional Search Parameters as described in the section 4.4.4.
Salesforce Classic Service Cloud Console App
In Service Cloud Classic, b+s Connects is designed to run in the Softphone window of the Service Cloud Console.
b+s Connects for Salesforce in Service Cloud Console
How to create a Service Cloud Console App
Click Setup | Create | Apps
Click New
Select the type Console (not Custom app)
infoTo be able to choose this type, the current user must be a Service Cloud User (the dedicated permission has to be enabled within their User Details).
Follow the wizard steps
When finished, find and select the Service Cloud Console App in the dropdown in the upper right corner (if the user is defined as a Service Cloud User in their personal information page).
How to Configure the Service Cloud Console App
Whitelist Domains
For CCX deployments the Finesse domain on the CCX server has to be white listed:
e.g. yourPrimaryCCXServer:8445,yourSecondaryCCXServer:8445
Display Customizable Data
It is possible to display customizable data in b+s Connects for Salesforce – CCE/CCX Edition.
There are two ways to store customized data. In the CCE Routing Script, the data can be stored into Peripheral or ECC variables. Alternatively, the Connects Integration API can be used to store the data into Peripheral, ECC, or local variables.
The following three display options are available:
- External Link: Link to another web site like http://www.google.com
- CRM Link: in this case, only a Salesforce entry ID must be sent. Connects for Salesforce will manage the rest.
- Key-Value-Pair: A simple text output.
To display the information correctly, the following syntax must be used:
- Every item must begin and end with
{and}, respectively - Inside the braces are key-value pairs separated by semicolons
- Each key-value within a pair is separated from the value by a colon
Example: {myKey:Hello; anotherKey:World}
The example contains two key-value-pairs:
| Key | Value |
|---|---|
| myKey | Hello |
| anotherKey | World |
Cisco Finesse supports only ASCII printable characters. The full list of these ASCII printable characters can be found here.
External Link
To display an external link on the task, the following key-value-pairs are required:
| Key | Description | Example |
|---|---|---|
| k | Key (Title to display) | Google |
| v | Value (Link title) | Open |
| l | Link (URL) | http://www.google.ch |
Display External Link
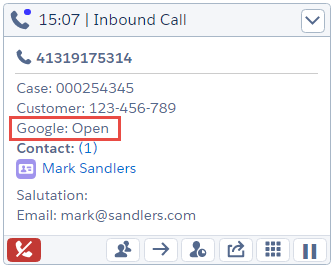
Example: {k:Google;v:Open;l:http://www.google.ch}
The external link can only be sent using an ECC variable.
CRM Link
To display a CRM link on the task, the following key-value-pairs are required:
| Key | Description | Example |
|---|---|---|
| k | Key (Title to display) | Case |
| v | Value (Link title) | Open |
| id | Id* | 500E0000001xnKa or apex/MyPage |
| ap | [Optional] Open the Salesforce-Object automatically | 1 |
* (Salesforce record has to be 15 char length or Salesforce page)
Display CRM Link
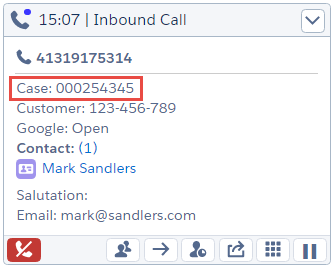
Example:
{k:Case;v:00001080;id:500E0000001xnKa;ap:1}
{k:Case;v:00001080;id:apex/MyPage?Id=1080;ap:1}
The CRM link can only be sent using an ECC variable.
Key-Value-Pair
To display a key-value-pair on the task, the following key-value-pairs are required:
| Key | Description | Example |
|---|---|---|
| k | Key (Title to display) | Customer-ID |
| v | Value (Text to display) | 123-456-7 |
Display Key-Value-Pair
Example: {k:Customer-ID;v:123-456-7}
The content must not exceed the length of 39 characters if it is stored in a Peripheral Variable. Longer values have to be passed in an ECC Variable.
b+s Supervisor Component
The b+s Supervisor Component has moved to the Feature section. See b+s Supervisor
b+s Realtime View Component
The b+s Realtime View Component has moved to the Feature section. See b+s Realtime View
The Custom Settings for the b+s Realtime View are deprecated. Please use the new Configuration
My Calls Today Component
Overview
The My Calls Today component allows agents to access to the last three tasks they were working during the current day. It is intended to be used as a working reference of the possibilities of the Connects Integration API, deployed as part of the current software.
My Calls Today Component
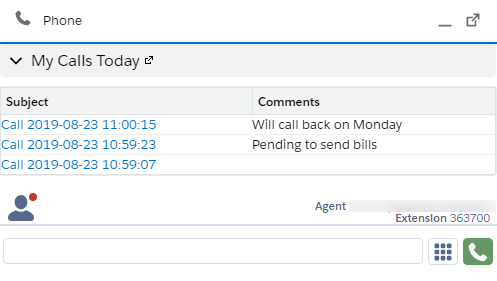
My Calls Today Component is only supported in CRM Hosted deployments
Configuration
To use the My Calls Today component in a Custom Toolbar of the Connects Finesse Gadget, do the following:
- Click Setup | Custom Code | Visualforce Pages | b+s MyCallsToday
- Click the Preview button and copy the URL of the Visualforce Page from the newly opened tab after it is fully loaded.
- In the b+s Configuration | Integrations | Custom Toolbars add a new entry with copied URL.
The recommended height value is 140.
Upload SSO Frame on Finesse Server
Depending on the Cisco Finesse version, the newly installed web resources, the 3rdpartygadget and the FTP user password are lost when upgrading the Finesse server. Consequently, making a backup before the upgrade is performed is highly recommend.
On the Finesse server a Tomcat web server is running.
In Finesse, it is possible to upload 3rd party components directly to the Finesse server.
To upload the SSO Frame to a Finesse server use the following procedure:
- Open a SSH session to the Finesse server with a SSH client (e.g. PuTTY) and log on to Finesse CLI (Command Line Interface)
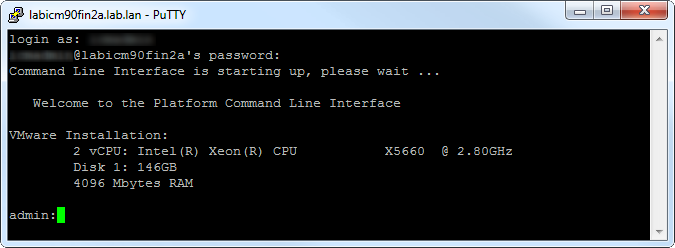
- Set an FTP password for the pre-configured FTP user "3rdpartygadget".
utils reset_3rdpartygadget_password
<password>
<password> (for confirmation)
- Open a SFTP (port 22) connection to the Finesse server (e.g. with FileZilla).

- Upload the Finesse SSO Frame so that it is reachable at
<Finesse Server A/B>:<Port>/3rdpartygadget/files/Connects/V_MAJOR_MINOR_PATCH/finesseSSOFrame.html
Secure the Connects Finesse Gadget
Since modern browsers all block mixed content and the Salesforce CRM is running secured, the Connects Finesse Gadget must also be run secured.
To secure the Connects Finesse Gadget a trusted certificate has to be created (and validated against a certification authority. Either an official one or a company-wide trusted authority) and uploaded to the Cisco Finesse server.
The Salesforce user browser has to trust this CA (which has validated the certificate) too.
Replace the Self-Signed Cisco Finesse Server Certificate
To use encrypted connections to the finesse server you must have a certificate on the Cisco Finesse Server that is trusted by your organizations browsers.
Use the following steps to replace the existing self-signed certificate.
Login to the Server Administration with your Browser. (Only Firefox is supported by Cisco
https://<Finesse Server>:8443/cmplatformSelect the menu Option "Cisco Unified OS Administration" from the drop-down menu in the upper right corner.

- Select the menu Item Security -> Certificate Management
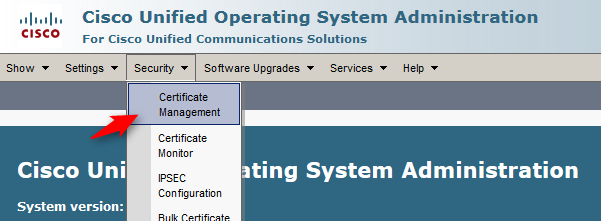
- Generate a Certificate Signing Request (CSR) for the tomcat Service to validate the request against a certification authority. (Either an official one or a company-wide trusted CA.)

Upload the root certificate and application certificate received form the Certification authority to Finesse Servers A and B.
Restart the services "Cisco Finesse Notification Service" and the "Cisco Tomcat" using the CLI for a Finesse server on CCE deployments or restart the services "Cisco Unified CCX Notification Service" and the "Cisco Finesse Tomcat" using the CLI for a Finesse server on CCX deployments.
utils service restart <service name>
- Check the validity of the Certificate by browsing the Finesse Agent Desktop.
For further information please refer to the official installation guide for Cisco Finesse Server: http://www.cisco.com/c/en/us/support/customer-collaboration/finesse/products-installation-guides-list.html