Troubleshooting
During troubleshooting, it is important to define the specific symptoms, identify all potential problems that could be causing the symptoms, and then systematically eliminate each potential problem from most likely to least likely until the symptoms disappear.
There are many areas to consider if a problem arises with Connects for Salesforce. The following steps provide some guidelines to assist you with isolating a particular issue:
- Analyze the problem and create a clear problem statement
- Define symptoms and potential causes
- Gather the facts needed to help isolate possible causes
- Consider possible causes based on the facts gathered
- Was anything recently added, removed, or modified?
- Is the event reproducible?
- Does it occur at a particular time of day, or day of week?
- Have there been any changes made to the domain, network, or security policies?
- Gather logs that capture the complete timeframe of the problem.
Logs for services (Routing Adapter) are written in separate log files in simple ASCII text format and can be opened directly with a conventional text editor, such as Notepad.
When a problem arises, it is suggested that the following files/logs be gathered:
- Client logs
- Routing Adapter logs *
- CCE/CCH PG logs **
- This includes Finesse, OPC, CTI Server, PIM etc. logs
- MR PG logs * + **
* If Case Routing Add-On Ext-MRI is installed
** Output is in EMS format
Troubleshooting Client Desktop
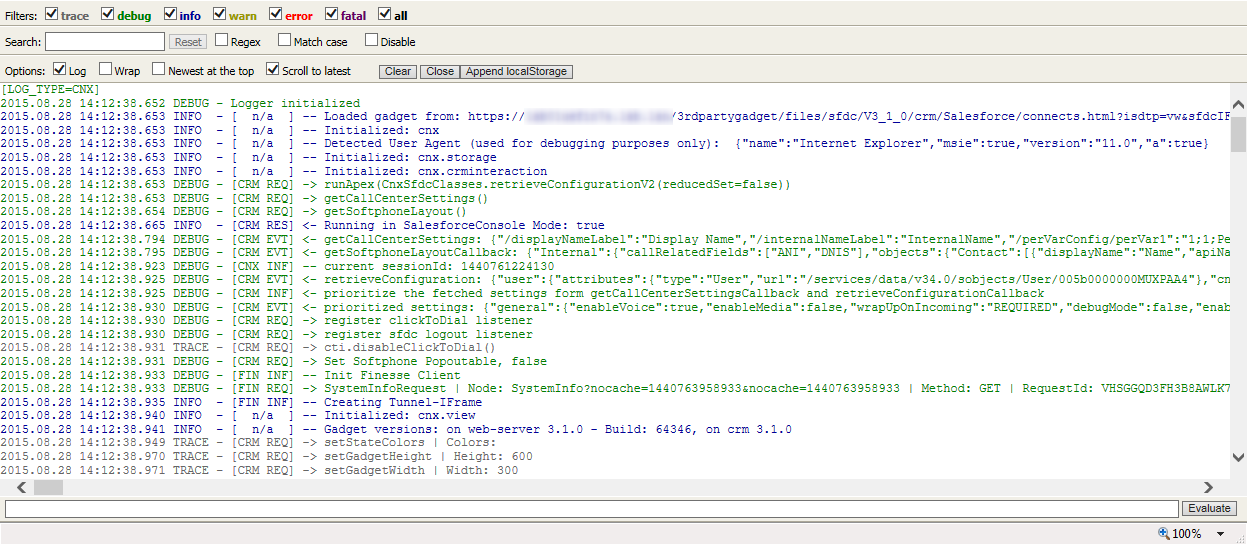
The product uses the log4javascript library to write client logs. The log is captured in the background and can be downloaded or displayed on demand in a popup window.
Depending on the situation or the needs from the Support Engineers, the Client Log can be viewed or retrieved in 3 different ways:
- By directly downloading the current Client Log as a text file
- By opening the Client Log in a User Interface, where filters can be applied for quick debugging. The log in the User Interface can be easily copy/pasted.
- By using the
Report an Issuefunction, which automatically uploads the current Client Log to Finesse and prepares an email ready to be sent to Support.
Quick guide to generate a meaningful log report
Follow these steps to generate a logs report which can be analyzed by Support:
- If the Client Log User Interface was enabled and is currently visible, do not disable or close it
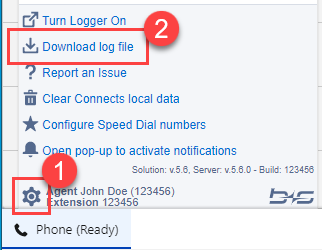
- Click on the icon to open the settings panel
- Click on
Download log file
1. Download Client Log
The Client Log can be downloaded at any time directly from the Softphone Settings panel:
- Click on the icon to open the settings panel
- Click on
Download log file
The logs captured in background since last page refresh will be downloaded automatically as a .txt file.
If the Client Log popup window is turned off (by clicking on Turn Logger Off) after being opened,
the logs captured since last page refresh will be lost and the log capturing re-started.
Make sure that the issue is reproduced after changing the state of the Client Log popup window.
2. Open Client Log in a User Interface
The popup window contains the log since the last reload of the Connects Finesse Gadget. If the popup is visible, the log remains in the popup even after a page reload.
The pop-up blockers must be disabled to display the client log.
Open/Close the Client Log in User Interface
To enable and open, or disable and close the log4javascript popup in the user interface, open the settings panel (1) and use the toggle logger window link (2)
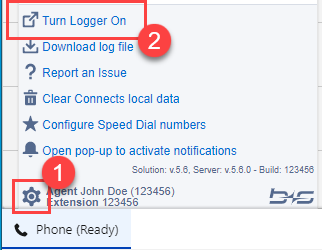
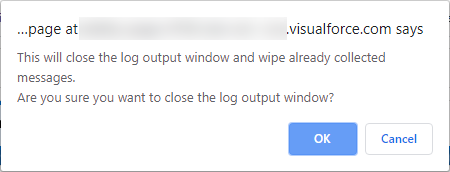
When closing the popup using this link, confirm the warning that appears explaining that current window content will be lost.
Open/Close the Client Log with Keyboard Shortcuts
To enable and open the log4javascript popup, set the focus on the Connects Finesse Gadget and press Ctrl + F1.
To disable and close the log4javascript popup, set the focus on the Connects Finesse Gadget and press Ctrl + F2.
Once the popup is enabled, closing the popup window with "X" or "Close" button will only temporarily close the popup window until the next page reload.
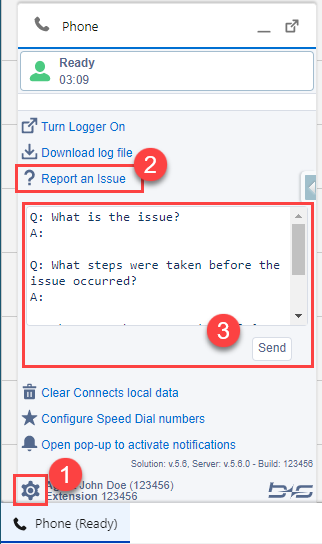
3. Use "Report an Issue" to upload the Client Log to Finesse Server
This feature automatically generates a log report, including some additional information, from the current Client Log captured in background since last page refresh and uploads it automatically to Finesse.
The agent must be logged in on voice channel to be able to upload the client log.
Follow these steps to upload the client logs to the Finesse server:
- Click on the icon to open the settings panel
- Click the link "report an issue"
- Answer the questions in the text window by writing your answer after the "A:". Add all the additional information that may help in analyzing the issue
- Press the button to upload the client log and the comments to Finesse server. The button flashes green if the logs were uploaded successfully, otherwise it flashes red
- After successfully uploading the client log to the Finesse server, a configurable URL is triggered to inform internal support about the uploaded client logs. The default value of this URL is a mailto: URL that opens a window of the local mail client
The questions to be answered by the agent come from a custom label in Salesforce and can be customized. If the logger window is closed, the uploaded file contains the client log since the last refresh. To collect logs for an issue containing a page refresh, please open the logger window first. The popup will keep the logs even if the page is refreshed.
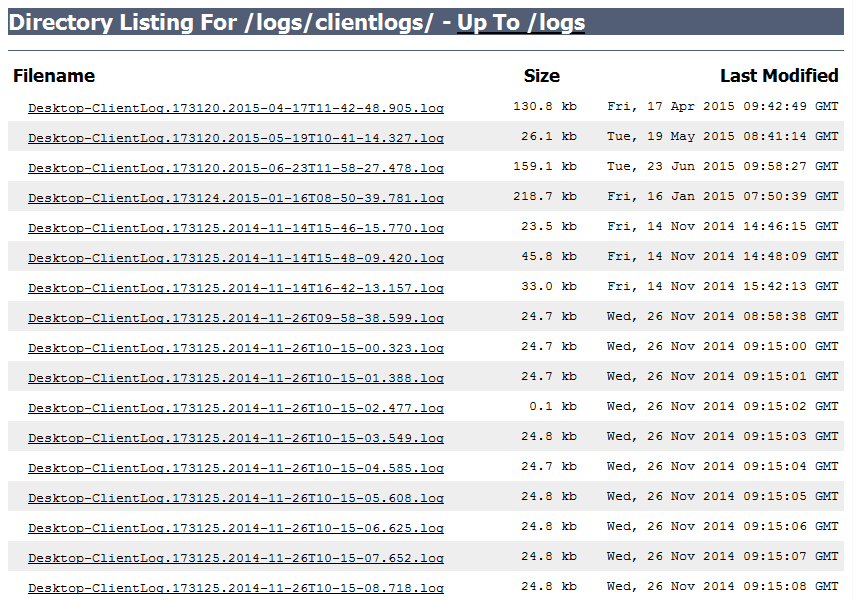
Find the Uploaded Client Logs on Finesse Server
The uploaded client logs can be found and downloaded from the Finesse server. Use a web browser and navigate to the following URL:
https://<Finesse Server>:<port>/finesse/logs/clientlogs/
Then a prompt for the Finesse administrator username and password to access the client logs will appear.
Common Problems and Solutions
The Connects Finesse Gadget is not available for users without a valid package license
Symptom
The agent is not logged in and no login form appears. There is only an error message shown in the Connects Finesse Gadget.
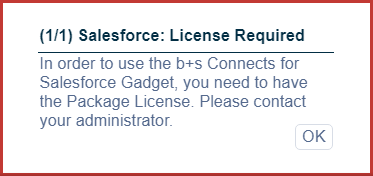
The client log contains the error message "…The Apex Class CnxSfdcClasses is part of the AppExchange Package Connects for Cisco Contact Center, and requires a license to use."
Possible Cause(s)
The agent has no assigned license for the package Connects for Cisco Contact Center.
Solution
Assign the user to the package in Salesforce App Setup | Deploy | Installed Packages
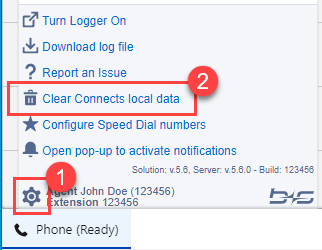
The Connects Finesse Gadget behavior does not work as expected
Symptom
The UI does not work as expected.
Possible Cause(s)
A new version of the software has been installed, but the agent browser still uses some old files from the browser cache.
Solution
Clear the browser cache using the link "Clear Connects local data" on settings panel.
The Connects Finesse Gadget is not shown
Symptom
The Connects Finesse Gadget is not available because the Phone component is not shown.
Possible Cause(s)
The Salesforce user is not assigned to a Call Center. The phone is not configured for the Utility Bar of the lightning app.
Solution
To assign a Salesforce user to a Call Center perform the following steps:
- On the Setup section, go to App Setup | Customize | Call Center | Call Centers
- Open the corresponding Call Center clicking on the name
- Scroll down to section Call Center Users and assign Salesforce users to a Call Center
To configure the phone for the utility bar perform the following steps:
- Go to the App Manager and click on Edit for the app
- Select the Utility Bar section
- Click on Add and select Open CTI Softphone
Login Is Not Possible – Login button is greyed out with "Connecting..." text.
Symptom
Login button is greyed out with "Connecting..." text on login form.
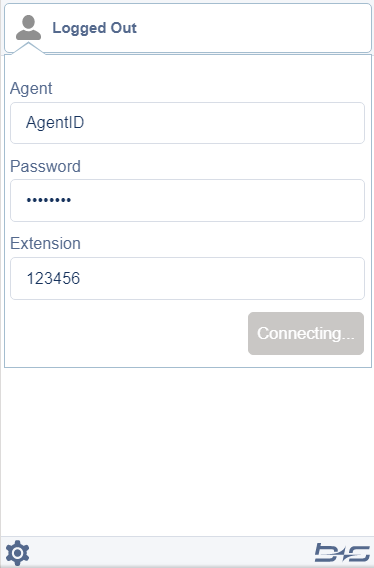
Possible Cause(s)
a) Wrong Finesse Server URL
b) Both Finesse A and B servers are down
c) Finesse Certificate Is Not Accepted
If using self-signed SSL certificates for testing purposes, the Connects Finesse Gadget or the Finesse Tunnel iFrame may not be able connect to the web server because the SSL certificate is untrusted.
The client log shows connection failures or timeout messages.
d) Salesforce domains not whitelisted in CORS and CSP settings in Cisco Finesse Server
Solution
a) Check that the configured Finesse Server URL in the b+s Configuration is properly configured.
b) Check that the Finesse servers are reachable, up and running and IN_SERVICE
c) It is common that the login works correctly in Chrome, but the certificates used are not accepted in Mozilla Firefox. The reason for this behavior is that Firefox uses its own certificate store and does not rely on the Windows certificate store, as both Google Chrome and IE do. Self-signed certificates need to be imported in Firefox as well
d) Add the Salesforce domains to Cisco Finesse CORS whitelist and CSP whitelist. Please refer to the section Enable CORS on Finesse and Enable Content Security Policy on Finesse Server for more details and how to configure.
Import a trusted root certificate in Firefox:
- Open Firefox
- In the Tools menu, select Options
- Click the Advanced icon and select the Certificates tab
- Click the View Certificates button and select the Authorities tab
- Click the Import button
- Browse to locate your CA certificates and click Ok
- Define the trust purposes. At least Trust this CA to identify websites is mandatory
- Ok to finish the import
Troubleshooting Media deployments
Omni-Channel Federation
Channel does not appear in the agent state bar
Symptom
Omni-Channel Federation channel does not appear in the agent state bar when the gadget is loaded.
Possible Cause(s)
- Omni-Channel is not enabled in Salesforce
- Omni-Channel Federation is not enabled in the b+s Configuration
- Omni-Channel is not available in Salesforce
Solution
- Enable and configure Omni-Channel in Salesforce
- Enable and configure Omni-Channel Federation in the b+s Configuration
- Reload the gadget
Channel states do not appear
Symptom
Channel states are not displayed in the Omni-Channel Federation channel.
Possible Cause(s)
- Omni-Channel states are not configured in Salesforce
- Omni-Channel Federation states are not configured in b+s Configuration
Solution
- Configure the states in Salesforce
- Adjust the b+s Configuration parameter accordingly
Troubleshooting Routing Adapter
Logging
The Routing Adapter logs are written in text format into the log directory.
By default this directory is: C:\BucherSuter\log\ and C:\ProgramData\BucherSuter\logfiles\Connects\ for SFDC Routing Adapter External – MRI.
Please refer to the section Configuration file SFDCRoutingAdapter.ini to configure the logging.
Trace Levels
Trace levels for the Routing Adapter can be found in the configuration file under
LogMask (Default: 0x80000004) -> collected logging enabled, log level "Info".
Setting the MSB to 1 enables collected logging. You can recognize this, if the trace mask starts with 0x8........ The last 4 bits define the log level, possible log levels are:
Off     0x00000000
Fatal   0x00000001
Error   0x00000002
Warn    0x00000003
Info    0x00000004
Debug   0x00000005
It is not possible to change configuration parameters of the Routing Adapter without restarting the service.
The default value for the log trace mask is 0x80000004. Changing this value can have a serious impact on client performance. It should only be modified by experienced field personnel or at the request of b+s support personnel. Reset the LogMask value to its default level after capturing logs as full tracing will have a performance impact. Set the value for LogMask to 0xffffffff for maximum tracing.
Collected Trace Levels
Trace levels for the Routing Adapter can be found in the configuration file under
CollectedLogMask (Default: 0x00000004) -> log level "Info".
The last 4 bits of this 32bit mask are used to define the level of the collected log messages like for the LogMask parameter.
The default value for the collected log trace mask is 0x00000004. Changing this value can have a serious impact on client performance. It should only be modified by experienced field personnel or at the request of b+s support personnel. Reset the CollectedLogMask value and to its default level after capturing logs as full tracing will have a performance impact. Set the value for CollectedLogMask to 0xffffffff for maximum tracing.
Logfile Size and Count
Log file size and count can be found in the configuration file.
MaxLogFileSize=10000KB
MaxLogFileCount=10
The size of log files can be defined in kilobyte (KB) or megabyte (MB).
Remote Console
The Remote Console is the main interface console to the Routing Adapter. You can use Remote Console to query information directly from the running service. Several monitors can be run at the same time. The impact on the performance of the system is minimal. The features of the monitor are kept for each session. Please note that only local access is supported. The monitor process supports local commands. Local commands are defined within monitor.
To navigate or edit the executed commands you can press the <Up> or %lt;Down> arrows on the keyboard.
A monitor telnet session can be started by entering following command at a DOS command prompt C:\>telnet localhost <RemoteConsolePort>
localhost indicates a connection to the local server and is the same as the 127.0.0.1 IP address which always points to the current machine.
<RemoteConsolePort> is the address of the gateway port, which is set by the following parameter in the configuration file TelnetServerPort (Default: 9011)
After the monitor is started the following prompt is visible:
Type "help" to list the available commands.
>
List of Commands
In order to display a basic list of commands type help. The following list is displayed:
> help
Available commands are:
Command     Aliases     Parameters          Description
---------------------------------------------------------------------------
cfg                                         Configure the connector core.
help                                        Display this help text.
httpsrv                 start|stop|status   Control the HTTP server.
list_gates  lg                              List gates.
quit        exit                            Quit the program.
start                                       Start the connector.
stop                                        Stop the connector
status      s           [mask]              Get status of the connector.
telnetsrv               start|stop|status   Control the telnet server.
version                                     Display version information.
list_tasks  lt,list_t   [id]                Lists all active tasks

To get help on a specific command, use:
  help <command>
To get help for a specific gate, type
  $<gate id> help
The most important commands used to check the current status are:
s (status): Get status of the connector
lt (list_tasks): Lists all active tasks
Status Information
In order to display status information of the Agent Adapter service type status (or alias s). The following list is displayed:
> status

--- Logger counters ---
    Errors:     0
    Warnings:   0

--- Core ---
    Status:     Started
    Started at: 11.07.2012 17:12:52
    Server time:    12.07.2012 16:58:33

--- Gate:sfdc ---
    Status:     Started
    Class:      SFDCGate.SFDCRoutingGate
    Receive Queue:  0 items
    Send Queue: 0 items
    Direct Message Dispatcher contains 0 entries

    SFDCRoutingGate MCO
    Current State:  Online
    Idle Time:  85541s

--- Gate:mcal ---
    Status:     Started
    Class:      MCALGate.MCALGate
    Receive Queue:  0 items
    Send Queue: 0 items
    Direct Message Dispatcher contains 0 entries

    MediaRoutingGate MCO
    Current State:  Started
    Idle Time:  22883s
    MCAL status:    Online (net.tcp://labicm85mediaa:8020/V4/mcal)
    ARM status: Online
    MRI status: Online

        RoutingControlClient
        Current State:  Ready
        Idle Time:  22883s
>
Web Status Page
To verify that the Routing Adapter service is up and running, open a browser and point it to http://<hostname>:<port>
<hostname> is the name of the server where the Routing Adapter service is running and <port> is the port number configured in the configuration file. This port number can be found in the HttpServerPort setting in the [core] section of the Routing Adapter initialization file or by typing "httpsrv status" on the remote console.
HttpServerPort=9081
The default is 9081.
Please note that this service is only available if the AutoStartHttpServer is set to active (1) in the [core] section of the configuration file or if the server has been manually started by typing "httpsrv start" on the remote console.
Common Problems / Solutions
Login is not allowed for this channel
Symptom
When logging in with valid credentials, one or more MRD channels are not logged in. The message "Login is not allowed for this channel: " is displayed, with the MRD ID channel with issues. The referred channel is not displayed in the available channels.
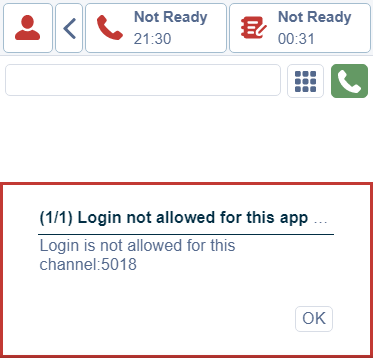
Possible Cause(s):
- The user has no login privileges for this channel
- The channel is misconfigured in the b+s Configuration
- The used Application Path in CCE configuration does not contain the MRD
Solution:
- Check that the agent has login credentials in the MRD channel
- Configure the correct MRD ID for the Media Channel in the b+s Configuration
- Add the MRD to the application path
Certificate Not Found
Symptom
The Routing Adapter does not start. In the Routing Adapter log file there is a line:
System.Exception: No certificate for thumb
<certificate thumb> containing a private key has been found
Possible Cause(s)
The certificate used to secure the notification web service does not include the private key.
To check if a certificate contains a private key, open the certificate. In the certificate window, there should be a key symbol displayed and a text next to it saying "You have a private key that corresponds to this certificate".
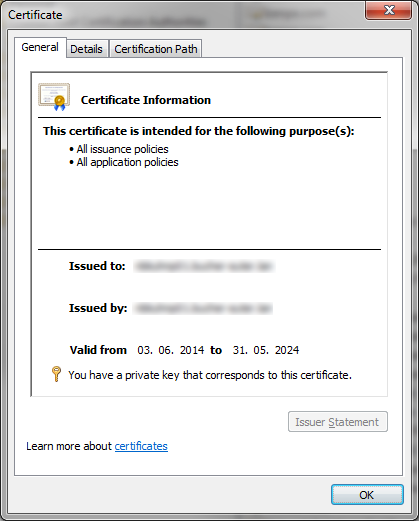
Solution
The certificate used to secure the notification webservice must include the private key.
No Such Host Is Known
Symptom
The Routing Adapter does not start. In the Routing Adapter log file there is a line:
Could not start chat RoutingAdapter. Failed to initialize the main connector object
    of a specific gate.
--- was caused by ---
No such host is known
Possible Cause(s)
The machine where the Routing Adapter is running on is not allowed to perform a DNS lookup.
In order to set up the notification web service, the Routing Adapter performs a DNS lookup on the domain name in the notification web service URL to find out the IP(s) that are associated with that domain name. If a DNS lookup is not allowed on the network, the notification web service cannot be created.
Solution
Allow the machine where the Routing Adapter is running to perform a DNS lookup.
USER: State Change Error
Symptom
A media channel cannot change to READY. Although it can change to another NOT_READY state.
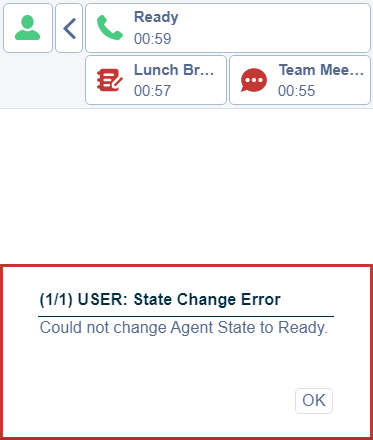
Possible Cause(s)
This can happen after a Finesse failover. Agent recovers in state WRAPUP and when changing to READY, there is a Finesse API conflict not allowing changing the Routable Flag to true. As a result, the agent cannot go to READY state. It can also happen in other scenarios.
Solution
Log out and log in again.
Knowledge Base on b+s Hub
Find more help for common issues in our Knowlege base on the b+s Hub