Cisco UQ
Limitations
External Routing can be used with Omni-Channel in Salesforce Classic Console and Lightning Console. Using both External Routing and Omni-Channel routing in the same Salesforce organization is not supported.
Transfer scenarios between External Routing Queues and Omni-Channel Queues are not supported.
Status-Based Capacity Model is not supported for Cisco UQ.
Pause Work feature introduced with Enhanced Omni-Channel is not supported for Cisco UQ.
Salesforce Omni-Channel
In order to be able to use External Routing in Salesforce, Omni-Channel must be properly configured. Make sure to use Salesforce standard APIs and streaming APIs, versions 48.0 or later to be able to use External Routing.
This guide provides the basic information to be able to configure External Routing for Omni-Channel in Salesforce. If additional information is required, consult the document Omni-Channel for Administrators Guide from Salesforce.
Enable Omni-Channel
Enable Omni-Channel in the Salesforce organization.
- Navigate to Setup | Feature Settings | Service | Omni-Channel | Omni-Channel Settings
- Check Enable Omni-Channel
- Click Save button
- Refresh the page to display the Omni-Channel Settings
Create Service Channels
Service Channels define what types of work (like chats, cases, or custom objects) can be routed through Omni-Channel.
You need a Service Channel for each objects you want to route. This also includes the Chat Service Channel if it is not present after enabling Omni-Channel.
Navigate to Setup | Feature Settings | Service | Omni-Channel | Service Channels
Click New button
Complete the configuration:
Service Channel Name:
Case ChannelDeveloper Name:
CaseChannelSalesforce Object:
CaseClick Save button
Create Presence Statuses
The initial deployment of the External Routing Add-on uses two generic Presence Statuses: Ready and Busy. Consequently, all Service Channels for External Routing must be assigned to the same Ready State.
Navigate to Setup | Feature Settings | Service | Omni-Channel | Presence Statuses
Click New button
Complete the configuration:
Status Name:
ReadyStatus Options:
OnlineSelected Channels:
Case ChannelClick Save button
Set Access to Presence Statuses
To make the newly created Presence Statuses visible for users, assign them to each agent by using either Permission Sets or Profiles:
Method 1: Setup by Permission Set
- Go to Users | Permission Sets
- Click the name of the Permission Set which should be granted access to statuses, or create a new one.
- Click Service Presence Statuses Access
- Click Edit
- Select the Service Presence Statuses Access to associate with the Permission Set
- Click Save
- Assign users to the Permission Set by clicking Manage Assignments | Add Assignment.
Assign all users to the Permission Set by clicking Manage Assignments.
Method 2: Setup by Profile
- Go to Users | Profiles
- Click the name of the Profile you want to give access to the statuses
- Click Enabled Service Presence Status Access
- Click Edit
- Select the Service Presence Statuses Access to associate with the profile
- Click Save
Presence Configuration
The default presence Configuration does not have to be updated in order to install the Routing Adapter. Keep in mind that the capacity settings are ignored.
Add Omni-Channel as a Utility Bar Component
As a last step in the Omni-Channel configuration, the Utility Bar Component will need to be configured in the App Manager
- Go to Apps | App Manager
- In the desired App Name, click on Dropdown menu | Edit
- Select Utility Items | Add Utility Item
- Select Omni Channel
- Save
The Omni Channel Utility Bar Component will now be displayed in the utility bar next to the gadget.
Integrate External Routing for Omni-Channel configuration
External routing requires a separate Routing Configuration and Queue in Omni-Channel. These separate objects define routing behavior and assign work to agents.
Routing Configuration
Create a new Routing Configuration and select External Routing as routing model:
Go to Setup | Feature Settings | Service | Omni-Channel | Routing Configurations
Click New
Complete the configuration:
Routing Configuration Name:
ExternalRoutingConfigDeveloper Name:
ExternalRoutingConfigRouting Model:
External RoutingComplete the rest of the configuration based on your Business Logic
Click Save
Queue for External Routing
From Setup, enter “Queues” in the Quick Find box and select “Queues”.
Create a new queue, configure and connect it to the routing configuration created previously.
Go to Setup | Users | Queues
Click New
Complete the configuration:
Label:
RoutingQueueQueue Name:
RoutingQueueRouting Configuration:
ExternalRoutingQueueSelected Objects:
CaseFinish the queue configuration, assigning the proper queue members among the four possible filters: Users, Public Groups, Roles, or Roles and Subordinates.
Click Save
Integrate External Routing for Omni-Channel and Chat configuration
Salesforce allows External Routing configurations for Omni-Channel and Chat working at the same time. Important note: there are limitations that have to be considered:
- It is not possible to transfer a chat from a button using Chat routing to a button using Omni-Channel routing
- It is not possible to use direct-to-agent routing with chats routed by Omni-Channel
- It is not possible to use chat conferencing with chats routed by Omni-Channel
- Queues with multiple object types can cause problems when using Omni-Channel routing for chats. It is recommended to create a separate queue for each object type, such as Chats, Cases, and Leads, instead of setting queues to handle multiple object types
- Chats routed with Omni-Channel cannot use supervisor whisper messages and assistance flags with Omni-Channel Supervisor
Remember these limitations when extending the base configuration from the previous chapters for Chat and External Routing.
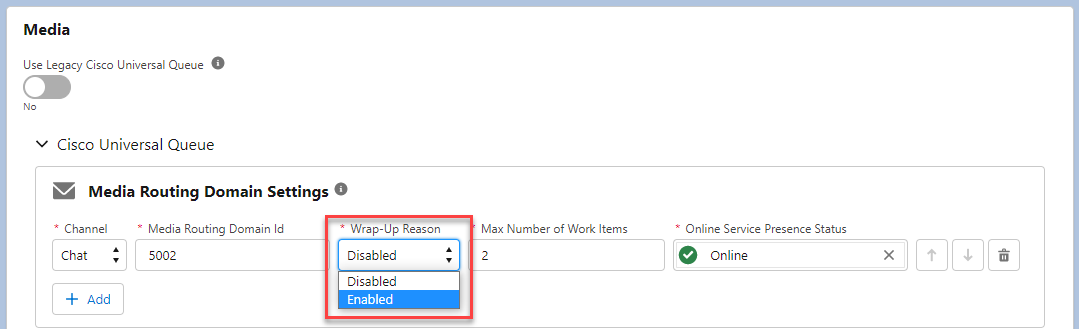
Enable Wrap-Up Reason for a Media Channel
The Wrap-Up Reason can be enabled for a Media Channel in the Media Routing Domain Settings section of the Media block.
Select "Enable" from the "Wrap-Up Reason" dropdown of the Media channel the setting should be enabled for.
Configure a routing configuration for Chat queue
Create a new routing configuration for the Chat queue and select External Routing as routing model:
Go to Setup | Feature Settings | Service | Omni-Channel | Routing Configurations
Click New
Complete the configuration:
Routing Configuration Name:
Chat External RoutingDeveloper Name:
Chat_External_RoutingRouting Model:
External RoutingComplete the rest of the configuration based on your Business Logic. Example:
Routing Priority:
1Push Time-Out(seconds):
20Units of Capacity: ``1.00```
Click Save
Queue configuration for Chat
Create a new queue, configure and connect it to the routing configuration created previously. This queue is used to route Messaging Sessions via Omni-Channel and External Routing.
Go to Setup | Users | Queues
Click New
Complete the configuration:
Label:
ChatQueue Name:
ChatRouting Configuration:
Chat_External_RoutingSelected Objects:
Messaging SessionFinish the queue configuration, assigning the proper queue members among the four possible filters: Users, Public Groups, Roles, or Roles and Subordinates.
Click Save
Configure Presence Statuses for Chat
With the provided configuration, Chat will be found in state “online” whenever an agent enters the state “ready”, as all the channels share the same Presence State. In order to avoid this and have the ability to manage the Chat channel independently from all other media channels, it is best to configure two additional Presence Statuses:
| Presence Status name | Case Channel Selected | Chat Channel Selected | Chat Channel status |
|---|---|---|---|
| Ready | ✓ | ✓ | Online |
| Ready for Cases | ✓ | - | Offline |
| Ready for Chats | - | ✓ | Online |
| Busy | - | - | Offline |
Behavior of External Routing for Omni-Channel
For further insights into External Routing for Omni-Channel consult the Salesforce Omni-Channel Developer Guide.
Salesforce User for Routing Adapter
The Routing Adapter requires a Salesforce User in order to login to Salesforce and to receive and query routing information. This User must have the permission to:
- Read the PushTopic standard object to receive notifications
- Read the entities to be routed (e.g. Case)
- Reassign entities (e.g. Case) to a failure queue
- Read AgentWork in order to get re-route reasons
This can be achieved by configuring a new Salesforce Profile and Permission Set and assigning them to the User.
Configuration steps
The following configuration steps are required to allow the b+s Routing Adapter to connect to the Streaming API:
- Create a Permission Set for the Integration User (created in step 3)
- Clone and modify the profile
Minimum Access - API Only Integrations - Create an integration user for the b+s Routing Adapter
- Create and configure an External Client App
- Assign the Permission Set to the External Client App
Permission Set “b+s External Routing Addon”
This Permission Set will be used for the Integration User, which will be created later.
Navigate to Setup | Users | Permission Sets
Click New
- Label: for example
b+s External Routing Addon - API Name: for example
b_s_External_Routing_Addon
- Label: for example
Set permission for the Push Topic objects and all objects you want to route. In the following example: “Case” and “Messaging Session” (for Chat)
Go to Apps | Object Settings
Click on Push Topics
- Enable Read permission
Click on Cases
- Enable Read and View All permissions.
- In order to assign Cases to a failure queue, enable the Edit permission.
If you want to route Messaging Sessions, continue with the next step. Please note, Messaging Session requires the Digital Engagement Salesforce License.
Click on Messaging Sessions
- Enable Read permission and View All permission
- In order to assign Messaging Sessions to a failure queue, enable the Edit permission.
Please make sure you also update the Field Permissions for the objects mentioned above and enable Read Access for all fields you configured in the SFDCRoutingAdapter.ini
Minimum Access - API Only Integrations profile
This profile is a clone of the Minimum Access - API Only Integrations profile and is used to integrate with the b+s Routing Adapter.
Navigate to Setup | Users | Profiles
In the Profiles list, search for the Profile
Minimum Access - API Only IntegrationsClick on the profile name to open it in view mode
On the top of the page, click the
ClonebuttonEnter a new Profile Name, for example:
b+s External Routing AddonClick on
Savebutton- The newly created profile opens
Navigate to
System Permissions- Make sure the following Permissions are enabled:
- API Enabled
- Api Only User
- Make sure the following Permissions are enabled:
Integration User for the b+s Routing Adapter
The following is an example configuration and describes the minimum required permissions in order for the b+s Routing Adapter to work.
The Integration User does not require a b+s Connects for Salesforce license.
Navigate to Setup | Users | Users
Click on
New Userbutton- Enter First Name, Last Name, and all other mandatory fields
- User License:
Salesforce Integration - Profile: select the profile created in the previous step (
Minimum Access - API Only Integrations)
Click on
SavebuttonOpen the new User record
Assign the Permission Set License
Salesforce API IntegrationAssign the Permission Set created earlier (
b+s External Routing Addon)
OAuth 2.0 access in Salesforce
Dedicated Routing Adapter UQ requires an External Client App in order to obtain a valid Salesforce Access Token via OAuth 2.
Create a new External Client App
- From Setup, navigate to Apps | External Client Apps | External Client App Manager
- Click on
New External Client Appbutton
The following section shows the minimal required configuration needed in order to allow the external components to connect to your Salesforce Org.
External Client App - Basic Information
- External Client App Name: the name of the External Client App, for example:
b+s Case Routing Addon - API Name: the API name of the External Client App, for example:
b_s_Case_Routing_Addon - Contact Email: < your email >
- Distribution State: select Local
- External Client App Name: the name of the External Client App, for example:
External Client App - API (Enable OAuth Settings)
- Select: Enable OAuth
- App Settings
- Callback URL: http://localhost:1717/OauthRedirect as a sample callback URL
- OAuth Scopes
- Select OAuth scopes:
- Manage user data via APIs (api)
- Select OAuth scopes:
- Flow Enablement
- Select: Enable Client Credentials Flow
Click on
CreatebuttonChange to Tab
Policies- Click on
Editbutton
- Click on
Policies - OAuth Policies
- Plugin Policies
- Permitted Users: select Admin approved users are pre-authorized
- Confirm the change
- OAuth Flows and External Client App Enhancements
- Select: Enable Client Credentials Flow
- Run As (Username): Salesforce username of the Integration User for the b+s Routing Adapter
- App Authorization
- Refresh Token Policy: select Immediately expire refresh token
- IP Relaxation: select Enforce IP restrictions
- Plugin Policies
Policies - App Policies
- Start Page: none
- Select Permission Sets: Assign the Permission Set created before (
b+s External Routing Addon)
Click on
SavebuttonChange to Tab
SettingsSection OAuth Settings, click
Consumer Key and SecretbuttonWait for email and verify your identity
A new browser tab opens with the Consumer Details
Click Copy and save the Consumer Key and the Consumer Secret. The consumer key and secret are used later to create in the b+s Routing Adapter ini-File.
Make sure you regularly rotate your Client IDs and Client Secrets to keep your integrations secure. You can follow the process described in Stage, Rotate, and Delete OAuth Credentials for an External Client App.
After generating new credentials, remember to update the Client ID and Client Secret in the b+s Routing Adapter ini-File. This will prevent any disruptions in your existing integrations.
Streaming API in Salesforce
Salesforce uses the Streaming API to push routing events to 3rd party applications.
In order to allow the Routing Adapter to receive notifications, the Salesforce Streaming API must be available and ready to use inside the organization.
Required permission
The Streaming API permission must be enabled.
Navigate to Setup | User Interface | User Interface. and verify that the Enable Streaming API permissions are enabled in your organization.
Push Topic
In order to notify the Routing Adapter about new cases, chats and other entities, it is necessary to configure a Streaming API Push Topic to which the Routing Adapter will subscribe.
The easiest and most convenient way to provide a Push Topic is to use the Salesforce Developer Console:

Inside the Developer Console, click Debug | Open Execute Anonymous Window or press CTRL+E.
Next, modify the pushTopic.Name value and execute the following code snippet:
PushTopic pushTopic = new PushTopic();
pushTopic.Name = 'PT_CNX_ExternalRouting';
pushTopic.Query = 'Select Id,Serial,QueueId,WorkItemId,IsPushed,IsTransfer,ServiceChannelId,LastDeclinedAgentSession,CreatedDate from PendingServiceRouting where RoutingModel = \'ExternalRouting\'';
pushTopic.ApiVersion = 59.0;
pushTopic.NotifyForOperationCreate = true;
pushTopic.NotifyForOperationDelete = true;
pushTopic.NotifyForOperationUpdate = true;
pushTopic.NotifyForOperationUndelete = false;
pushTopic.NotifyForFields = 'Referenced';
insert pushTopic;
The query provided in pushTopic.Query defines the matching set of data that will cause a notification for the Routing Adapter. Multiple Routing Configurations / multiple Routing Adapter instances not supported.
In order to delete a PushTopic, use the Developerforce Workbench.
Installation in Salesforce
The installation steps in this chapter are made inside the Salesforce user interface.
It is assumed that you already have the Connects for Cisco Contact Center package installed and configured in your Salesforce org.
This chapter only describes Cisco Universal Queue related fields.
Global
Deployment Type
Set the Deployment Type to Cisco Universal Queue to enable Cisco Universal Queue related fields.
Media
Use Legacy Cisco Universal Queue
Set this field to No
Default: No
Note: Cisco Universal Queue Legacy is no longer supported.
Cisco Universal Queue
Media Routing Domain Settings
In this section you can configure one or two media channels.
Channel
This label corresponds to the Channel name to be configured.
Default: Ticket or Chat
Media Routing Domain Id
Media Routing Domain Id of the Cisco media channel. The Cisco engineer has to provide the identifier of the media Channel. More information in Media Routing Domains
Wrap-Up Reason
If Enabled, gives the agent the possibility of setting up Wrap-Up Reasons for Media Routing Work Items.
Max Number of Work Items
Maximum number of dialogs to be routed to the agent simultaneously per channel.
Online Service Presence Status
Salesforce Omni-Channel presence status in which only the configured channel is online.
Presence State Available All
Salesforce Omni-Channel presence status in which all media channels are online.
Presence State Busy All
Salesforce Omni-Channel presence status in which all media channels are busy.
Work Item Id Variable
The peripheral variable (1-10) or ECC variable that is used to receive the Salesforce work item ID from the Routing Adapter.
Default: empty
For PV use PV<n> (Range: PV1-PV10). For ECC variable use the form user.ECCVariableName
This setting has to match with the “MediaUrlVariable” setting in the Routing Adapter UQ SFDCRoutingAdapter.ini configuration file.
Support Chat Button State
This setting has to be checked in order to switch the chat button to offline, if all agents are talking or on full capacity.
Agent Work Layout
Please refer to the Agent Work Layout section of the Configuration page.
Additional Media Settings
End Media Task From Gadget
If checked, a button is displayed on the gadget that ends an Omni Work Item and removes it from the Omni Widget.
Disabled Media Actions
Chat Item Reject: If checked button to reject Chats is disabled.Ticket Item Reject: If checked button to reject Tickets is disabled.Task Screen Pop: If unchecked, new tasks pop to the screen. If checked, new task will not screen pop.