Call Control
This guide describes how to handle calls with the b+s Connects for Microsoft Dynamics gadget.
Each active call in the gadget is shown as a so called "work item". These items are displayed at the bottom of the gadget and contain the name or, if the conversation partner is not yet known, the phone number.
Incoming Call
To be able to receive a routed incoming call, the agent state must be Ready.
Direct calls to an agent are possible when agents are in both Ready or Not Ready states.
Participant lookup - Multi-match
It is possible that multiple matches for the calling number are returned.
You can then use the radio buttons to choose the caller to associate with that particular call. In addition, it is possible to choose an incident, task, or case, if the participant lookup is configured accordingly.
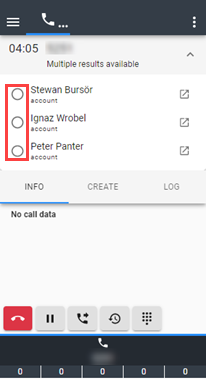
The item selected is then automatically associated with the phone call log (if the selected record type can be associated).
Outgoing Call
b+s Connects for Dynamics provides several ways to initiate an outgoing call.
To be able to dial out, the agent state must be Not Ready.
Since Finesse version 12.5 it is also possible to dial out from agent state Ready.
Enter a phone number to make a new outgoing call
- Enter the phone number of the person / company to be called (including any dial prefix necessary)
- Press the Call button
The b+s Connects solution automatically removes all characters except numbers, hashtags (#), asterisks (*), commas (,) and leading plus signs (+). It also removes the first occurrence of (0).
Search for the person / company to call
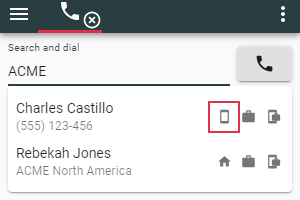
- Enter the search string (e.g. name, parts of the phone number, company etc.) in the search field
- Press one of the phone icons (hover over the icon to see the number) to initiate the call
Initiate a call via Speed Dial list
Speed Dial numbers allow an agent to quickly dial, consult, direct transfer or single step conference a call without having to look the number up in CRM or b+s Connects.
The Speed Dial numbers are shown on the b+s Connects home screen to let the agent initiate a call to a pre-configured number. During a call, the Speed Dial numbers are shown on the work item and allow an agent to consult another party, transfer the call or conference in another party with just one click.
From the Home screen
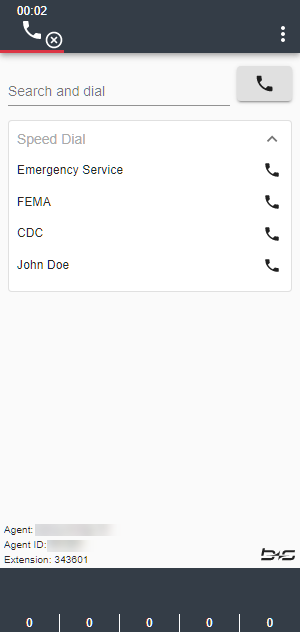
On the home screen all available Speed Dial numbers are listed, clicking on any of these entries calls the configured number. Configured Speed Dial numbers for Consult, Direct Transfer or Single Step Conference are displayed as normal dial numbers.
Duplicate entries in the Speed Dial list are reduced to one entry. "Duplicate entries" in this regard means: entries with the same description and the same number but regardless of their type.
The list of Speed Dial numbers can be collapsed/expanded by the agent. The Speed Dial numbers are not available on the home screen during an active call.
On a work item
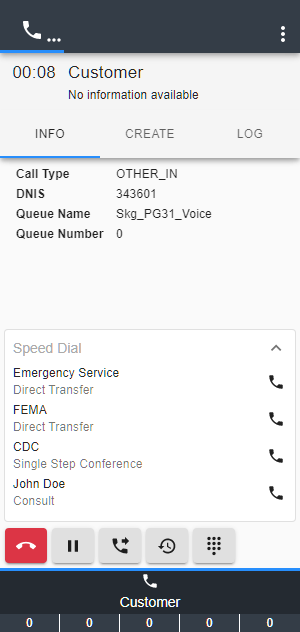
On an established work item, the Speed Dial numbers are visible (order as configured in the Service Layout). As long as the work item is alerting, the Speed Dial numbers are not displayed in order to maximize the space available for call data. During the call, the Speed Dial numbers can be collapsed/expanded by the agent.
Clicking on any of these entries carries out one of the following functions on the currently active work item:
- Direct Transfer: Transfers the work item (call) to the configured number.
- Single Step Conference: Initiates a consultation call to the configured number and completes the conference as soon as the consulted party answers the call.
- Consult: Initiates a consultation call to the configured number.
Initiate an outgoing call from Dynamics (Click-to-dial)
Clicking on the phone icons next to phone number fields within Dynamics will initiate a new outgoing call or a consultation call if there is already an active call.
Campaign Call
With outbound campaigns, contact centers can call out to a predefined list of customers or potential customers. In most campaign modes, the handling of these campaign calls for the agent is identical to the handling of normal incoming customer calls. However, campaign calls have some additional options and this chapter explains the differences.
Reservation Call
A reservation call is presented only when the campaign mode is set to Preview/DirectPreview.
The reservation call can be accepted or rejected by utilizing the call control buttons.
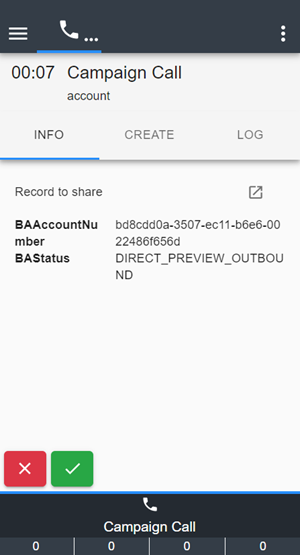
The reject button opens a menu with two options:
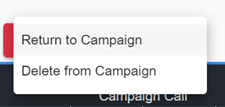
| Value | Description |
|---|---|
Return to Campaign | The call will be offered to the next available agent. |
Delete from Campaign | The call will be removed from the campaign list. |
Callback
If the called customer currently doesn't have time to talk, but wants to be called later, you can schedule a callback at a specific time. It is also possible to change the phone number to be used for that later call.
Schedule a callback
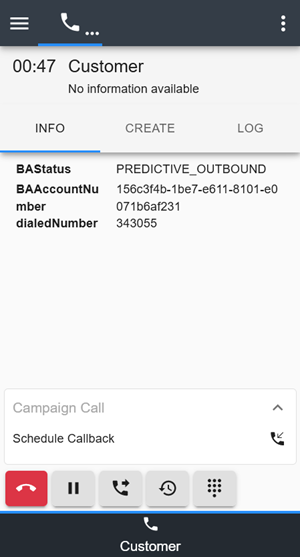
To schedule a callback, press the Schedule Callback button on the Campaign Call card.
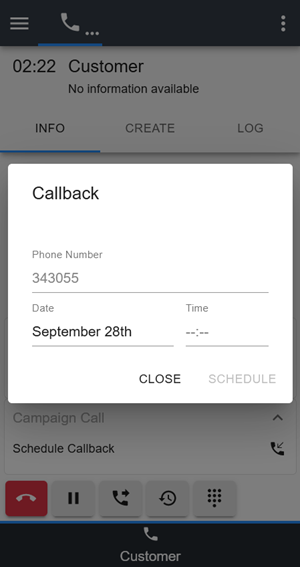
A window appears, where you can select date and time and optionally change the phone number. The selected callback time and date must be in the future, otherwise the SCHEDULE button is not enabled.
By pressing the CLOSE button or by clicking outside of the window, you can leave the form without scheduling a callback.
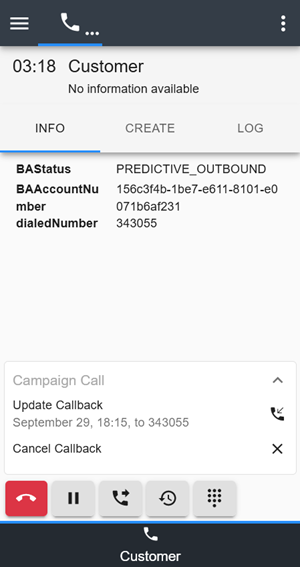
Once a callback is scheduled, the Campaign Call card contains the two buttons Update Callback and Cancel Callback.
Modify the callback
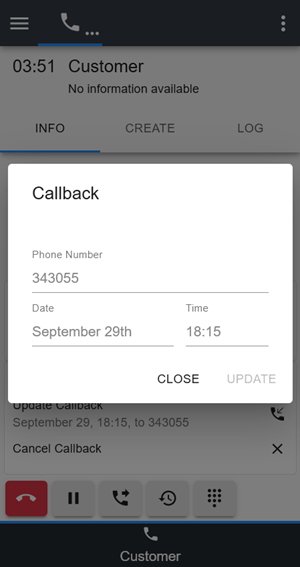
To change the phone number, date or time of the callback, click on Update Callback. The same window, as already used to schedule the callback, appears again. You need to change at least one of the fields in order to enable the UPDATE button.
The callback time and date must be in the future, otherwise the UPDATE button is also not enabled.
By pressing the CLOSE button or by clicking outside of the window, you can leave the form without changing the scheduled callback.
Delete the callback
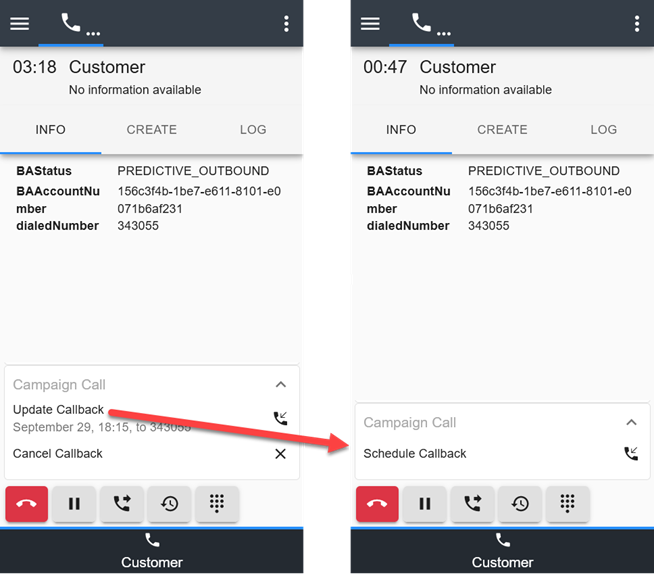
To delete the scheduled callback, click the Cancel Callback button. The scheduled callback will then be removed immediately without additional confirmation.
The original Schedule Callback button then reappears, as if you had never scheduled a callback.
Reclassify
Reclassify is only available when the campaign mode is set to DirectPreview.
If the dialed campaign call does not reach the customer, the agent can select a reason why. Depending on that classification, the system may try to call that customer later again.
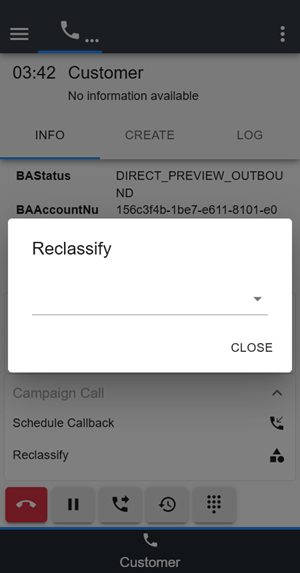
To reclassify the campaign call, press the Reclassify button on the Campaign Call card.
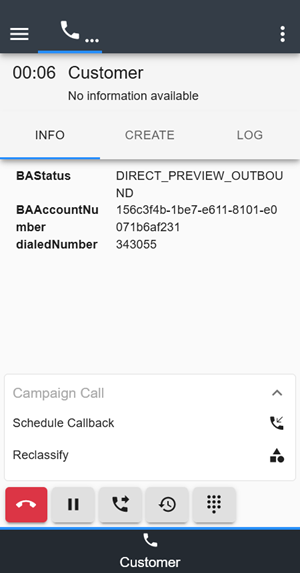
A window appears, where you can select one of the following classifications from the dropdown list:
| Value | Description |
|---|---|
Voice | The customer answered the call. |
Fax | A fax machine answered the call. |
Answering Machine | An answering machine answered the call. |
Invalid | The dialed number was invalid. |
Busy | The dialed number was busy (UCCX only). |
By pressing the CLOSE button or by clicking outside of the window, you can leave the form without reclassifying the call.
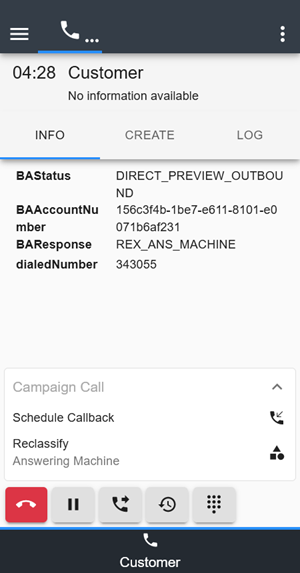
Once you have reclassified the call, the Reclassify button will also display the selected classification. You can press the button again to change the previously selected value.
Multiple concurrent calls
When handling more than one call at a time, you can navigate between the calls by clicking on the corresponding work item.
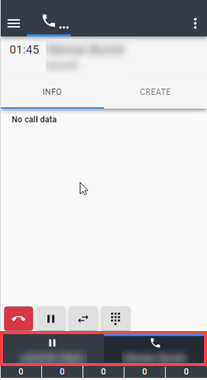
b+s Connects for Microsoft Dynamics has a different work flow than Cisco Finesse. This means that with this gadget, transfer, conference, or consultation calls are initiated on the active work item.
Work item timers
There are two timers available for work items. All timers are updated every second as long as the time is under one hour. After that they update every minute.
Call is active
During an active work item (e.g. when a call is established) a timer starts to count in the header view of the corresponding work item.
This timer is visible and increments as long as the work item is active or on hold.
The duration timer is shown throughout the complete lifetime of the work item (including Wrap-Up). The timer doesn't start when the item is presented to the agent but only if they accept it.
In these cases the timer is replaced by an icon.
Call is on hold
If the work item is set to hold, a second timer starts to increment. Next to this timer a little pause icon is displayed. The hold timer starts with 0 every time the work item is set to hold and it does not accumulate the total paused time.
Call is in Wrap-Up
The Wrap-Up timer starts to count as soon as an item ends and enters the Wrap-Up state.
With Cisco Finesse 12 or higher the counter starts running backwards and shows the remaining time before the Wrap-Up state ends.
In earlier versions the counter incremented every second and showed how long the agent was already in Wrap-Up state.
Record share
When a consultation call occurs, both agents will see a link to the phone call record on the associated call's INFO tab.
For direct transfers or transferred consultation calls, this link can also be seen on the customer call for the second agent. This makes it possible for the consulted agent to see the call notes and assignments the first agent made by simply clicking on the icon next to the shared record.
Call Tabs
For every call, detailed information and advanced options are available. Everything call related is organized into three different tabs.
Info Tab
Information collected from the person who is calling is displayed here.
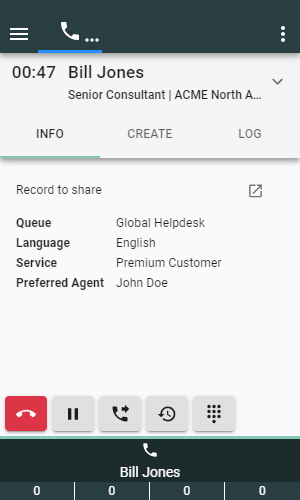
At the top of this tab the Record to share appears. By clicking the icon next to it, the Dynamics phone call record with all attached data and possible notes from other agents will open. This is especially useful for transferred calls.
Cisco Contact Center configured call data can be displayed here, in order to see more information about who is calling and what the call is about.
Create Tab
Customers may call to report a new concern. Depending on the organization, new records in Dynamics must be created which keep track of the customers concerns. For scenarios like these, b+s Connects for Dynamics provides a handy way to create new records by using the CREATE tab.
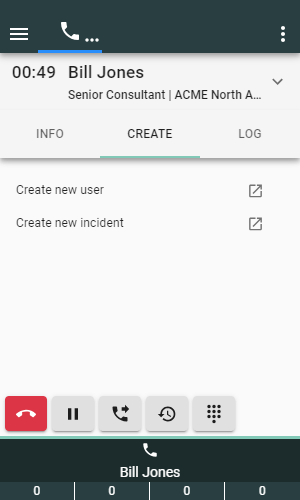
An administrator can configure different entries to make it easier to create new records within Dynamics with prefilled data such as the found participant (caller). The prefilled data will always originate from the currently selected work item. When on multiple concurrent calls, make sure to select the right one before creating a new record. It is also possible to create dynamic links that open an external website in a new browser tab.
Log Tab
Customer concerns can easily be documented in a phonecall record by using the LOG tab.
How to assign a record to a phone call
Depending on the type, a record can be manually assigned to Call To, Call From or Regarding. Contacts, Accounts, Leads and Systemusers will be assigned to the Call To or Call From field. All other allowed records will be assigned to the Regarding field.
Step 1: Open a record in your Dynamics instance.
Step 2: Open the "Associate" section in the Log Tab of the b+s Connects gadget.
Step 3: Click the assign button in order to assign the currently opened record.
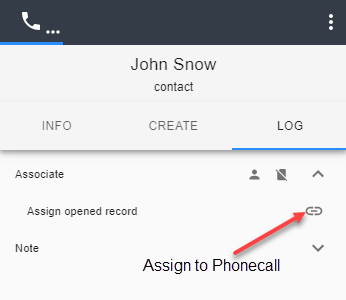
When manually assigning a record while having an exact lookup match and reloading b+s Connects, the manually assigned record is overwritten with the lookup match.
View the phone call log or associated records
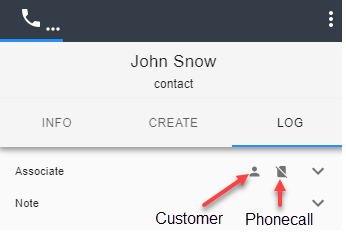
The assigned records and the phone call log are displayed in the "Associate" section of the Log Tab.
The phone call log and the associated records are assigned to the categories: User, Company, Task and Other. Click a category to display the associated record or phone call log.
Phonecall Record
A phonecall record is created when a new work item is created (call is ringing).
The fields of the record will be automatically updated as outlined below.
Call starts
The fields Subject, Phone Number, Direction and Call State are filled out.
Depending on the type of an identified record, the fields Call To, Call From and Regarding are filled out automatically.
Contacts, Accounts, Leads and Systemusers will be assigned to the Call To or Call From field. All other allowed records will be assigned to the Regarding field.
Call is active
The field Call State is updated.
Call ends
When a call is hung-up or the wrap-up time has elapsed, various details associated with the call are stored. These details include the Duration, Call State, Start Date and Time, End Date and Time, Duration on Hold (in seconds), Times on Hold, and any other configurable fields. If enabled, the phonecall record is then marked as complete.
If you see an incorrect date/time in the Start Date and Time or End Date and Time, make sure the time zone setting reflects your time zone (Settings cogwheel -> Personalization, General Tab -> Set the time zone you are in).
If call recording is enabled the URL to the recorded call is stored.
Call is transferred
When the call is transferred, the agent receiving the customer call is assigned to the Call To or Call From field (depending on the direction).
When the agent talking to the customer consults another agent (i.e. agent 2), b+s Connects might assign Call To and Call From automatically if agent 2 has a single match or agent 2 selects a record from the multi match result manually (this most likely happens when the consultation call is made to a Cisco queue).
When the agent, who initially handled the customer, leaves a conference and there are only 2 participants left (customer and another agent with b+s Connects), the remaining agent is assigned to the Call To or Call From field (depending on the direction).
Consultation Call
The following table shows how to initiate a consultation call. Consultation Calls are used to consult with a coworker or supervisor while keeping the customer call on hold.
| Icon | Description |
|---|---|
| Press the Initiate New Consultation call button | |
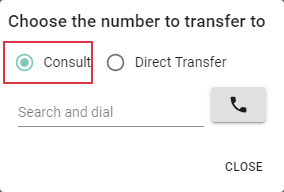 | Select Consult |
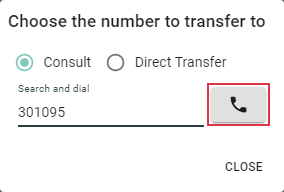 | Either enter the number to dial and press the call button ... |
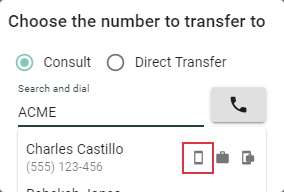 | ... or search in the directory and click on one of the phone icons |
Direct Transfer
Direct Transfers are used to directly transfer a customer to a coworker or supervisor. When calls are transferred directly, customers will hear the call ring prior to the coworker / supervisor accepting the call.
| Icon | Description |
|---|---|
| Press the Initiate New Consultation call button | |
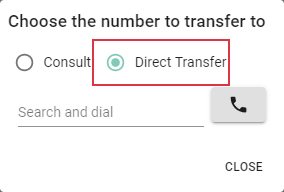 | Select Direct Transfer |
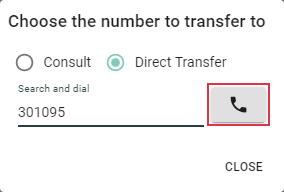 | Either enter the number to dial and press the call button ... |
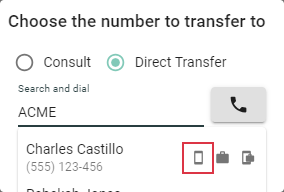 | ... or search in the directory and click on one of the phone icons |
Warm Transfer / Conference
In order to transfer a customer to the consulted coworker / supervisor or to start a conference it is necessary to first place a consultation call. When transferring to a consulted coworker / supervisor, customers will not have to wait for the call to be accepted by the consulted party.
| Icon | Description |
|---|---|
| Press the Call through / Conference button | |
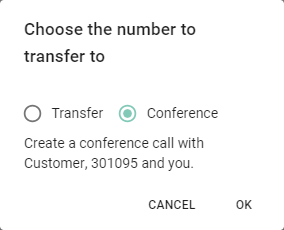 | Choose the mode (Transfer or Conference) and click OK |
Wrap-Up
The state Wrap-Up provides extra time to finish work after a call has ended. If Wrap-Up is not configured for your agent in Cisco, the following information may not be displayed.
| Icon | Description |
|---|---|
| Request Wrap-Up | |
| Wrap-Up requested |
By clicking the yellow Wrap-Up button again, a Wrap-Up reason can be selected during the call.
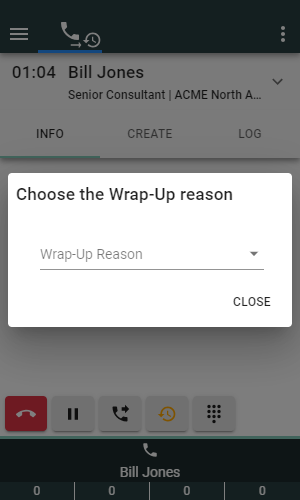
The Wrap-Up timer starts to count as soon as the call ends. The call is then in Wrap-Up state.
While in Wrap-Up, a Wrap-Up reason can be selected. The channel button in the header indicates if the agent state will be set to Ready or Not Ready after Wrap-Up has ended.
When the timer expires, the agent state is automatically set to the state before the call. If the Wrap-Up state is intended to be left before the timer expires, the agent state can be changed directly to Ready or Not Ready:
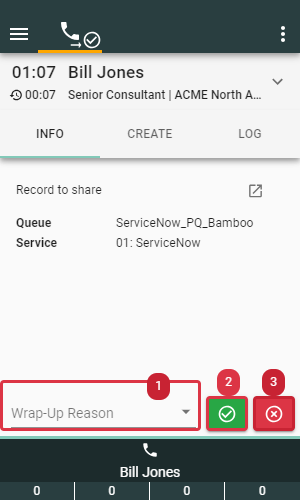
- Select the Wrap-Up reason
- End Wrap-Up and go to
Ready - End Wrap-Up and go to
Not Ready
Number Pad
By clicking on the call control button, a number pad is shown on the agent's gadget. It is only available during active incoming or outgoing calls and is meant to send DTMF tones. It can be controlled by mouse and keyboard.
Letters can also be used to send the DTMF tones. When typing a letter on the keyboard, it will be converted into the corresponding number that is shown on the number pad.
For example: "A" becomes a 2, "M" becomes a 6 and "W" will be converted into the number 9 and so on.
Note that the dial pad cannot be used to initiate new calls and it is not possible to delete numbers that have already been sent.
Call Recording
Call recording allows calls to be recorded and stored for future quality assurance.
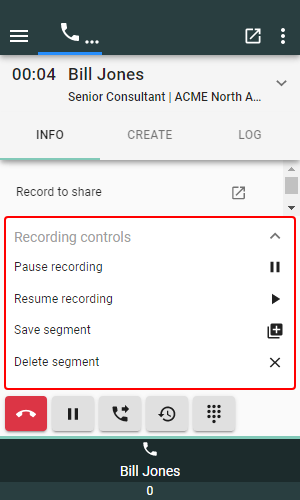
When call recording is set up and activated for you and a call is active, additional options are displayed in a card named Recording controls.
The card is initially collapsed and can be expanded to see the available recording commands.
Start Recording
This recording option starts the recording if it is not yet started automatically.
Pause Recording
This recording option pauses the active recording. This can be helpful when customers divulge confidential information (e.g. passwords or credit card information) that should not be recorded.
Resume Recording
This recording option resumes an active recording. The resulting recording will still be contained within one file.
Save segment
This recording option saves the recording from the beginning or last saved segment up to the current time and starts a new segment.
Delete segment
This recording option deletes the recording from the beginning or last segment up to the current time and starts a new segment.
Recording playback access
If your administrator has set up storing of the recording URLs for you, a link to the recording will be available on the Phonecall Record after the current call has ended.