Call Control
Starting with the 'Cheetah' release, the use of b+s Connects for ServiceNow with Cisco Webex Contact Centers is deprecated.
Instead, please use the 'Cisco Webex Contact Center' integration from Cisco for new deployments.
This guide describes how to handle calls with the b+s Connects for ServiceNow gadget.
Each active call in the gadget is shown as a so called "work item". These items are displayed at the bottom of the gadget and contain the name or, if the conversation partner is not yet known, the phone number. Different symbols are displayed to indicate if the call is active or on hold/paused.
Incoming Call
To be able to receive a routed incoming call, the agent state must be Available.
Your phone (hard- or softphone) must be used to accept incoming calls. Once the call is established and displayed on the b+s Connects gadget, only the b+s Connects Gadget should be used to control calls.
Direct calls to an agent are possible when agents are in Available and Unavailable states.
Outgoing Call
b+s Connects for ServiceNow provides several ways to initiate an outgoing call.
Enter a phone number to make a new outgoing call
- Enter the phone number of the person / company to be called (including any dial prefix necessary)
- Press the Call button
The b+s Connects solution automatically removes all characters except numbers, hashtags (#), asterisks (*), commas (,) and leading plus signs (+). It also removes the first occurrence of (0).
If the search field is not displayed, Outdial is disabled in your WxCC Desktop Profile. Contact your administrator to configure the Dial Plan to allow outgoing calls.
Search for the person / company to call
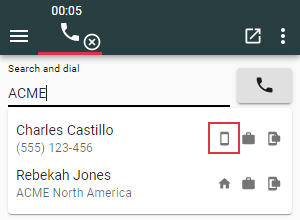
- Enter the search string (e.g. name, parts of the phone number, company etc.) in the search field
- Press one of the phone icons (hover over the icon to see the number) to initiate the call
Initiate an outgoing call from ServiceNow (Click-to-dial)
Clicking on the phone icons next to phone number fields within ServiceNow will initiate a new outgoing call or a consultation call if there is already an active call.
If the call is initiated on a task object, (e.g. case or incident), the object will automatically be associated to the corresponding interaction.
There are some limitations with automatic associations of interactions to task objects. See chapter Associations and ask your ServiceNow administrator for further assistance.
Multiple concurrent calls
When handling more than one call at a time, you can navigate between the calls by clicking on the corresponding work item.
The b+s Connects for ServiceNow gadget has a different work flow to the original WxCC Desktop by Cisco. This means that with this gadget, transfer, conference, or consultation calls are generated on the active work item.
Possible Call States
| Icon | Description |
|---|---|
| Call is ringing | |
| Call is active | |
| Call is on hold | |
| Call is in Wrap-Up |
Work item timers
There are three timers available for work items. All timers are updated every second as long as the elapsed time is under one hour. After that they update every minute.
Call is active
During an active work item (e.g. when a call is established) a timer starts to count in the header view of the corresponding work item.
This timer is visible and increments as long as the work item is active or on hold.
The duration timer is shown throughout the complete lifetime of the workitem (including Wrap-Up). The timer doesn't start when the item is presented to the agent but only if they accept it.
In these cases the timer is replaced by an icon.
Call is on hold
If the work item is set to hold, a second timer starts to increment. Next to this timer a little pause icon is displayed.
The hold timer starts from 0 every time the work item is set to hold and it does not accumulate the total paused time.
Call is in Wrap-Up
The Wrap-Up timer starts to count as soon as an item ends and enters the Wrap-Up state.
Call Buttons
Like on a smart phone, calls are controlled by pressing the appropriate button:
| Icon | Description |
|---|---|
| Answer call | |
| Hang up (end) call | |
| Set call on hold | |
| Retrieve call from hold | |
| Initiate new consultation call | |
| Put through / conference call | |
| Transfer and leave conference | |
| Pause recording | |
| Resume recording |
Call tabs
For every call, detailed information and advanced options are available. Everything call related is organized into three different tabs.
Info Tab
Information collected from the person who is calling is displayed here.
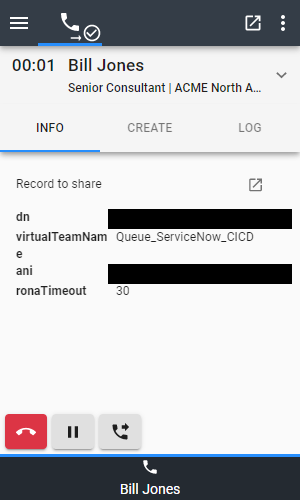
- At the top of this tab the Record to share appears. By clicking the icon next to it, the ServiceNow interaction record with all attached data and possible notes from other agents will open. This is especially useful for transferred calls.
Depending on your configuration, the Record to share may not be available.
- Cisco Contact Center configured call data can be displayed here, in order to see more information about who is calling and what it is about.
Create tab
Customers may call to report a new concern. Depending on the organization, new records in ServiceNow must be created which keep track of the customers concerns. For scenarios like these, b+s Connects for ServiceNow provides a handy way to create new records by using the CREATE tab.
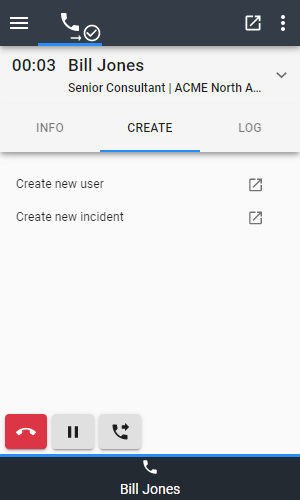
An administrator can configure different entries to make it easier to create new records within ServiceNow with prefilled data such as the found participant (caller). It is also possible to create dynamic links that open an external website in a new browser tab.
Log tab
Customer concerns can easily be documented in ServiceNow by using the LOG tab.
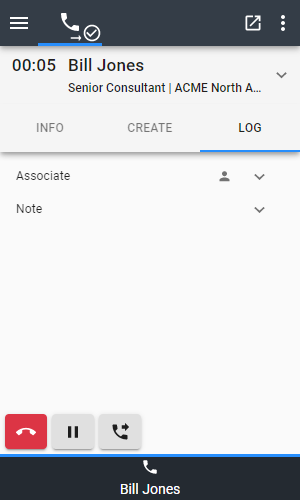
This tab contains two sections which can be expanded by clicking on the arrow on the right.
Depending on your configuration, the LOG tab may not be available.
Associate
ServiceNow Records which are related to the current call are shown here.
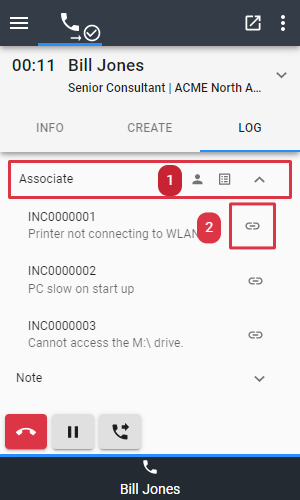
- Shows records which are already assigned to this call. See Associations for more information.
- Ability to manually associate a record in case customers call because of a previously reported concern.
Note
If customers provide additional details regarding their concern, a note can be created directly from within the gadget.
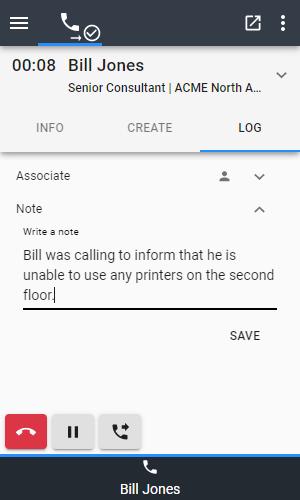
This note will be written as a work note to the interaction and cannot be changed once it is saved.
Consultation Call
The following table shows how to initiate a consultation call. Consultation Calls are used to consult a coworker or supervisor while keeping the customer call on hold.
| Icon | Description |
|---|---|
| Press the Initiate New Consultation call button | |
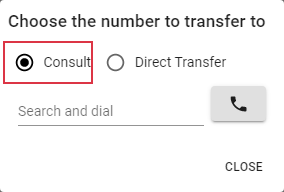 | Select Consult |
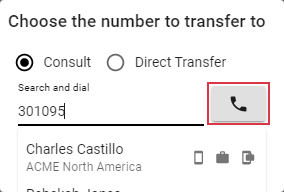 | Either enter the number to dial and press the call button ... |
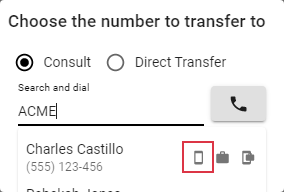 | ... or search in the directory and click on one of the phone icons |
It is not recommended to reload the gadget when handling an incoming or outgoing consultation call as this can lead to unexpected behavior.
Direct Transfer
Direct Transfers are used to directly transfer a customer to a coworker or supervisor. When calls are transferred directly, customers will hear the call ring prior to the coworker / supervisor accepting the call.
If this option is not available, direct transfer has been disabled by your ServiceNow administrator.
| Icon | Description |
|---|---|
| Press the Initiate New Consultation call button | |
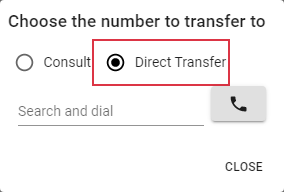 | Select Direct Transfer |
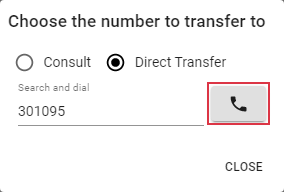 | Either enter the number to dial and press the call button ... |
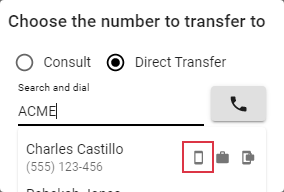 | ... or search in the directory and click on one of the phone icons |
Conference
To start a conference with the customer and a consulted coworker/supervisor, it is necessary to first place a consultation call.
| Icon | Description |
|---|---|
| Press the Call through / Conference button | |
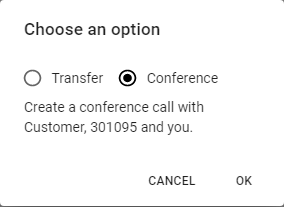 | Select Conference and click OK |
Leave / End Conference
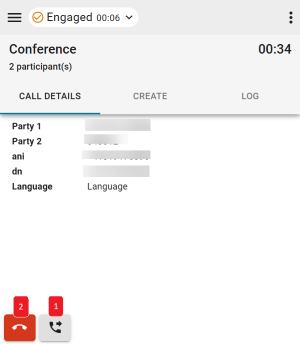
- To exit the conference, the
Leave Conferencebutton can be used. - In order to end the conference call for all participants, the
Endbutton can be used. If the call is ended for all participants, only the agent who created the conference will be inWrap-Upstate.
Wrap-Up
Wrap-Up provides extra time to finish work after a call has ended.
While in Wrap-Up, a Wrap-Up reason can be selected by using the dropdown menu at the bottom. The channel button in the header indicates whether the agent state will be set to Available or Unavailable after Wrap-Up has ended. The next state can be changed by using the dropdown on the voice channel button.
The Wrap-Up timer starts to count as soon as the actual call ends. The call is then in Wrap-Up state.
When the timer expires, the agent state is automatically set to the state before the call. If the Wrap-Up state is intended to be left before the timer expires, the agent state can be changed directly:
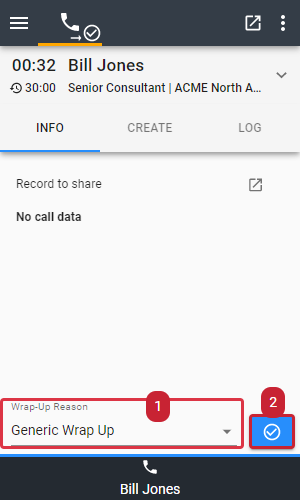
- Select the Wrap-Up reason
- Submit the reason and end Wrap-Up