Configuration
Pre-requisites
In order to authenticate agents in Webex Contact Center, an OAuth app needs to be configured: WxCC OAuth App configuration
Create WxCC credential custom metadata record
In order to connect into your Webex Contact Center, you must create a custom metadata type record:
- From Setup, enter
Custom Metadata typein the Quick Find box, then selectCustom Metadata Types - In the list, find the
WxCC Connection(API Namecnxscv__WxccConnection__mdt) Custom Metadata Type - Click on the
Manage Recordsbutton in front of theWxCC Connectionand thenNew - Enter a name
- Enter the authentication URL and the client secret as defined in WxCC OAuth App configuration
- Click Save.
- Note the
WxCC Connection Name, you need this name in the Contact Center configuration
Configure the Contact Center
A Contact Center definition file specifies a set of fields and values that are used to define a contact center in Salesforce for a particular CTI system. Salesforce uses Contact Center definition files to support the integration with multiple CTI system vendors.
Further information can be found in the Salesforce's official reference (direct link).
Import the Contact Center
Download the latest version of the Contact Center here
- From Setup, enter
Partner Telephony Contact Centersin the Quick Find box, then selectPartner Telephony Contact Centers - The list of the existing (if any) Contact Centers is displayed. Click on the
Newbutton on the right side of the page. - Select
Bucher + Suter | Cisco WxCCas your telephony provider. Then clickNext - A file browser opens. Select the .xml file that contains your contact center definition.
- Click Open. The file is imported.
- Check that your Contact Center is shown in the Contact Centers list view.
Configure the Contact Center
- From Setup, enter
Partner Telephony Contact Centersin the Quick Find box, then selectPartner Telephony Contact Centers - Click on the Contact Center previously imported
- Click on the
Editbutton
Display name
This is the name of the Contact Center that will appear in the list of available Contact Centers. The same Contact Center definition file (.xml) can be imported multiple times and be given different display names.
Required: Yes
Public Key
To use Voice functionalities, a certificate with public and private keys is required.
In order to obtain a private key, it is possible to Generate a Self-Signed Certificate,
Generate a Certificate Signed by a Certificate Authority
or directly import Java keystore files (JKS) or Bouncy castle fips keystore files (BCFKS) using the "Import from keystore" button.
Once the certificate has been generated:
- Click on the Certificate label
- Click on the "Download Certificate" button
- Open the downloaded certificate with a text editor
- Copy its content into the "Public key" field of the Contact Center.
Required: Yes
Webex Contact Center Connection Name
Unique name of the WxCC Connection Custom Meta Data record as configured in Create WxCC credential custom metadata record.
Required: Yes
Certificate Unique Name
The Unique Name of the Self-Signed Certificate created for the Public Key
Required: Yes
Ready State Id
- Open the
Presence Statusespage in Setup - Click on the 'Online' status and copy its Salesforce ID from the URL bar.
- Paste the ID into this field.
Format: Presence status IDs start with 0N5. for example 0N51X0000000AUT.
Required: Yes
Not Ready State Id
- Open the
Presence Statusespage in Setup - Click on the 'Busy' status and copy its Salesforce ID from the URL bar.
- Paste the ID into this field.
Format: Presence status IDs start with 0N5. for example 0N51X0000000AUT.
Required: Yes
Default Cisco Not Ready Reason
Cisco idle code ID which will be used as a default idle code in case no mapping is provided for a certain presence state.
Required: Yes
In order to check the configured idle code IDs, this guide can be referenced.
Presence State Mapping
Used to map the Salesforce Omni Presence Statuses to the Cisco idle codes.
The 'Busy' statuses need to be added:
- Open the
Presence Statusespage in Setup. - Click on one of the 'Busy' statuses and copy its Salesforce ID from the URL bar. Presence status IDs start with
0N5. for example0N51X0000000AUT. - Paste the ID into this field, followed by a comma and the Cisco idle code ID.
- Separated by a semicolon, one or more 'Busy' mappings can be added this way.
Format: busyPresenceID1,ciscoIdleCodeID1;busyPresenceID2,ciscoIdleCodeID2
Example: 0N5FT000000286L,731bbf85-b3a5-4b0e-aaa5-8aea337a2b1c;0N5FT00000028EP,d7b8cc8a-ea3c-41cc-9bc7-3dca6cd549c0
Required: No
For more details about the state mapping, continue reading here.
- Only configure 'Busy' states that require a specific Cisco idle code mapping.
- Default presence states do not need configuration.
- The
RONApresence does not need to be mapped. - If you configured a
Declinestatus in thePresence Configuration, include it in the mapping with a corresponding Cisco idle code.
Call Variable for Voice Call Id
The Call Variable used for storing the ID of the current Voice Call. It is used to correctly update the call state.
Format: Variable name as configured in Webex Contact Center Flow. For example SCV_VoiceCallReference
Required: Yes
Default value: SCV_VoiceCallRecordId
Note: If you have combined the Voice Call record ID and the Vendor Call Key into one flow variable, you can configure its name in this field. See also Flow variable for Voice Call record ID and Vendor Call Key
Call Variable for the Vendor Call Key
The Call Variable used for storing the Vendor Call Key of the current Voice Call. It is used to open the correct voice call record.
Format: Variable name as configured in Webex Contact Center Flow. For example SCV_VendorCallKey
Required: Yes
Default value: SCV_VendorCallKey
Note: If you have combined the Voice Call record ID and the Vendor Call Key into one flow variable, you can leave this field empty, and configure the name of the flow variable with the Voice Call record ID and the Vendor Call Key in the field "Call Variable for Voice Call Id". See also Flow variable for Voice Call record ID and Vendor Call Key
Webex Contact Center Tenant
The tenant is used to determine the Webex Contact Center region. It can be found in the URL of the Webex Contact Center Portal, Dev Portal or Desktop. See this example:
https://devportal.wxcc-eu2.cisco.com/
Format: eu2
Required: Yes
Webex Contact CenterCC WebRTC Domain
The domain is used to establish the correct WebRTC connection. Use the location of your Webex Contact Center tenant:
- US:
rtw.prod-us1.rtmsprod.net - ANZ:
rtw.prod-as1.rtmsprod.net - CA:
rtw.prod-ca1.rtmsprod.net - JP:
rtw.prod-ja1.rtmsprod.net - EU1:
rtw.prod-uk1.rtmsprod.net - EU2:
rtw.prod-gm1.rtmsprod.net
Required: Yes for WebRTC
Dialing Phone Number Translation
Phone number translation rules that are applied to the number before it is dialed.
Required: No
Enable WCCAI Transcription
Used to enable or disable the WCCAI Transcription.
Format: true or false
Required: No
Default value: false
Save Recording Link
Used to save the Webex call recording link in the Voice Call record.
Format: true or false
Required: No
Default value: true
Flags
Semicolon-separated list of feature flags that modify the connector behavior.
Format: Flag1; Flag2
Required: No
Assign users to the Contact Center
- At the bottom of the Contact Center page, click on the
Addbutton under Contact Center Users section. - Click on the + button next to the users that will have access to the open Contact Center
Only the users that have the Contact Center Agent (Partner Telephony)
permission set and have not been already assigned to other Contact Centers will appear in this list.
Language Translation
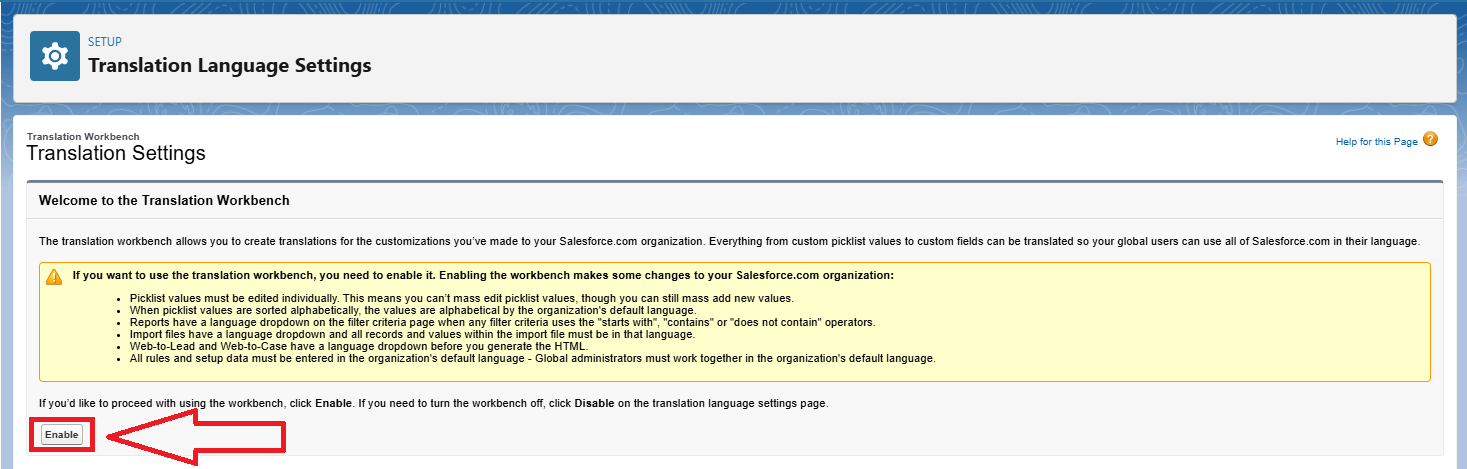
Enable Translation Workbench
In Setup → Translation Workbench → Translation Language Settings
Click the Enable button to select translation language.
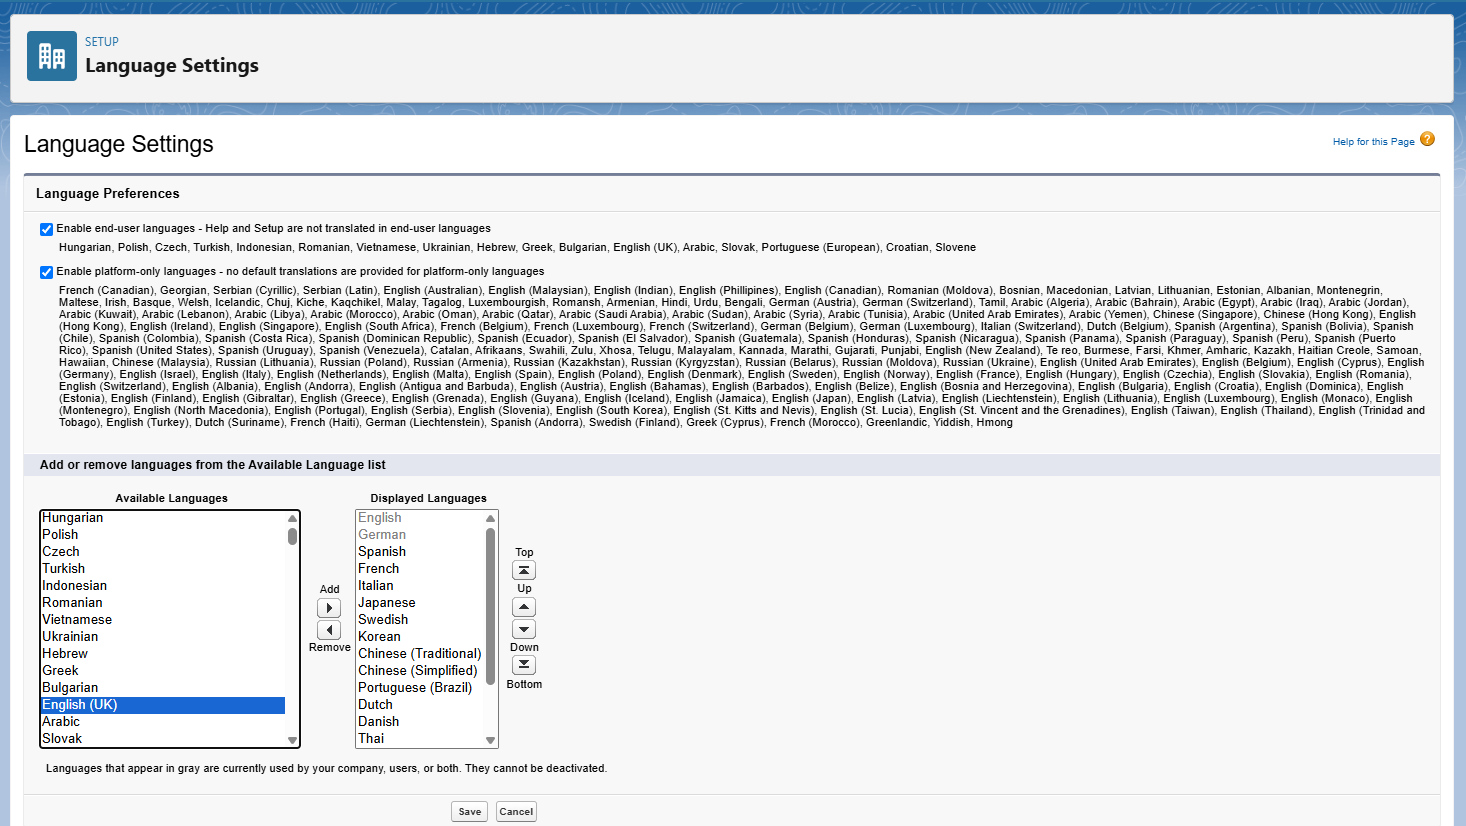
Enable Platform-only languages
In Setup → Company Settings → Language Settings.
Choose the languages that you need.
Select Enable end-user languages - Help and Setup are not translated in end-user languages and
Enable platform-only languages - no default translations are provided for platform-only languages.
Save your changes.
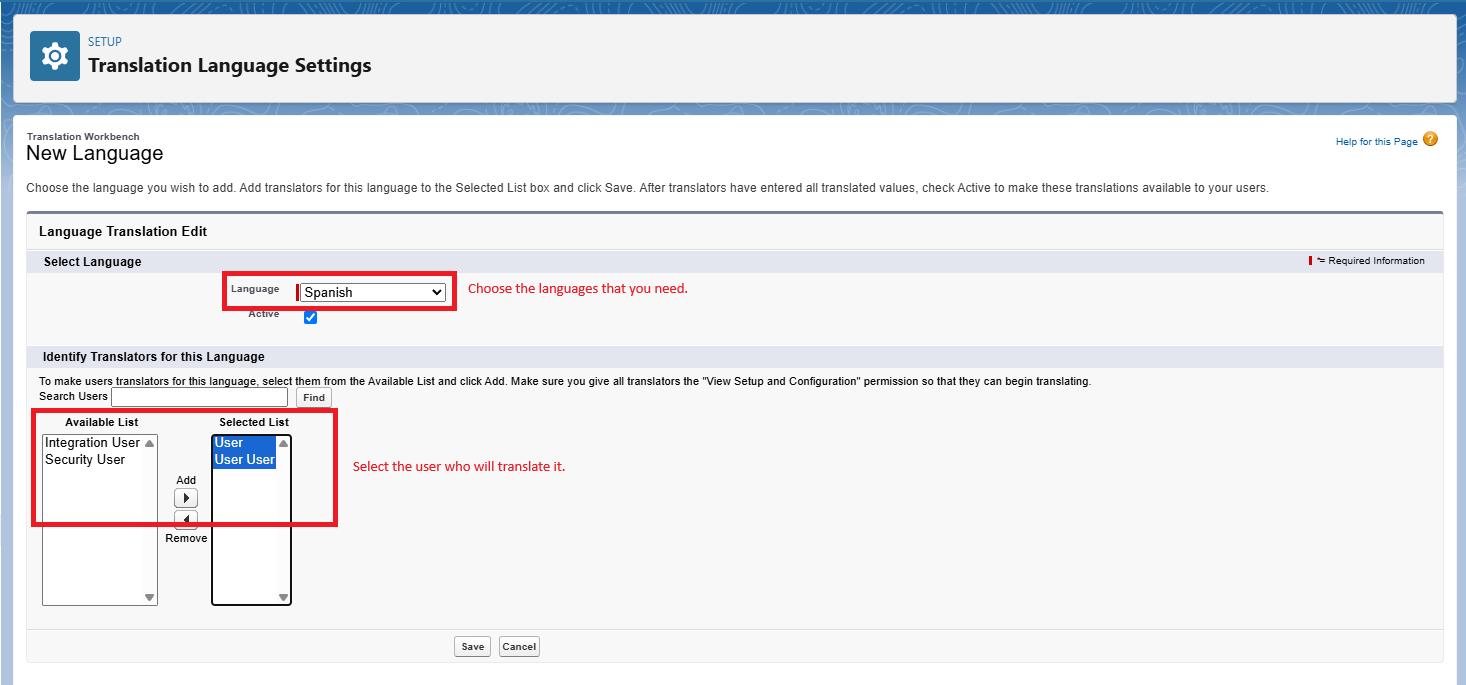
Activate the language and select the user
In Setup → Translation Workbench → Translation Language Settings.
Choose the language and select the user who will translate it.
Save your changes.
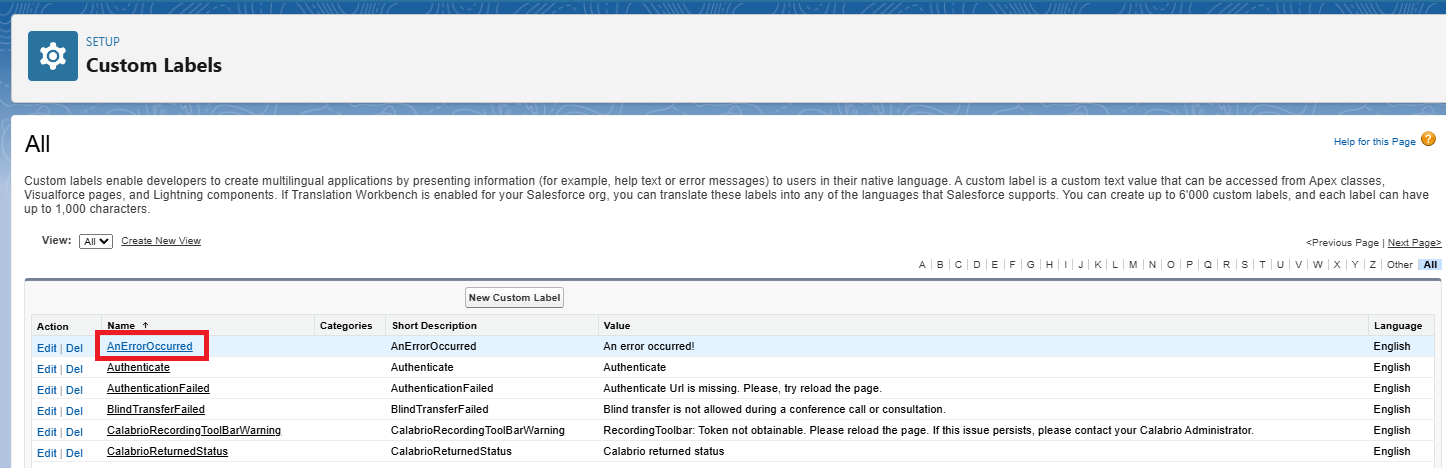
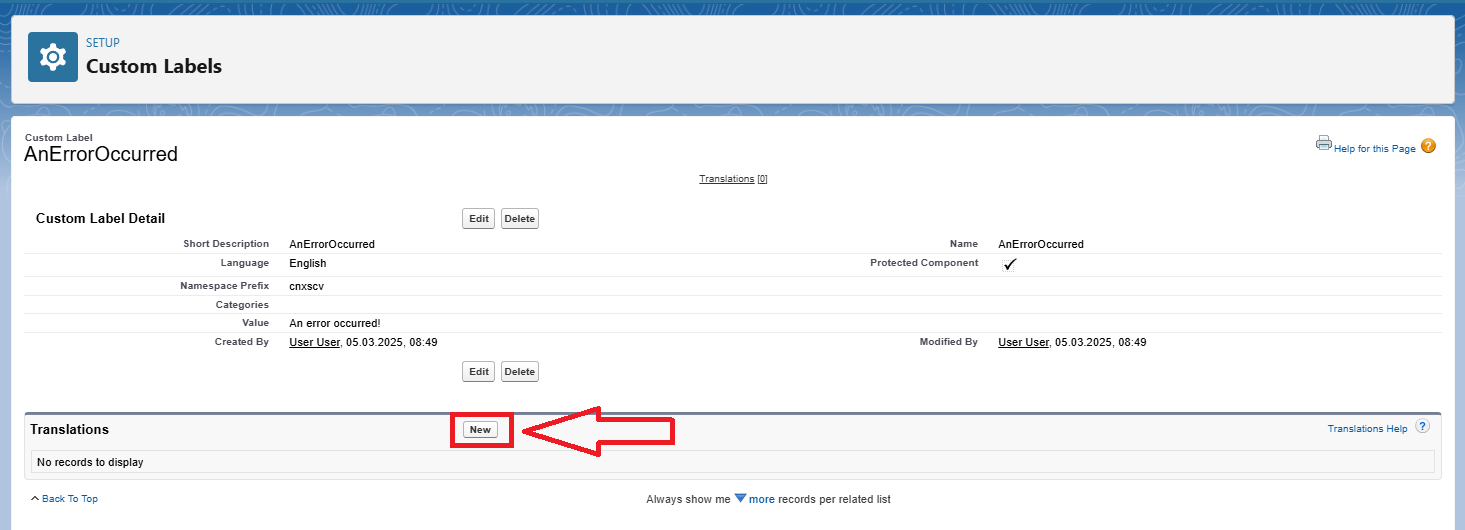
Translate Custom Labels
In Setup → Custom Labels
Select the name of the custom label to open.
In the related Translations list, click New to enter a new translation or Edit, (next to the language), to edit a translation.
Select the Language you are translating into.
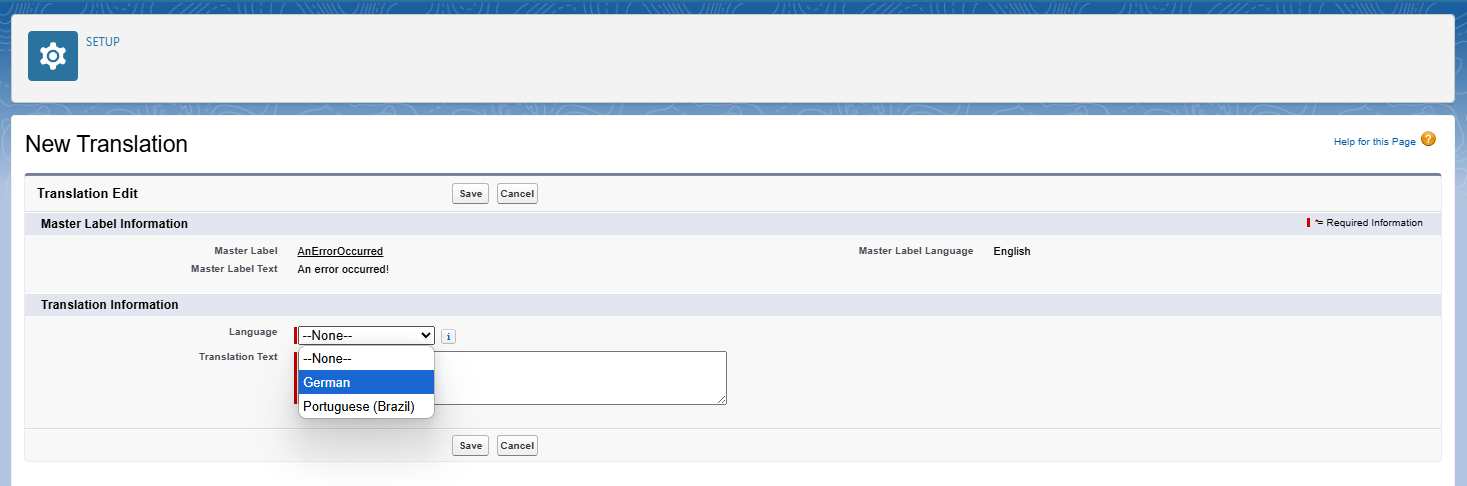
Enter the translated value into the Translation Text field. This text overrides the value specified in the label's Value field when a user's default language is the translation language.
Save your changes.