CCE Routing with Universal Queue
This manual provides information on installing and configuring the Multichannel Add-on for the b+s Connects for Oracle Service Cloud Routing with Universal Queue solution. It contains architectural diagrams and descriptions of the software components, as well as guidelines for installing and setting up the additional components for a multi-channel enabled b+s Connects.
Cisco Contact Center Configuration
The configuration steps for UCCE and PCCE are slightly different.
- For UCCE, continue with Chapter UCCE Configuration
- For PCCE, continue with Chapter PCCE Configuration
After configuring UCCE or PCCE , continue with chapter CCE Script
UCCE Configuration
For the UCCE configuration you will need:
- Unified CCE Administration (web application) at
https://<FQDN>/cceadmin - Configuration Manager on Unified CCE AW-HDS-DDS
- Script Editor on Unified CCE AW-HDS-DDS or Internet Script Editor
- Peripheral Gateway Setup on the Cisco Unified CCE PG server
The following configuration steps are required
- Configure Network VRU for Media Routing
- Configure Media Routing PG and PIM
- Set up the Media Routing PG and PIM
- Add Media Classes
- Media Routing Domains
- Define Application Path and add Application Path Members
- Configure Call Type
- Configure Dialed Number / Script Selector
- Configure Skill Group
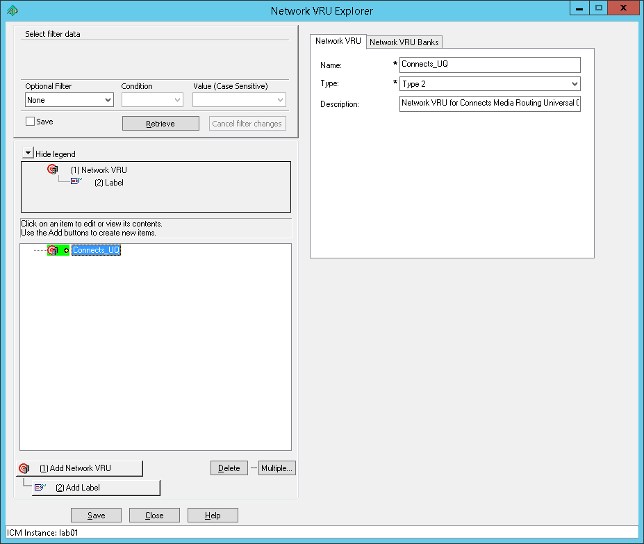
Configure Network VRU for Media Routing
- On Unified CCE AW-HDS-DDS open CCE Configuration Manager > Network VRU Explorer
- Add new Network VRU
- Name: Connects_UQ
- Type: Type 2
- Add Description: Network VRU for Connects Media Routing Universal Queue
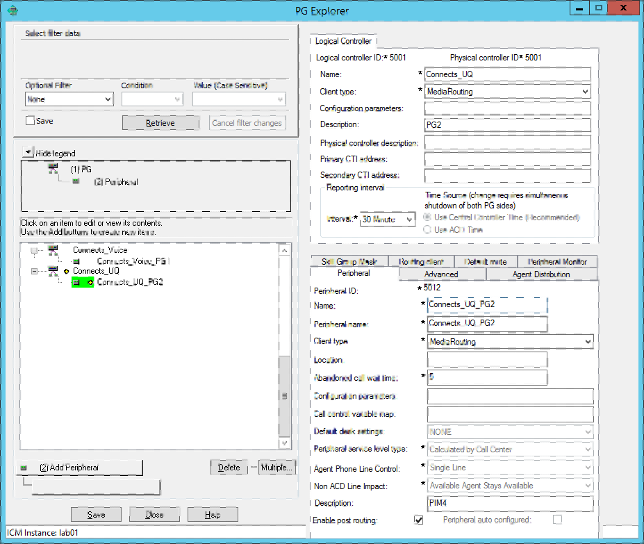
Configure Media Routing PG and PIM
As soon as the new Network VRU is configured, open CCE Configuration Manager > PG Explorer. Create a media routing PIM and routing client for the b+s Harmony Routing Adapter.
- Add PG
- Name: Connects UQ
- Client type: MediaRouting
- Add Peripheral
- On the Peripheral tab
- Name: Connects UQ PG
<MR PG Number> - Client type: MediaRouting
- Check the «Enable post routing» check box.
- Name: Connects UQ PG
- Advanced tab
- Network VRU: select Network VRU configured in the previous step
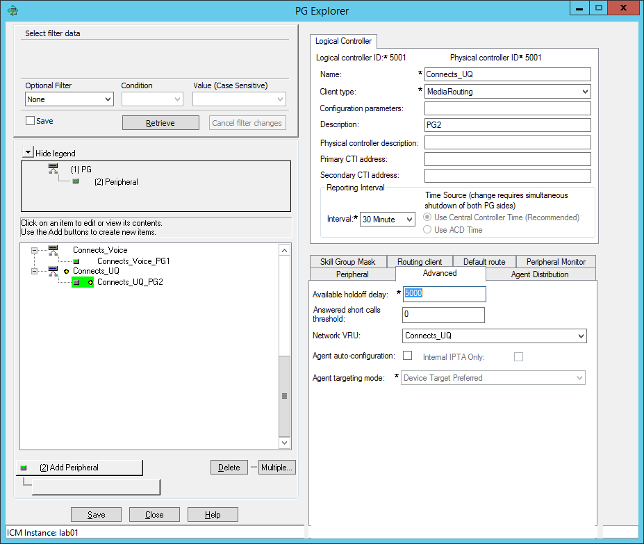
- Routing client tab
- Add values as outlined:
- Name: Connects_UQ_PG2
- Time threshold:
2000 - Late threshold:
1000 - Timeout limit:
10 - Default media routing domain:
NONE - Default call type:
NONE - Dialed Number/Label map:
Do not use DN/Label map - Client Type:
Media Routing - Description:
Routing Client Connects MR (PG2) - Congestion Treatment Mode:
Use System Congestion Control
- Add values as outlined:

Please Note the Logical Controller ID and the Peripheral ID. Both IDs are required for the PG setup.
Set up the Media Routing PG and PIM
Now switch to the Cisco Unified CCE PG server and open Peripheral Gateway Setup in Cisco Unified CCE Tools. Again, perform the following steps:
- On the Components Setup screen, in the Instance Components panel, select the PG Instance component. Click Edit.
- In the Peripheral Gateways Properties screen, click Media Routing. Click Next.
- Click Yes at the prompt to stop the service.
- From the Peripheral Gateway Component Properties screen, click Add, select the next PIM, and configure with the Client Type of Media Routing with the following steps:
- Check Enabled.
- In the Peripheral Name field, enter “Media Routing”.
- In the Peripheral ID field, enter the Peripheral ID for the unused Multichannel peripheral that you completed in previous step.
- For Application Hostname (1), enter the hostname of the b+s Routing Adapter server A.
- By default, b+s Routing Adapter accepts the MR connection on Port 7021. The Application Connection Port (1) setting must match the port setting on the b+s Routing Adapter.
- Configure Application Hostname (2) and Application Connection Port (2) for b+s Routing Adapter server B
- Click OK.
- Accept defaults and click Next until the Setup Complete screen opens.
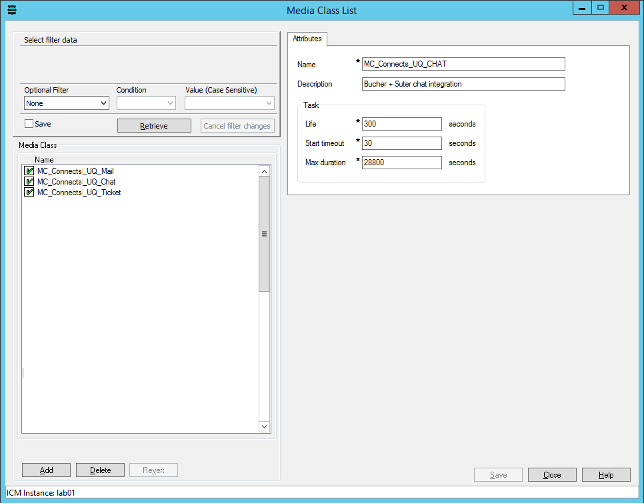
Add Media Classes
Go back to the CCE Configuration Manager in Unified CCE AW-HDS-DDS and open Media Class List. Configure the Media Classes, depending on the solution (mail, chat, ticket)
- For Ticket
- Add new Media Class
- Name: MC_Connects_UQ_Ticket
- Description:
Ticket routing integration for Connects - Life:
300 seconds - Start timeout:
30 seconds - Max duration:
28800 seconds
- For Chat
- Add new Media Class
- Name:
MC_Connects_UQ_Chat - Description:
Chat routing integration for Connects - Life:
300 seconds - Start timeout:
30 seconds - Max duration:
28800 seconds
- For Mail
- Add new Media Class
- Name:
MC_Connects_UQ_Mail - Description:
Mail routing integration for Connects - Life:
300 seconds - Start timeout:
30 seconds - Max duration:
28800 seconds
Media Routing Domain
When the required Media Classes are added, go to open Media Routing Domain List in CCE Configuration Manager of the Unified CCE AW-HDS-DDS. Create the Media Routing Domains, depending on the solution (mail, chat, ticket)
For Ticket
- Add new Media Routing Domain
- Name:
MRD_Connects_UQ_Ticket - Media routing domain ID: is assigned by the system
- Media Class:
MC_Connects_UQ_Ticket - Task Life: (already filled with default from Media Class)
- Task Start timeout: (already filled with default from Media Class – recommended: 5 sec)
- Task Max duration: (already filled with default from Media Class)
- Calls in Queue Max:
<empty> - Calls in Queue Max per call type:
<empty> - Calls in Queue Max time in queue:
<empty> - Service level threshold: 30 (default)
- Service level type: Ignore Abandoned Calls
- Interruptible:
<not selected> - Description:
<empty>
For Chat
- Add new Media Routing Domain
- Name:
MRD_Connects_UQ_Chat - Media routing domain ID: is assigned by the system
- Media Class:
MC_Connects_UQ_Chat - Task Life: (already filled with default from Media Class)
- Task Start timeout: (already filled with default from Media Class – recommended: 5 sec)
- Task Max duration: (already filled with default from Media Class)
- Calls in Queue Max:
<empty> - Calls in Queue Max per call type:
<empty> - Calls in Queue Max time in queue:
<empty> - Service level threshold:
30 (default) - Service level type:
Ignore Abandoned Calls - Interruptible:
<not selected> - Description:
<empty>
For Mail
- Add new Media Routing Domain
- Name:
MRD_Connects_UQ_Mail - Media routing domain ID: is assigned by the system
- Media Class:
MC_Connects_UQ_Mail - Task Life: (already filled with default from Media Class)
- Task Start timeout: (already filled with default from Media Class – recommended: 5 sec)
- Task Max duration: (already filled with default from Media Class)
- Calls in Queue Max:
<empty> - Calls in Queue Max per call type:
<empty> - Calls in Queue Max time in queue:
<empty> - Service level threshold:
30 (default) - Service level type:
Ignore Abandoned Calls - Interruptible:
<not selected> - Description:
<empty>

Please write the configured Media Routing Domain ID’s down. You will need these ID’s later during the installation process of the software.
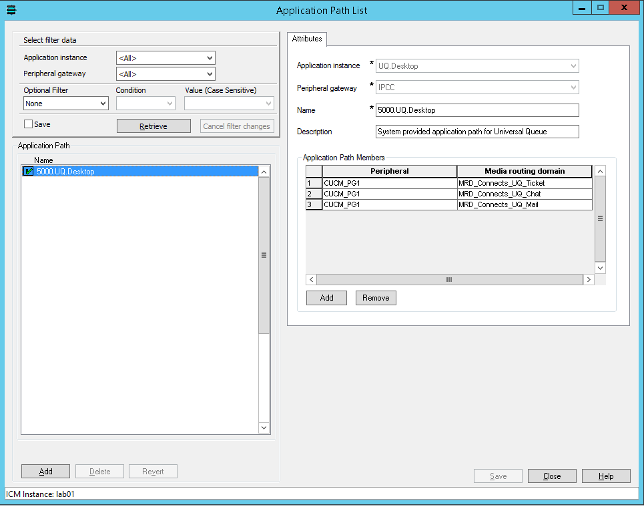
Define Application Path and add Application Path Members
In the Unified CCE AW-HDS-DDS open Application Path List in the CCE Configuration Manager, select the Application Path xxxx.UQ.Desktop that represents your Finesse desktop. xxxx is the “Logical Controller ID” or your voice PG. For example:
- Application Instance:
UQ.Desktop - Peripheral gateway:
CUCM_PG - Name:
5000.UQ.Desktop (cisco_voice PG)
- Add Application Path Members (for Ticket Domain if configured in the previous steps)
- Peripheral:
<select your voice Peripheral> - Media routing domain:
MRD_Connects_UQ_Ticket
- Peripheral:
- Add Application Path Members (for Mail domain if configured in the previous steps)
- Peripheral:
<select your voice Peripheral> - Media routing domain:
MRD_Connects_UQ_Chat
- Peripheral:
- Add Application Path Members (for Mail Domain if configured in the previous steps)
- Peripheral:
<select your voice Peripheral>- Media routing domain:
MRD_Connects_UQ_Mail
- Media routing domain:
- Peripheral:

Configure Dialed Number / Script Selector
Next, open CCE Configuration Manager > Dialed Number / Script Selector List on Unified CCE AW-HDS-DDS. Click New to create a new Script Selector
Script Selector for Ticket:
- Routing Client:
Connects MR(Routing client configured in previous step) - Media Routing Domain:
MRD_Connects_UQ_Ticket(media routing domain configured in previous step) - Dialed Number String:
<dialed number string configured in RoutingAdapter.ini> - Call Type: Call Type configured in previous step
- Routing Client:
Script Selector for Chat
- Routing Client:
Connects MR(Routing client configured in previous step) - Media Routing Domain:
MRD_Connects_UQ_Chat(media routing domain configured in previous step) - Dialed Number String:
<dialed number string configured in RoutingAdapter.ini> - Call Type: Call Type configured in previous step
- Routing Client:
Script Selector for Mail
- Routing Client:
Connects MR(Routing client configured in previous step) - Media Routing Domain:
MRD_Connects_UQ_Mail(media routing domain configured in previous step) - Dialed Number String:
<dialed number string configured in RoutingAdapter.ini> - Call Type: Call Type configured in previous step
- Routing Client:
Configure Skill Group
If media task routing is Skill Group based, open CCE AW-HDS-DDS open CCE Configuration Manager > Skill Group Explorer. Click New to create the new Skill Group. For Media Routing Domain, select one of the Task Routing MRDs you created. Assign agents to the skill group.
PCCE Configuration
For the PCCE configuration you need:
- Unified CCE Administration (web application) at
https://<FQDN>/cceadmin - Configuration Manager on Unified CCE AW-HDS-DDS
- Script Editor on Unified CCE AW-HDS-DDS or Internet Script Editor
- Peripheral Gateway Setup on the Cisco Unified CCE PG server
The following configuration steps are required:
- Determine the Peripheral ID for a Multichannel peripheral
- Set up the Media Routing PG and PIM
- Add b+s RoutingAdapter server(s) as External Machine(s)
- Add Media Routing Domain
- Define Application Path
- Configure Call Type
- Configure Dialed Number / Script Selector
- Configure Skill Group
- Labels
- CCE Script for Media Routing
Determine the Peripheral ID for a Multichannel peripheral
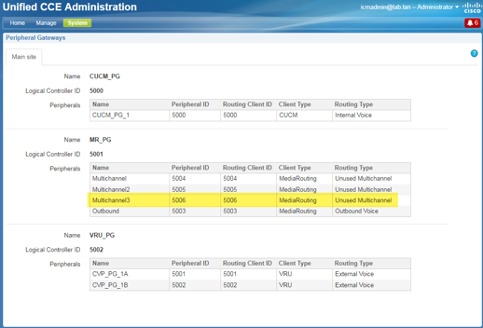
Navigate to Unified CCE Administration > System > Peripheral Gateways. Determine the Peripheral ID for a Multichannel peripheral that is unused.
PCCE has three pre-defined MR PIMs
- Multichannel: pre-defined for ECE
- Multichannel 2: pre-defined for Social Miner
- Multichannel 3: pre-defined for 3rd party integration,
b+s Media Routing use Multichannel 3
Set up the Media Routing PG and PIM
On the Cisco Unified CCE PG server: from Cisco Unified CCE Tools, select Peripheral Gateway Setup.
- On the Components Setup screen, in the Instance Components panel, select the PG Instance component. Click Edit.
- In the Peripheral Gateways Properties screen, click Media Routing. Click Next.
- Click Yes at the prompt to stop the service.
- From the Peripheral Gateway Component Properties screen, click Add, select the next PIM, and configure the Media Routing Client Type as follows.
- Check Enabled.
- In the Peripheral Name field, enter “Media Routing”.
- In the Peripheral ID field, enter the Peripheral ID for the unused Multichannel peripheral that you identified in previous step.
- For Application Hostname (1), enter the hostname of the b+s Routing Adapter server A.
- By default, b+s Routing Adapter accepts the MR connection on Port 7021. The Application Connection Port (1) setting must match the port setting on the Media Manager.
- Configure Application Hostname (2) and Application Connection Port (2) for b+s Routing Adapter server B
- Click OK.
- Accept defaults and click Next until the Setup Complete screen opens.
Add b+s RoutingAdapter server(s) as External Machine(s)
Navigate to Unified CCE Administration > System > Deployment and add b+s Routing Adapter servers as External Machines (3rd Party Multichannel)
Add Media Classes
On the Unified CCE AW-HDS-DDS open CCE Configuration Manager > Media Class List. Configure the Media Classes, depending on the solution (mail, chat, ticket)
- For Ticket
- Add new Media Class
- Name:
MC_Connects_UQ_Ticket - Description:
Ticket routing integration for Connects - Life:
300 seconds - Start timeout:
30 seconds - Max duration:
28800 seconds
- For Chat
- Add new Media Class
- Name:
MC_Connects_UQ_Chat - Description:
Chat routing integration for Connects - Life:
300 seconds - Start timeout:
30 seconds - Max duration:
28800 seconds
- For Mail
- Add new Media Class
- Name:
MC_Connects_UQ_Mail - Description:
Mail routing integration for Connects - Life:
300 seconds - Start timeout:
30 seconds - Max duration:
28800 seconds

Add Media Routing Domain
When the required Media Classes are added, open Media Routing Domain List in CCE Configuration Manager of the Unified CCE AW-HDS-DDS. Configure the Media Routing Domains, depending on the solution (mail, chat, ticket)
- For Ticket
- Add new Media Routing Domain
- Name:
MRD_Connects_UQ_Ticket - Media routing domain ID:
is assigned by the system - Media Class:
MC_Connects_UQ_Ticket - Task Life: (already filled with default from Media Class)
- Task Start timeout: (already filled with default from Media Class – recommended: 5 sec)
- Task Max duration: (already filled with default from Media Class)
- Calls in Queue Max:
<empty> - Calls in Queue Max per call type:
<empty> - Calls in Queue Max time in queue:
<empty> - Service level threshold:
30 (default) - Service level type:
Ignore Abandoned Calls - Interruptible:
<not selected> - Description:
<empty>
- For Chat
- Add new Media Routing Domain
- Name:
MRD_Connects_UQ_Chat - Media routing domain ID: is assigned by the system
- Media Class:
MC_Connects_UQ_Chat - Task Life: (already filled with default from Media Class)
- Task Start timeout: (already filled with default from Media Class – recommended: 5 sec)
- Task Max duration: (already filled with default from Media Class)
- Calls in Queue Max:
<empty> - Calls in Queue Max per call type:
<empty> - Calls in Queue Max time in queue:
<empty> - Service level threshold: 30 (default)
- Service level type: Ignore Abandoned Calls
- Interruptible:
<not selected> - Description:
<empty>
- For Mail
- Add new Media Routing Domain
- Name: MRD_Connects_UQ_Mail
- Media routing domain ID: is assigned by the system
- Media Class: MC_Connects_UQ_Mail
- Task Life: (already filled with default from Media Class)
- Task Start timeout: (already filled with default from Media Class – recommended: 5 sec)
- Task Max duration: (already filled with default from Media Class)
- Calls in Queue Max:
<empty> - Calls in Queue Max per call type:
<empty> - Calls in Queue Max time in queue:
<empty> - Service level threshold:
30(default) - Service level type:
Ignore Abandoned Calls - Interruptible:
<not selected> - Description:
<empty>

Alternatively, navigate to Unified CCE Administration > Manage >Media Routing Domains and click on New. Configure Name, for example “Case”, and select Interruptible if required.
Please write the configured Media Routing Domain ID’s down. You will need these ID’s later during the software installation process.
Define Application Path and add Application Path Members
In the Unified CCE AW-HDS-DDS, open Application Path List in the CCE Configuration Manager. Select Application Path xxxx.UQ.Desktop that represents your Finesse desktop. xxxx is the “Logical Controller ID” or your voice PG. Example
- Application Instance:
UQ.Desktop - Peripheral gateway:
CUCM_PG - Name:
5000.UQ.Desktop(cisco_voice PG)
- Add Application Path Members (for Ticket Domain if configured in the previous steps)
- Peripheral:
<select your voice Peripheral> - Media routing domain:
MRD_Connects_UQ_Ticket
- Peripheral:
- Add Application Path Members (for Mail domain if configured in the previous steps)
- Peripheral:
<select your voice Peripheral> - Media routing domain:
MRD_Connects_UQ_Chat
- Peripheral:
- Add Application Path Members (for Mail Domain if configured in the previous steps)
- Peripheral:
<select your voice Peripheral> - Media routing domain:
MRD_Connects_UQ_Mail
- Peripheral:
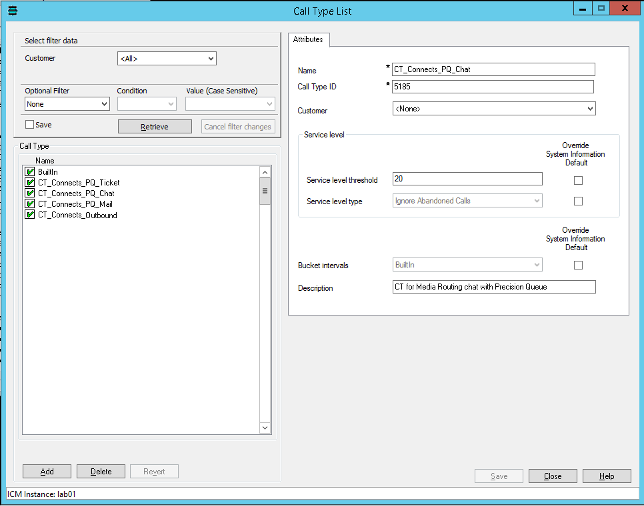
Configure Call Type
When the Application Paths are configured, open Unified Call Type List in the CCE Configuration Manager. Click New to create a new Call Type. For each Call Type configure a Call type name and define a Call Type ID (unique value).
Configure Dialed Number / Script Selector
Navigate to Unified CCE Administration > Manage > Dialed Number. Click New to create the new Script Selector
- Dialed Number String:
<dialed number string configured in RoutingAdapter.ini> - Routing Type:
3rd Party Multichannel - Media Routing Domain: the media routing domain configured in previous step
- Call Type: the Call Type configured in previous step
Configure Skill Group
Navigate to Unified CCE Administration > Manage > Skill Groups. Click New to create Skill Group for Media Routing
- Name:
<name of Skill Group> - Media Routing Domain: the media routing domain configured in previous step
CCE Script
Labels
With UCCE, you can configure global predefined labels that can be used in the different UCCE routing scripts, or you can use Dynamic Labels in the CCE routing script. With PCCE, it is not possible to configure global predefined labels that can be used in the different PCCE routing scripts. For each routing script, the labels must be configured directly in the script editor as Dynamic Labels.
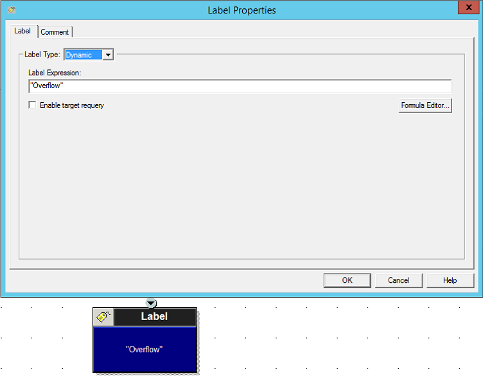
The RoutingAdapter is able to handle labels received from CCE routing script.
| Label | Description |
|---|---|
Overflow | Too many tasks in queue – a task will be rerouted after n seconds (configurable with OverflowDefaultTimeInSec-parameter). |
Overflow_<WaitTimeMin> | Too many tasks in queue – a task will be rerouted after <WaitTimeMin>_minutes (e.g. OVERFLOW_90 initiates reroute after 90 minutes). |
Error | Routing error, cannot be recovered, do not try to reroute again |
End | Delete Task. Do not try to reroute again. No Failure is written. |
Timeout | No agent found – task is rerouted immediately. |
CCE Script
A Script Editor on Unified CCE AW-HDS-DDS or Internet Script Editor. Sample Script to route media tasks:
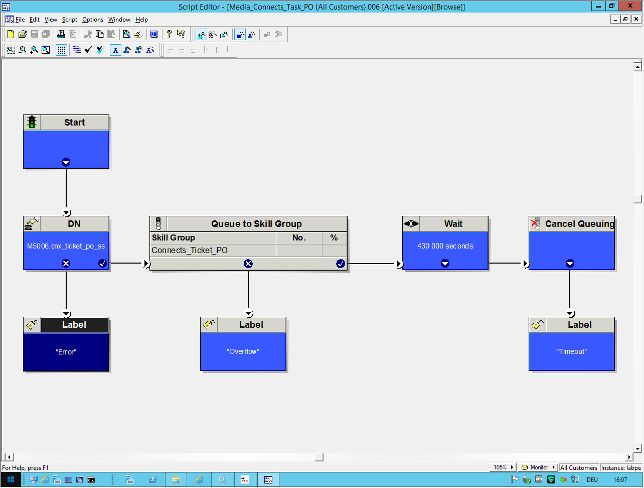
Time in Queue / CCE Script Wait node
After the task is queued, a Wait node is called with a time lower than the system limit (Max-TimeInQueue)
MaxTimeInQueue
The maximum duration of queued tasks of both Routers have to be increased from the default 3600 seconds up to 432'000 seconds (5 days) in the registry (HLM\SW\cisco...\<instance>\RouterA\Router\CurrentVersion\Configuration\Queuing\MaxTimeInQueue).
The settings on the PGs are not relevant in this case and can be kept as they are. The Wait within the script before the task timeout has to be shorter than the MaxTimeInQueue and should be set to a maximum value of 430'000 to ensure the script returns with the Timeout label and is not terminated by the MaxTimeInQueue value.
MaxCalls & MaxCallsPerCallType
The maximum number of calls and tasks summarized for all queues (MaxCalls) and the allowed amount of calls or tasks per CallType (MaxCallsPerCallType) may be easily exceeded with Media Routing (default = 10’000) and cause overflows. These two settings should also be changed in the registry to a value that is expected for the customers contact center (HLM\SW\cisco...\<instance>\RouterA\Router\CurrentVersion\Configuration\Queuing\...)