Step-by-Step
In order to install and use b+s Connects for ServiceNow, the following prerequisites must be met.
- Admin access to the target ServiceNow instance is granted.
- Cisco CCE/CCX is ready for use and agents are able to login and receive calls using the Finesse Agent Desktop.
Activate OpenFrame
b+s Connects for ServiceNow is based on the OpenFrame plugin which ensures that the phone gadget is permanently loaded. OpenFrame provides a communication framework that customer service agents use to place and receive customer calls.
Communication partners can use OpenFrame to integrate telephony systems into the Now Platform. The OpenFrame API can be used to communicate between the ServiceNow platform and the domain opened in the OpenFrame window.
Steps 1-5 below explain how to install and activate the Openframe within a ServiceNow instance.
ServiceNow role required: admin
Step by step instructions:
- Login to ServiceNow Service Management as an administrator.
- Go to "Plugins" by searching in the left panel. Then search for and select "Openframe" within the list of available plugins.
- On the System Plugin overview page, navigate to "Activate/Upgrade" in the lower right corner.
- A pop-up is displayed. Click "Upgrade" to start the activation process.
- After the activation process is complete, click the "Close & Reload Form" button. The OpenFrame plugin is now activated and ready to use.
b+s Connects for ServiceNow comes with a default OpenFrame configuration. It is not necessary to create a separate OpenFrame configuration, except if managing application visibility for ServiceNow users. We recommend using the Roles provided by b+s Connects for ServiceNow.
Activate Interaction Management
b+s Connects for ServiceNow is based on the Interaction Management plugin, which provides a centralized location for all communication channel data in the ServiceNow platform.
Steps 1-4 below explain how to install and activate the Openframe within a ServiceNow instance.
ServiceNow role required: admin
Step by step instructions:
- Login to ServiceNow Service Management as an administrator.
- Go to "Plugins" by searching in the left panel. Then search for "interaction" and select "Interactions Management" within the list of available plugins.
- On the System Plugin overview page, navigate to "Activate/Upgrade" in the lower right corner.
- A pop-up is displayed. Click "Upgrade" to start the activation process.
Install the Scoped Application
The b+s Connects for ServiceNow scoped application must be purchased in the ServiceNow store.
To get to b+s Connects for ServiceNow in the store, follow this link:
The scoped application provides the server-side configuration application as well as the b+s Connects Gadget.
Understanding configuration
The configuration consists of three objects. Contact Centers, Service Layouts, and Agents.
An agent is assigned to one Contact Center record and one Service Layout record. A Contact Center record (Finesse server) or a Service Layout record may be related to many agents.
Contact Centers
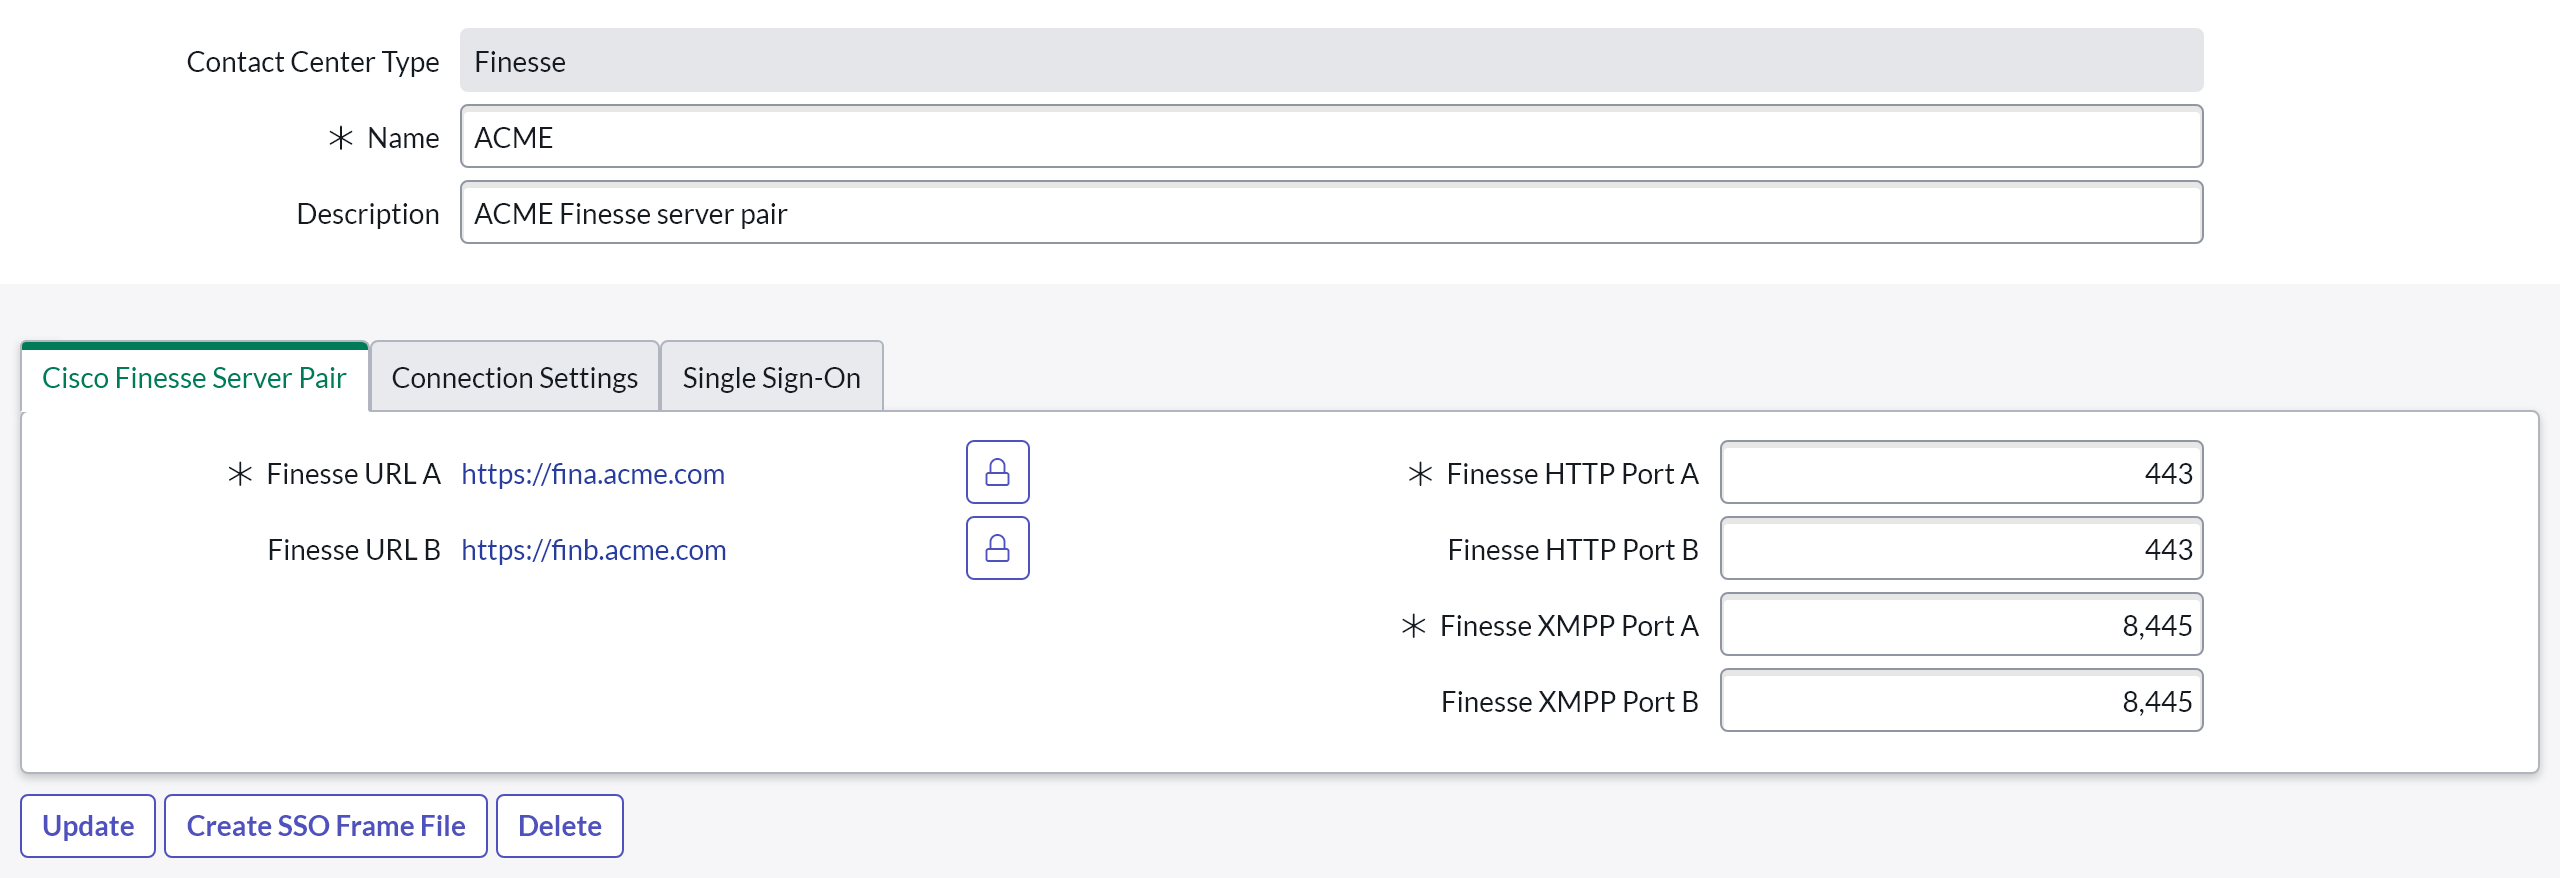
Contact Center configuration entries are records that contain the URL and the HTTP and XMPP Port to a Finesse Server. These records are used to assign an agent to a Finesse server.
Service Layouts
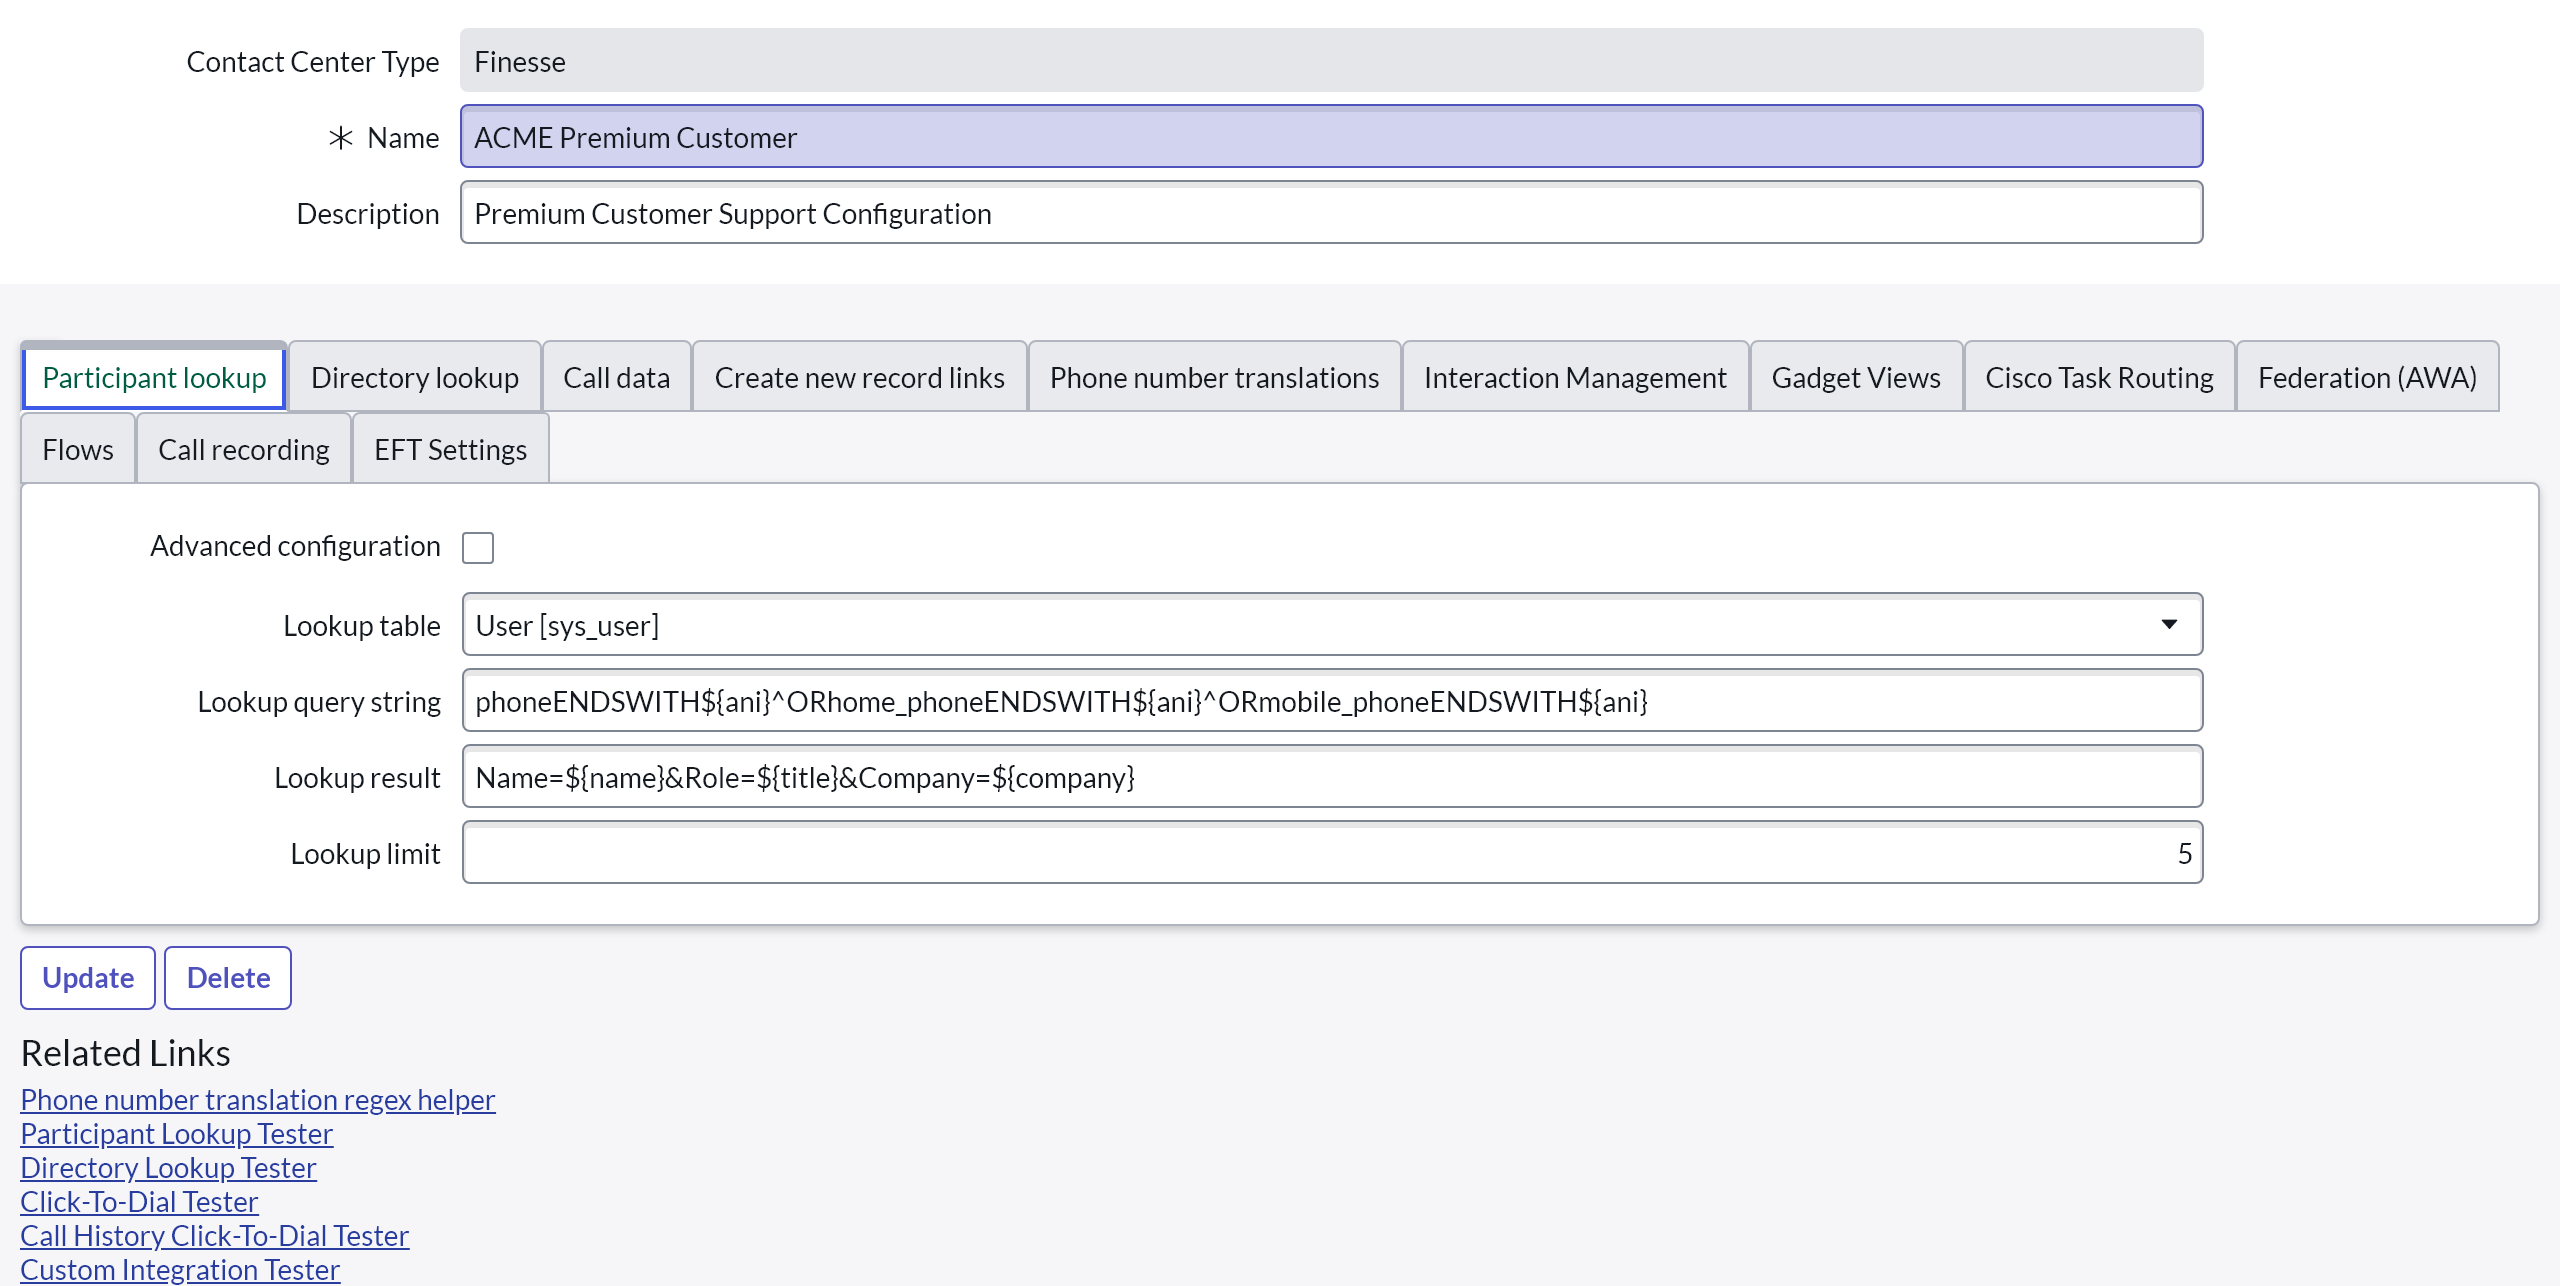
Service Layouts manage the Agent Desktop (Gadget) behavior. For example: which records should be queried in ServiceNow to identify a caller, or how phone numbers should be translated.
This type of configuration is used to describe the service being offered to clients.
Agents
An agent is a ServiceNow user who has the x_busag_cnx.CC Agent role assigned and is thus allowed to access b+s Connects for ServiceNow.
By splitting the configuration into Contact Servers and Service Layouts, it is possible to define global services with agents working across multiple Finesse servers.
Decide how to work with agent permissions
Contact Center Agents are records stored in the Call Center Agent table (x_busag_cnx_cc_agent). In addition, these agent records reference a user record (sys_user table).
The predefined roles in b+s Connects for ServiceNow allow creating, reading, updating and deleting agent records (see Roles & Permissions for more details). However, the referenced users require the role x_busag_cnx.CC Agent to start working as Contact Center Agents.
To make creating agents as convenient as possible, b+s Connects for ServiceNow comes with two Business Rules, which will add/remove the x_busag_cnx.CC Agent role to/from users upon agent record creation/deletion. The Business Rules are named Add cnx Agent role to agent user and Delete cnx Agent role from user.
When an agent is deleted from the Call Center Agent table, the Business Rule Delete cnx Agent role from user will not remove the role completely, but instead, will replace the role x_busag_cnx.CC Agent on the user record with an empty entry. See Deleting Agents for more information.
For these Business Rules to work, the user creating/deleting the agent records must have permission to add/remove roles to/from users. In the default ServiceNow configuration, this requires the user_admin role.
If this behavior is not desired, we recommend creating a dedicated group for ServiceNow users and assigning the x_busag_cnx.CC Agent role through the group. In addition, an Administrator can delete the two Business Rules mentioned before.
Minimal configuration
In order to use b+s Connects for ServiceNow, the following configuration must be performed in ServiceNow.
Add a Contact Center
ServiceNow role required: admin or x_busag_cnx.CC Administrator

Step by step instructions:
- Login to the ServiceNow Service Management as an administrator.
- Go to "Contact Centers" by searching in the left panel. Then click "New" to create a record.
- Select the Contact Center Type "Finesse".
- Enter a name and description to help identify the Finesse Servers being used.
- Select "Save" in the "hamburger menu" in the top left of the new record (or save and reopen the record).
- Now additional fields for Contact Centers of type "Finesse" appear.
- Enter the Finesse Server URL in the format: https://name.domain and readjust the XMPP Port if needed.
- Click "Submit" to save the configuration.
Add a Service Layout
ServiceNow role required: admin or x_busag_cnx.CC Administrator

Step by step instructions:
- Login to ServiceNow Service Management as an administrator.
- Go to "Service Layouts" by searching in the left panel. Then click "New" to create a record.
- Select the Contact Center Type "Finesse".
- Enter a name and description to help identify the Service Layout being configured.
- Select "Save" in the "hamburger menu" in the top left of the new record (or save and reopen the record).
- Now additional fields for Contact Centers of type "Finesse" appear.
- Configure the other settings.
- Click "Submit" to save the configuration.
Create an agent
ServiceNow role required: admin, user_admin, x_busag_cnx.CC Administrator, x_busag_cnx.CC Agent Admin or x_busag_cnx.CC Supervisor

Step by step instructions:
- Login to ServiceNow Service Management as an administrator.
- Go to "Agent List" by searching in the left panel. Then click "New" to create a record.
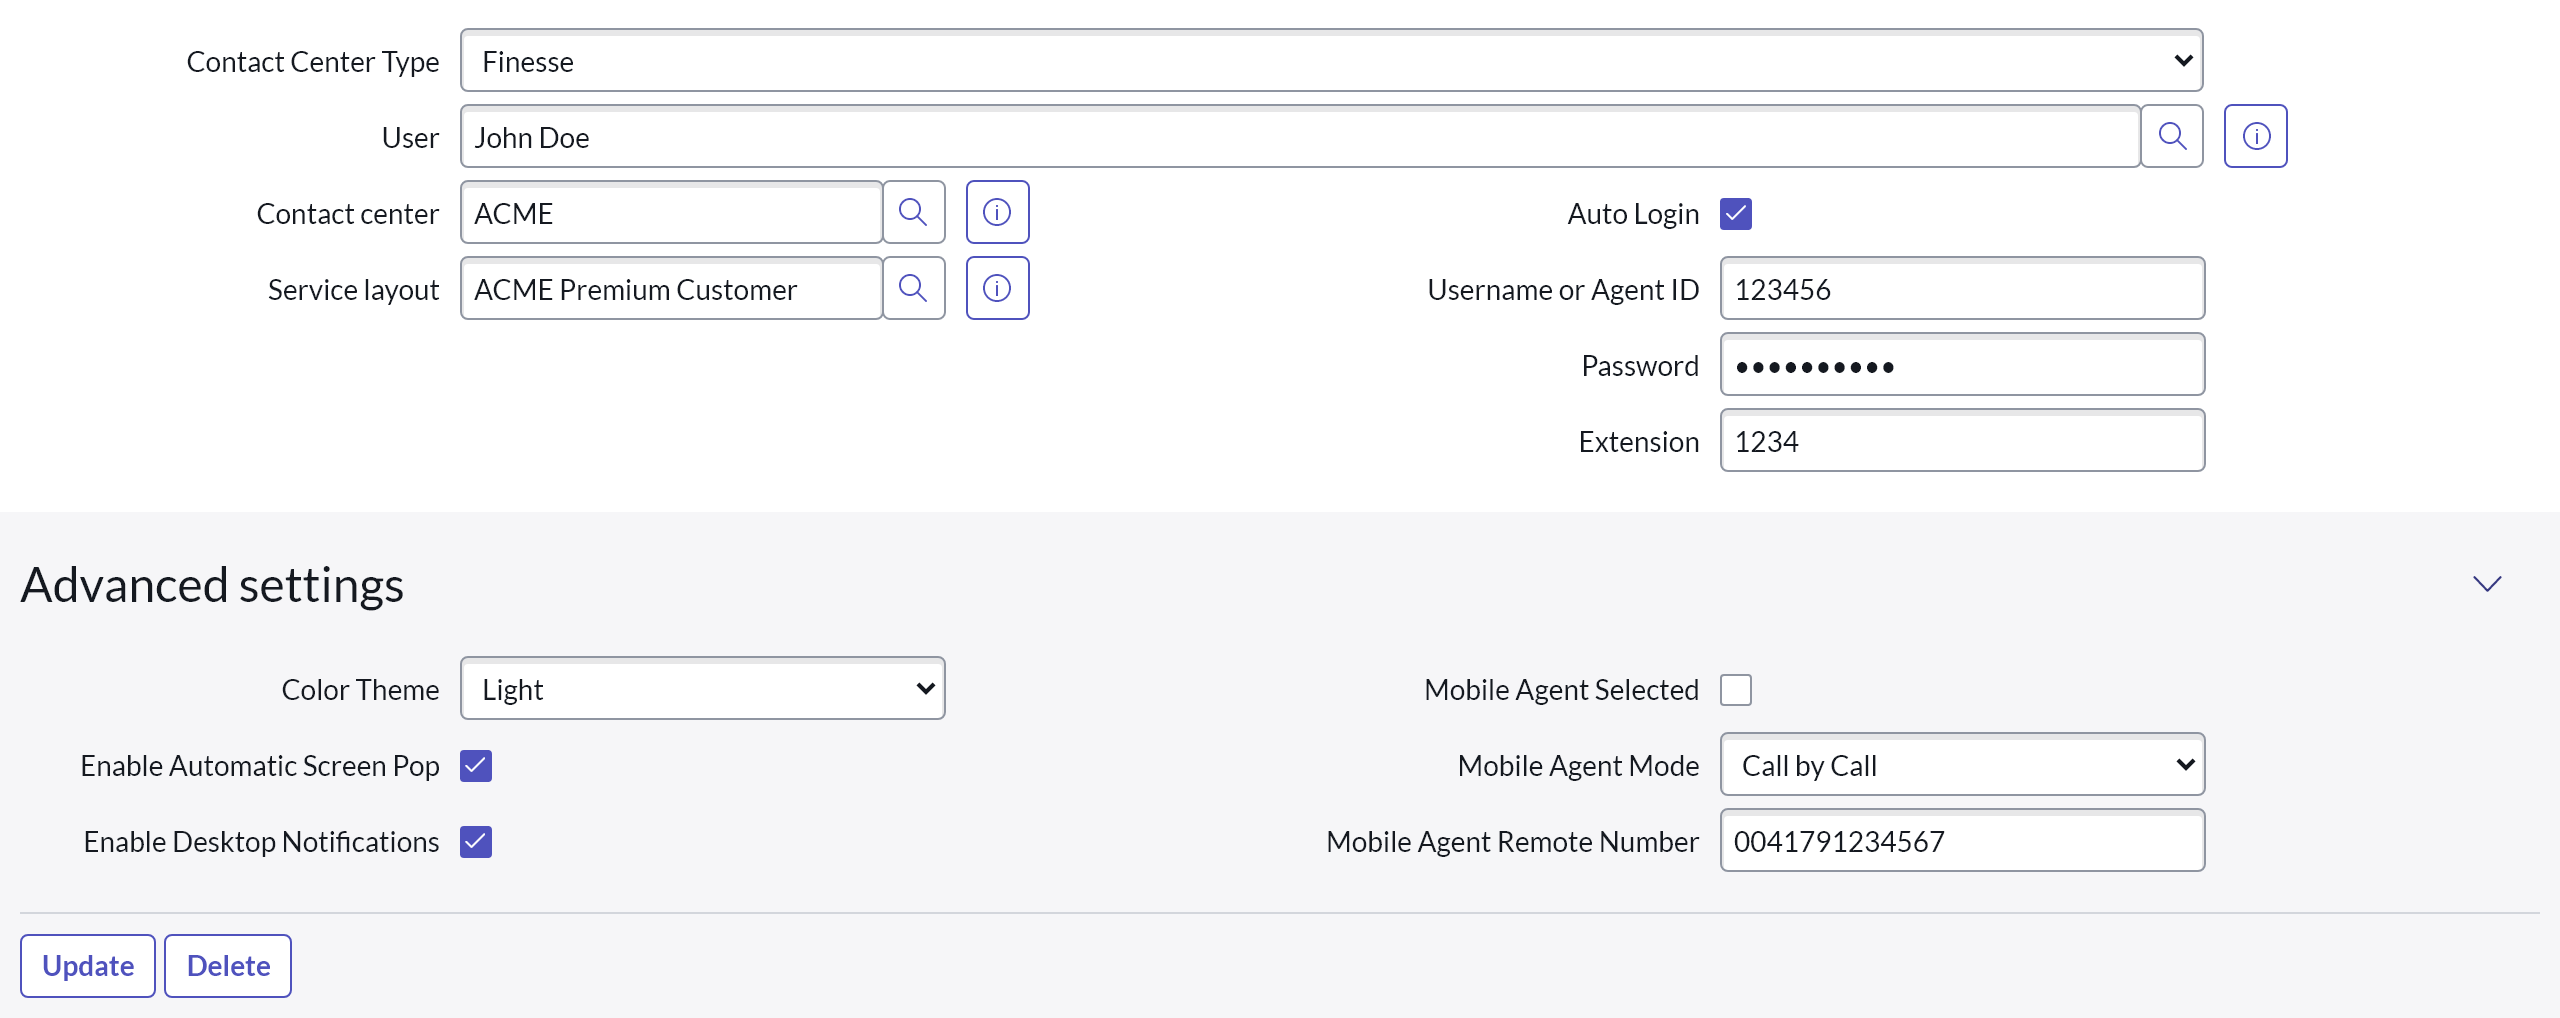
- Select the Contact Center Type "Finesse".
- Select the record of the ServiceNow user that will become a Contact Center Agent.
- Assign a Contact Center and Service Layout record.
- Select "Save" in the "hamburger menu" in the top left of the new record (or save and reopen the record).
- Now additional fields for Contact Centers of type "Finesse" appear.
- Configure the other settings.
- Click "Submit" to store the record.
In order to be able to remove the agent role when deleting an agent, the steps under Deleting Agents will need to be executed.
If the Cisco agent credentials are already known at the time of creating the agent in ServiceNow, provide them directly.
With Finesse 12.5 or newer, the agents username can also be provided for the "Username or Agent ID" field. With previous Finesse versions, only the actual Agent ID which is stored in the Cisco Contact Center is supported and logging in with the Login name will result in an authentication error.
To create multiple agent records, please read the Agent Producer documentation to help streamline the configuration effort.
Test the installation
Reload the page and click the phone icon in the upper right corner to open the gadget.
Update whitelist in ServiceNow
To suppress the Incoming message ignored due to origin mismatch warnings in the browser console, add the domain of the CDN (from which the gadget is loaded) to the relevant whitelist in ServiceNow.
Step by step instructions:
- Enter
sys_properties.listin the ServiceNow All menu. - Search for the property named
glide.ui.concourse.onmessage_enforce_same_origin_whitelist. - Add
https://connects.bucher-suter.com. - Make sure to delete Browser cache after this change.