Installation for Web Client
This guide describes how to integrate the b+s Connects for Microsoft Dynamics in the CRM and the few steps to have it up and running. It uses the installation method by importing the solution in make.powerapps.com.
If the installation is to be done using AppSource, please refer to Installation from AppSource.
Prerequisites
Webex Contact Center is ready for use, and agents are able to login and receive calls using the Webex Contact Center Desktop.
Access to Webex Contact Center for Developers
Admin access to the target Dynamics instance is granted.
Zip archive (ConnectsforDynamics_x_x_x_xxxxxx_managed.zip) of b+s Connects for Microsoft Dynamics is available.
The Channel Integration Framework has to be installed in your Dynamics instance.
To check if the framework is installed open the Apps overview and locate Channel Integration Framework.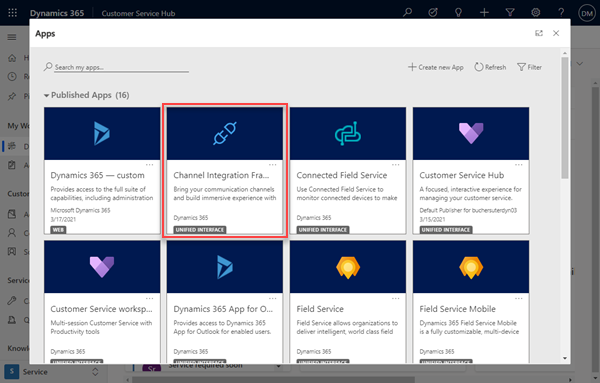
If the framework is not yet installed follow the installation steps outlined on the official documentation to install it.
Install b+s Connects for Microsoft Dynamics
Import the b+s Dynamics Solution archive to your Dynamics instance.
Step 1: Go to https://make.powerapps.com.
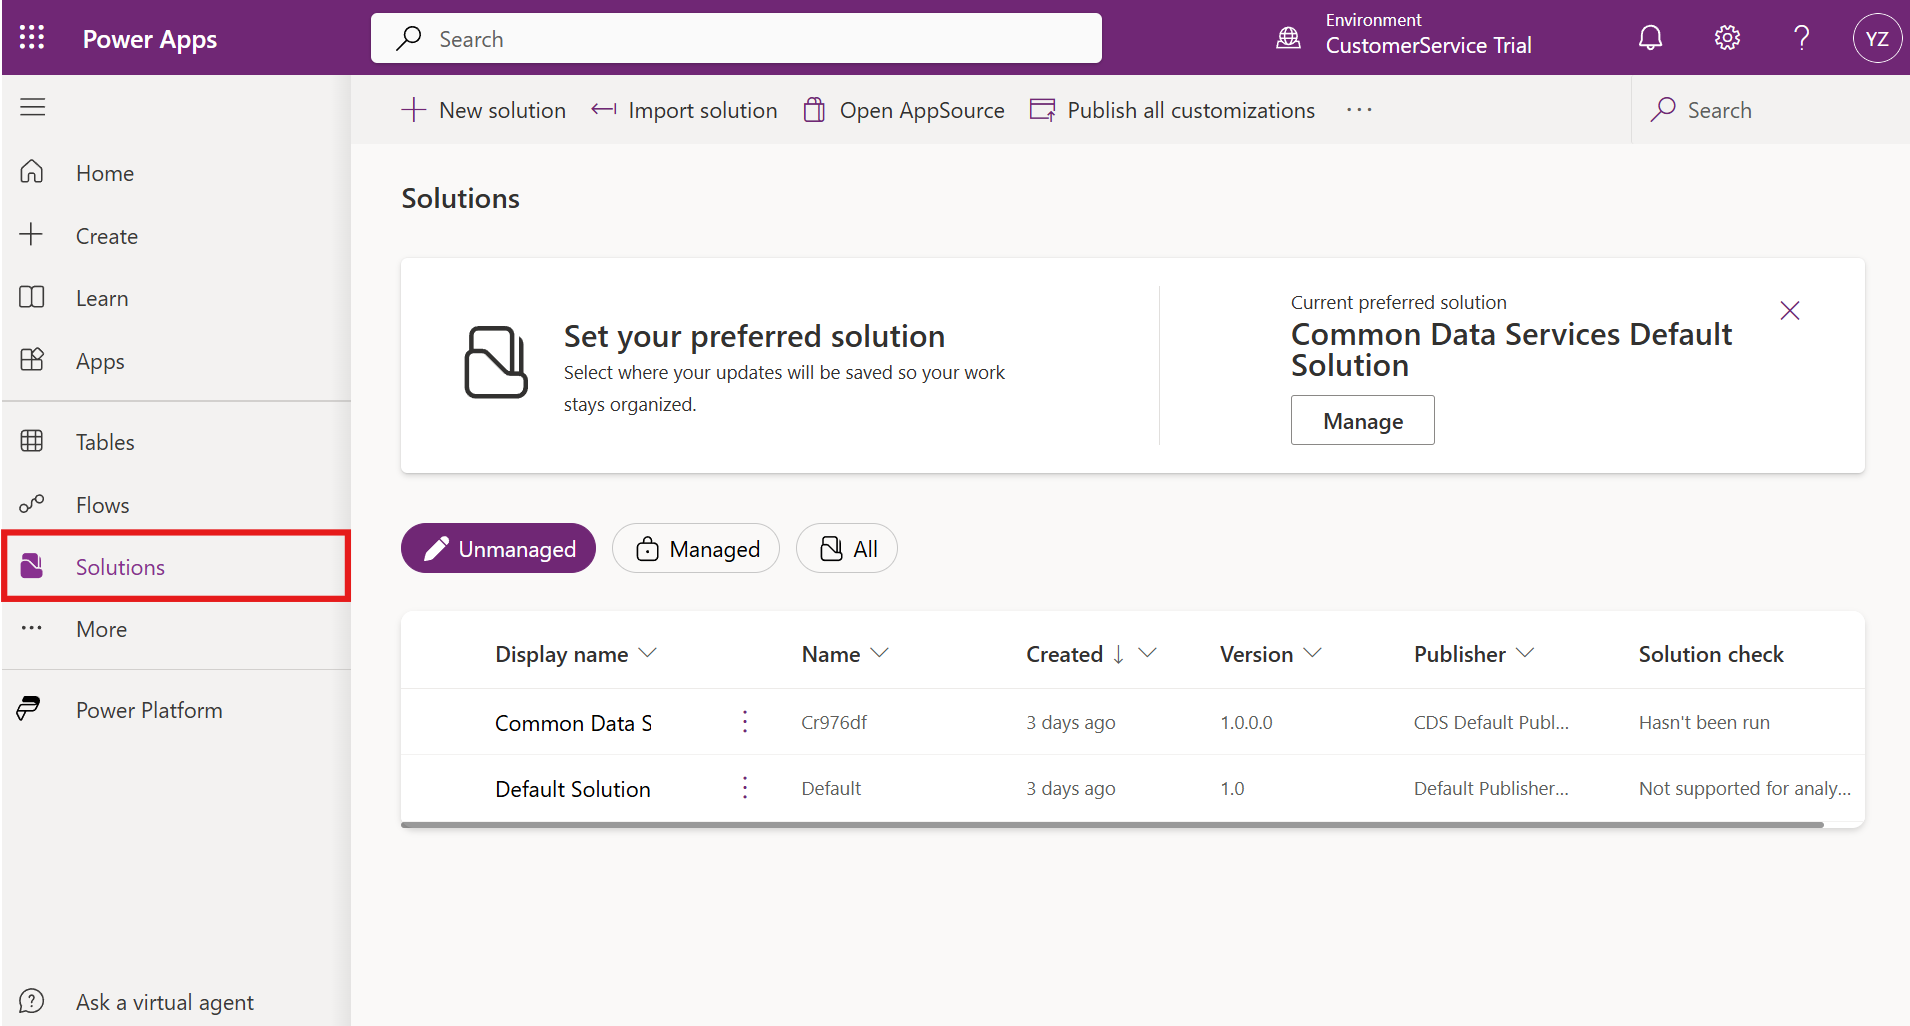
Step 2: Navigate to Solutions section.
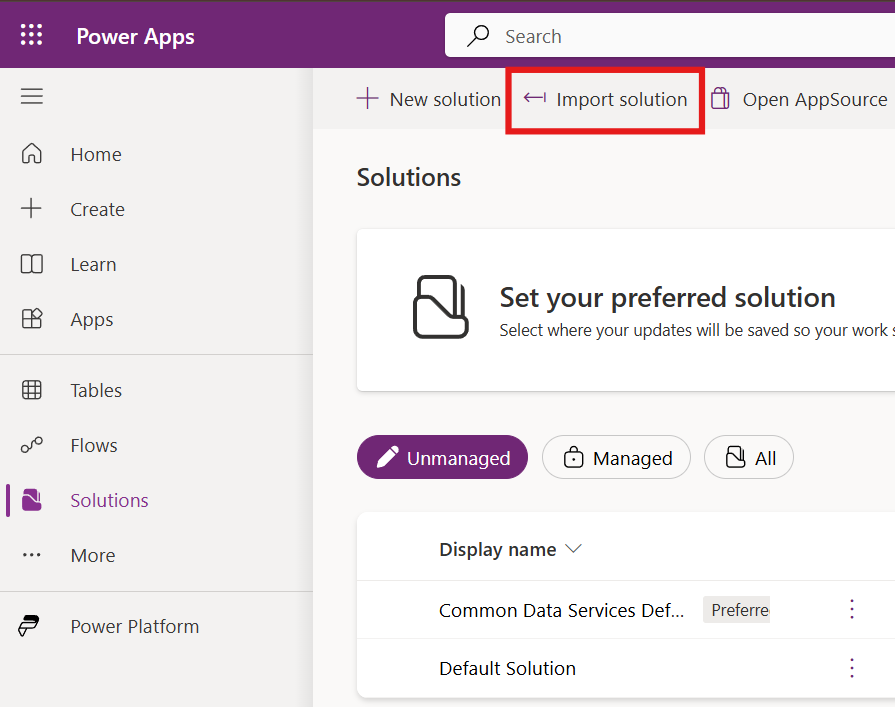
Step 3: Click Import.
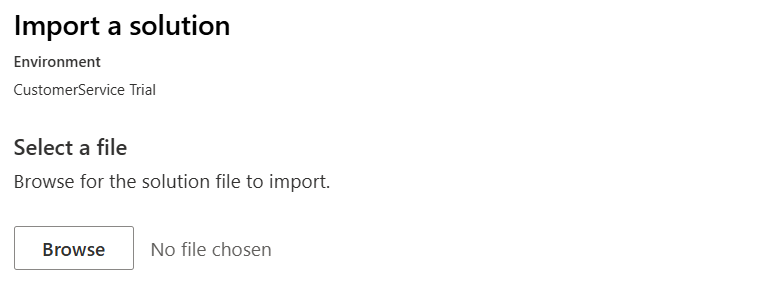
Step 4: Choose the file for the b+s Connects for Dynamics solution and click Next.
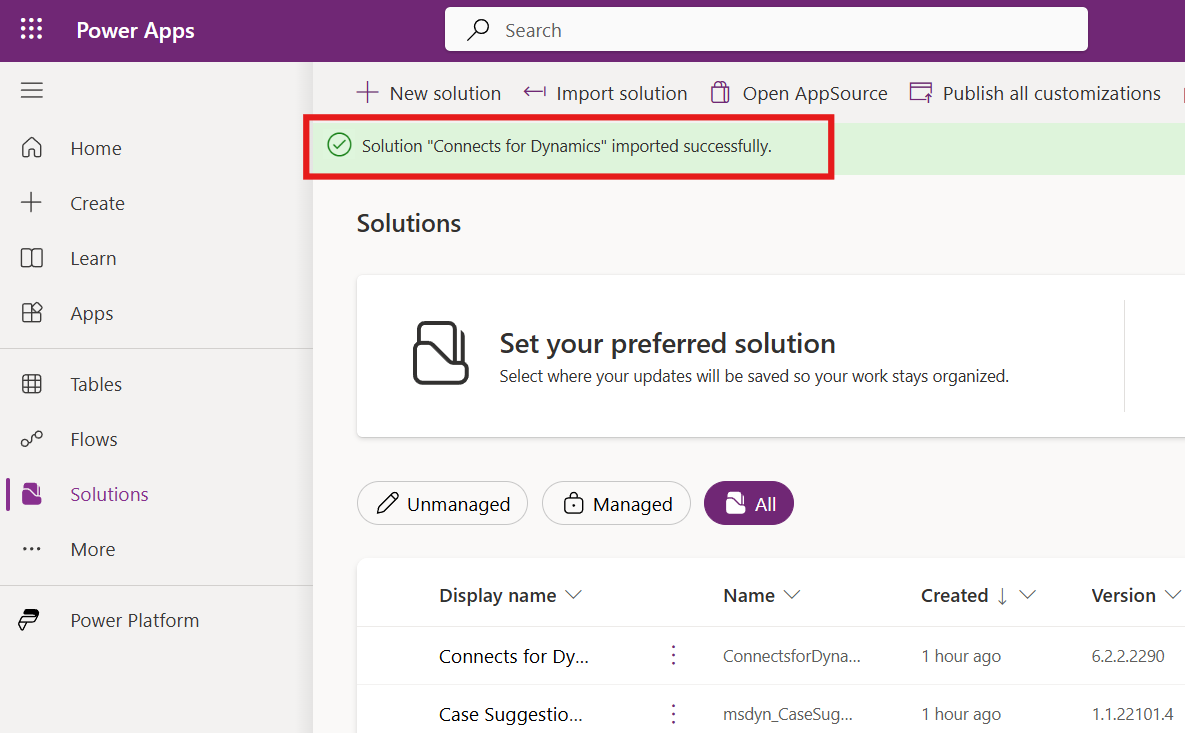
Step 5: Click again Next and then Import. A notification appears that the import was successful.
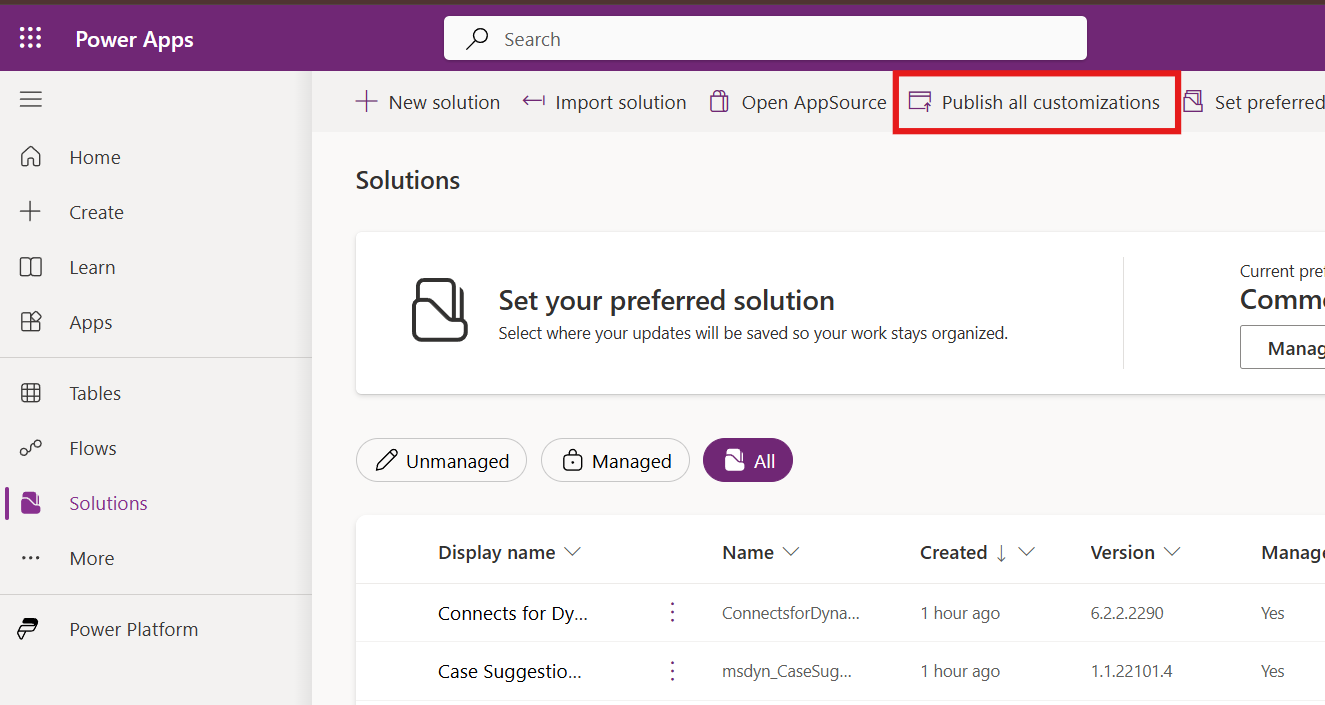
Step 6: Make sure to publish all customizations.
Apps Configuration
Multi session applications such as Omnichannel for Customer Service or Customer Service Workspace provide agents with a single workspace experience and allow them to multitask on various customer issues simultaneously.
To configure b+s Connects on a single session app (e.g. Customer Service Hub) please refer to Single Session Configuration.
Customer Service admin center
Multi session is configured in the Customer Service admin center.
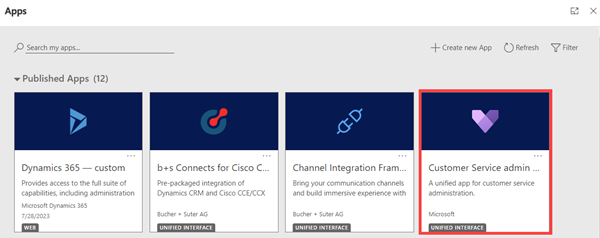
Step 1: Open the Apps overview and select the Customer Service admin center app.
Step 2: Navigate to Workspaces.

Agent experience profiles
Step 1: Go to Agent experience profiles.

Step 2: Create a new profile.
Step 3: Specify the following values.
| Field | Description |
|---|---|
| Name | bsAppProfile |
| Unique Name | cnx_appprofile |
Step 4: Click "Create" to create the Agent experience profile.
Step 5: Edit Channel providers.

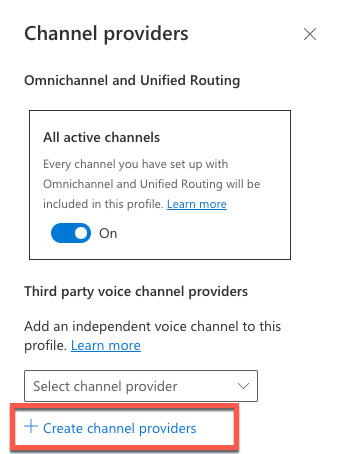
Step 6: Create new channel provider.
Step 7: Specify the following values.
| Field | Description |
|---|---|
| Name | bsChannelProvider |
| Unique Name | cnx_channelprovider |
| Label | b+s Connects |
| Channel URL | https://<yourorg>.crm<num>.dynamics.com/WebResources/cnx_index_wxcc.html |
| Enable Outbound Communication | Yes |
| Channel Order | 1 |
| Api Version | 2 |
For a full description of all fields refer to the official documentation.
Step 8: Click "Save and close" to keep your changes.
Step 9: Edit Channel providers again.
Step 10: Select the newly created channel provider and click "Save and close".
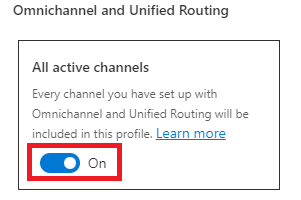
Step 11: If the profile contains other channels such as chat, select On for All active channels.
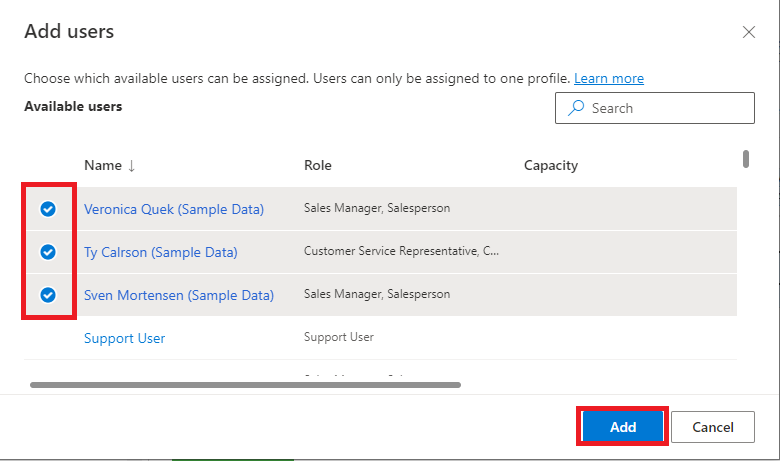
Step 12: Click on "Add users".

Step 13: Add the desired user entries.
Application tab templates
Step 1: Navigate to Workspaces.

Step 2: Go to Application tab templates.

Step 3: Create a new application tab template.

Step 4: Specify the following values.
| Field | Description |
|---|---|
| Name | bsApplicationTab |
| Unique Name | cnx_applicationtab |
| Title | b+s Application Tab |
| Page Type | Dashboard |
| Can close | Yes |
Step 5: Click "Save & Exit" to keep your changes.
For a full description of all fields refer to the official documentation.
Session templates
This describes how to configure the look and feel of the session that will contain the b+s Connects gadget and the session that will be created on an incoming call.
Step 1: Navigate to Workspaces.

Step 2: Go to Session templates.
Step 3: Create a new session template.

Step 4: Specify the following values.
| Field | Description |
|---|---|
| Name | bsDefaultSession |
| Unique Name | cnx_defaultsession |
| Type | Generic |
| Title | Voice |
| Communication panel mode | Docked |
| Session Icon | cnx_Connects_Icon_Color |
| Anchor tab | bsApplicationTab |
Step 5: Click "Save" to keep your changes.
Step 6: Create a new session template.
Step 7: Specify the following values.
| Field | Description |
|---|---|
| Name | bsCallSession |
| Unique Name | cnx_callsession |
| Type | Generic |
| Title | Call {callDetails} Refer to Multi Session Insights for more information on template parameters |
| Communication panel mode | Docked |
| Session Icon | cnx_Connects_Icon_Color |
| Anchor tab | bsApplicationTab |
Step 8: Click "Save" to keep your changes.
For a full description of all fields refer to the official documentation.
Configure WxCC App Integration
Step 1: Go to https://make.powerapps.com.
Step 2: Open the solution for b+s Connects for Dynamics.
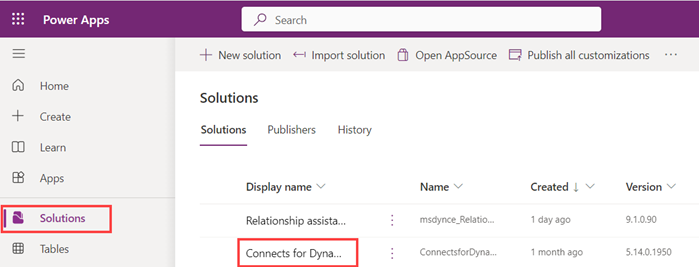
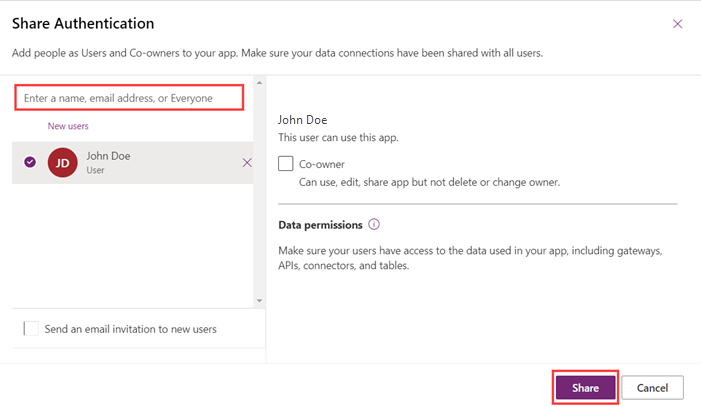
Step 3: Share the canvas app "Authentication".
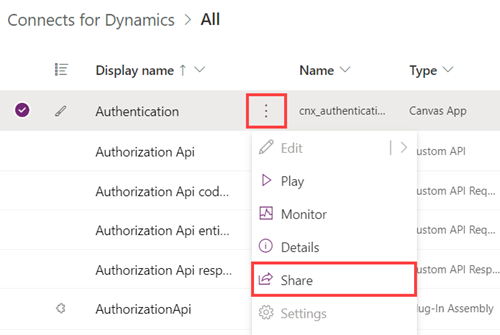
Step 4: Add all users who will use b+s Connects.
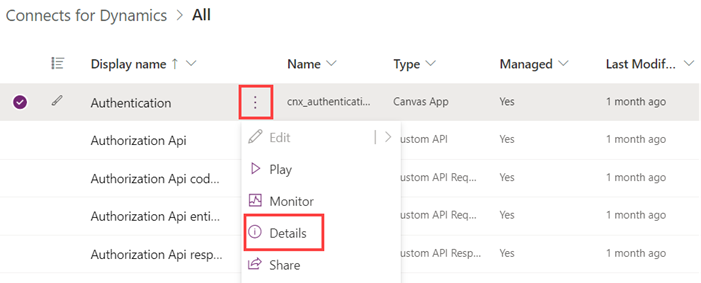
Step 5: Open the details of the canvas app "Authentication".
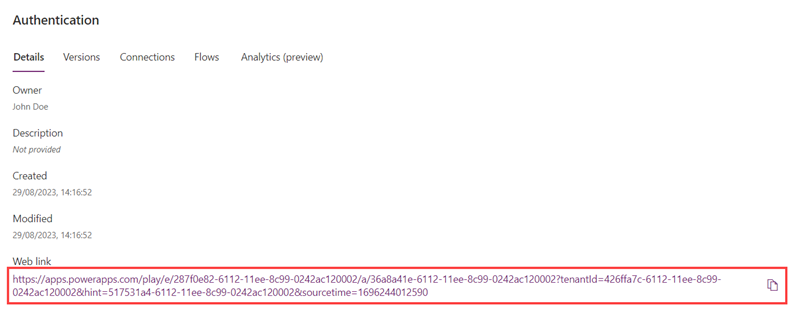
Step 6: Copy the URL to a text editor.
Step 7: Go to My Apps in Webex Contact Center for Developers.
Step 8: Create a new app.

Step 9: Specify the following values.
| Field | Description |
|---|---|
| Integration Name | Connects for Dynamics |
| Description | Connects for Dynamics |
| Redirect URI(s) | Copied URL of the canvas app "Authentication" |
| Scopes | cjp:config, cjp:config_read, cjp:user |
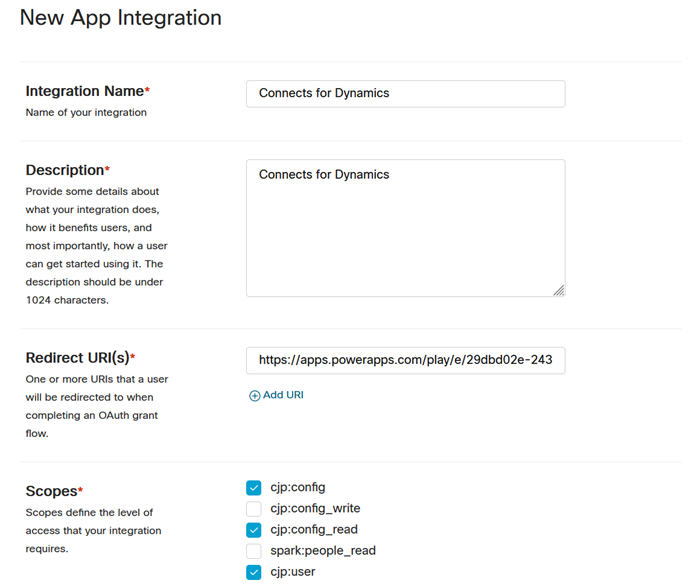
Step 10: Add the Integration.

Step 11: Copy Client Secret and the OAuth Authorization URL in a text editor.
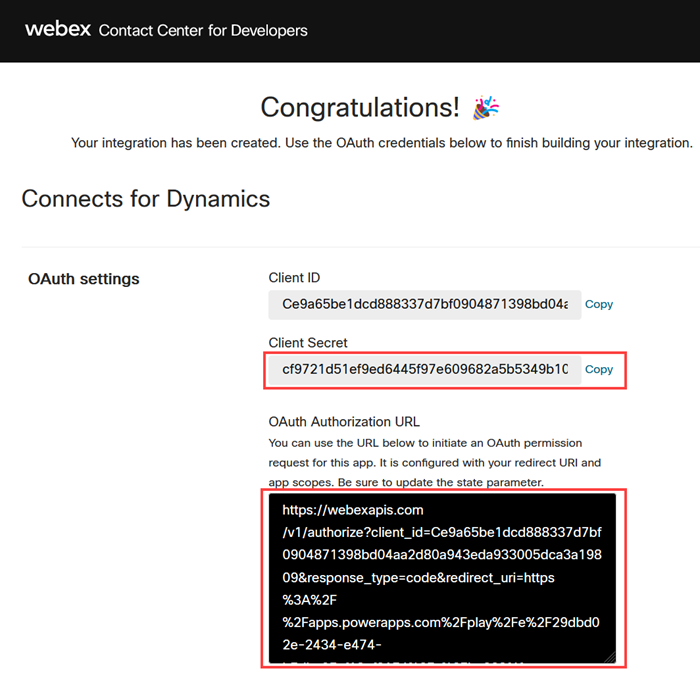
The Client Secret is only visible after a new app is added. It can not be retrieved later. Regenerating it will create a new Client Secret.
Configure Contact Center
Contact Center configuration entries are records that contain the Authorization URL, Region and a Client Secret for a WxCC integration. These records are used to sign in. To create a new record follow these steps:
Step 1: Go to Microsoft Dynamics.
Step 2: Navigate to b+s Connects for Cisco Contact Center.
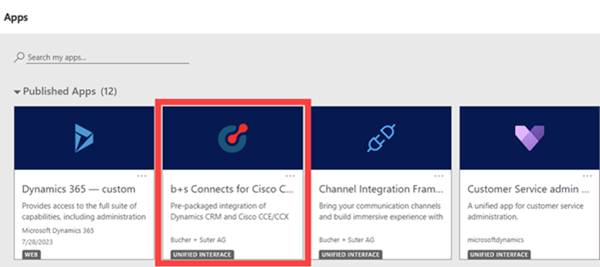
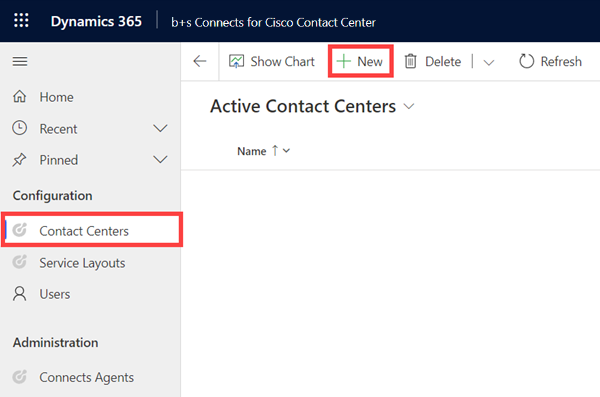
Step 3: Navigate to the Contact Centers and add a new configuration.
Step 4: Select the form for WxCC and specify the following values.
| Field | Description |
|---|---|
| Name | b+s Connects for WxCC |
| Auth URL | Paste the OAuth Authorization URL |
| Region | Enter the region of your WxCC (e.g. us1, eu2) |
| Client Secret | Paste the Client Secret |
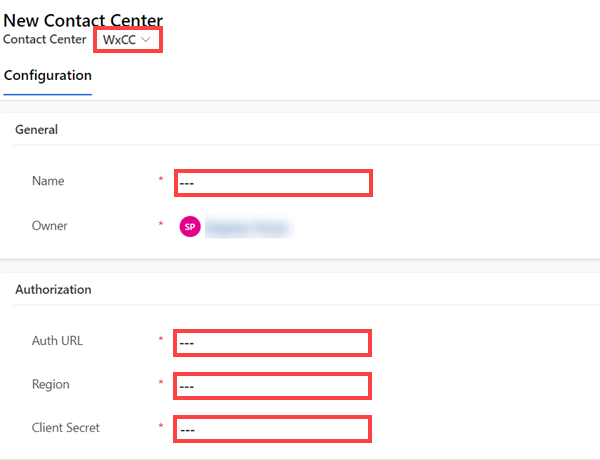
Step 5: Click Save to keep your changes.
It is essential that you allow pop-ups from https://apps.powerapps.com.
Configure Service Layout
Service Layouts manage the Agent Desktop (Gadget) behavior. For example: which records should be queried in Dynamics to identify a caller, or how phone numbers should be translated.
This type of configuration is used to describe the service being offered to clients. To create a new record follow these steps:
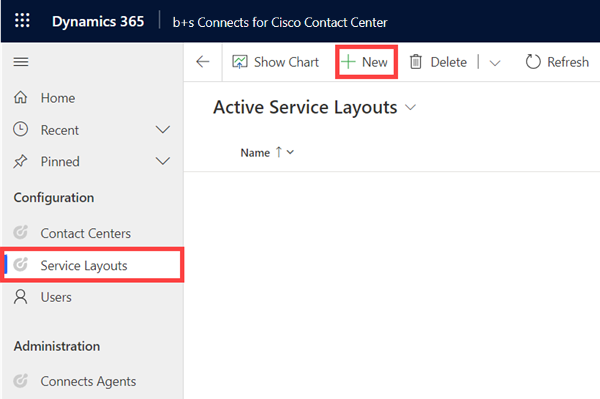
Step 1: Navigate to b+s Connects for Cisco Contact Center.

Step 2: Navigate to the Service Layout and add a new configuration.
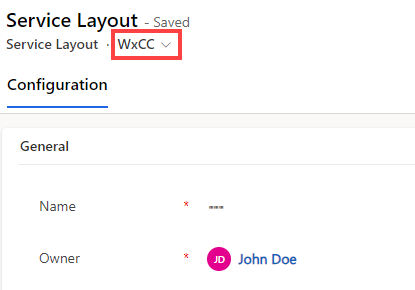
Step 3: Display the form for WxCC.
Step 4: Specify the following values.
| Field | Description |
|---|---|
| Name | Name of the Service Layout. It will be displayed in any related records. |
| Call Variable for Share Record (enables share record) | Defines the name of the call variable to share a record (e.g. shareRecord ). |
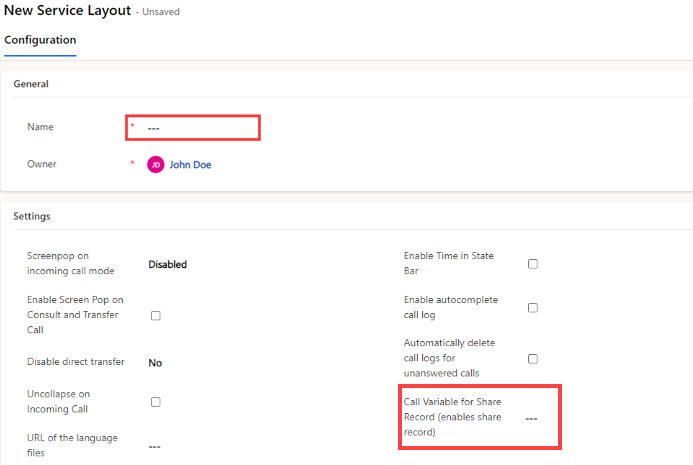
Step 5: Click Save to keep your changes.
For additional information please refer to the Service Layout guide.
Configure Dynamics User
In order to use b+s Connects for Dynamics each Dynamics user needs to have a Finesse Server and Service Layout entry configured. Follow the steps below to assign the entries to the Dynamics user.
Step 1: Navigate to b+s Connects for Cisco Contact Center.

Step 2: Navigate to Users.
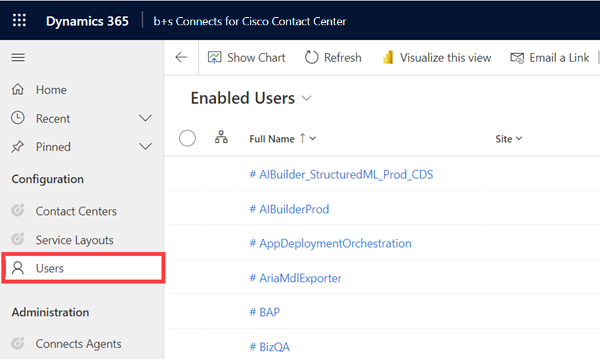
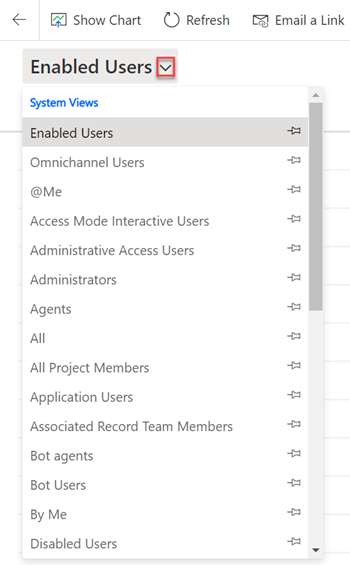
Step 3: Expand System Views to select the desired user view (e.g. Enabled Users).
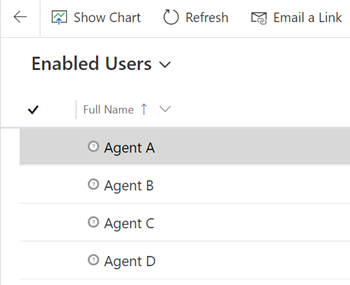
Step 4: Select a user.
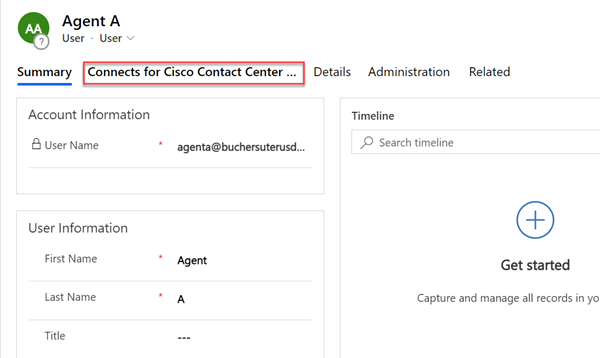
Step 5: Select tab Connects for Cisco Contact Center MSD - Configuration.
Step 6: Search and select your Contact Center configuration.

Step 7: Search and select your Service Layout configuration.

Step 8: Click Save to keep your changes.
Assign Roles to User
To grant permission for a user to access b+s Connects for Dynamics, assign the role "Connects Agent" or "Connects Administrator". Follow the steps below to manage the roles for users.
To grant permission for a user to access b+s Connects for Dynamics, assign the role "Connects Agent" or "Connects Administrator". Follow the steps below to manage the roles for users.
Step 1: Go to https://admin.powerplatform.microsoft.com.
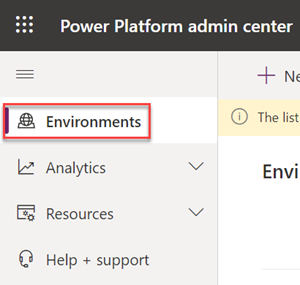
Step 2: Navigate to Environments.
Step 3: Click your environment to edit.

Step 4: Display the security roles.
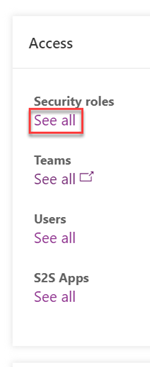
Step 5: Go to the "Connects ..." roles.
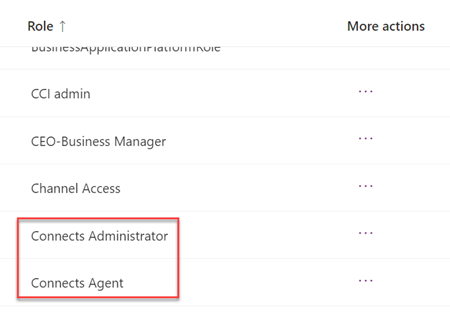
Step 6: Select the role "Connects Agent".
Step 7: Open "Members".

Step 8: Add users.
Step 9: Search for the user entry and click on it.
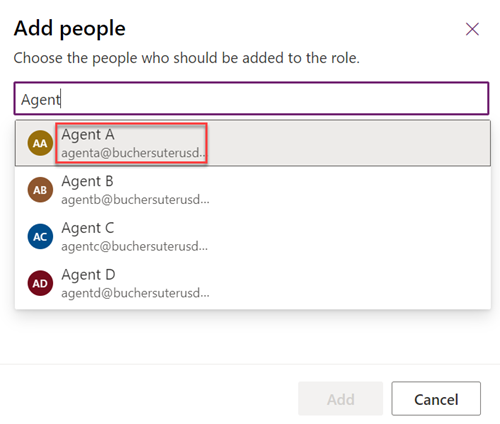
Step 10: Repeat step 9 to add more users.
Step 11: Add the selected users.
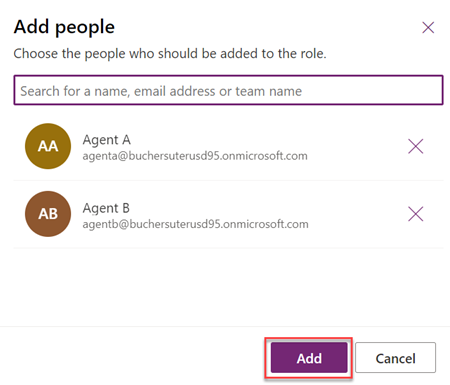
Step 12: Repeat steps 6 to 11 to assign users to the Connects Administrator role.
Upgrade
Upgrade for b+s Connects for Microsoft Dynamics
Step 1: Go to https://make.powerapps.com.
Step 2: Navigate to Solutions section.

Step 3: Click Import.
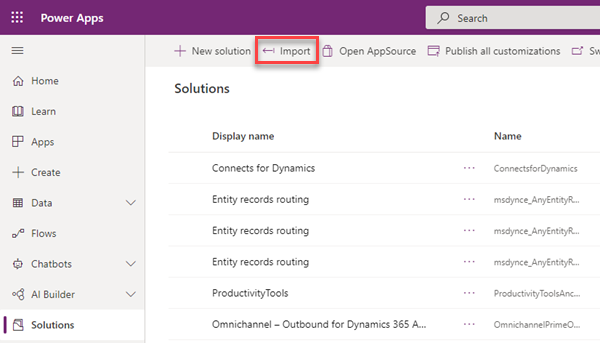
Step 4: Choose the new b+s Connects for Dynamics solution file and click Next

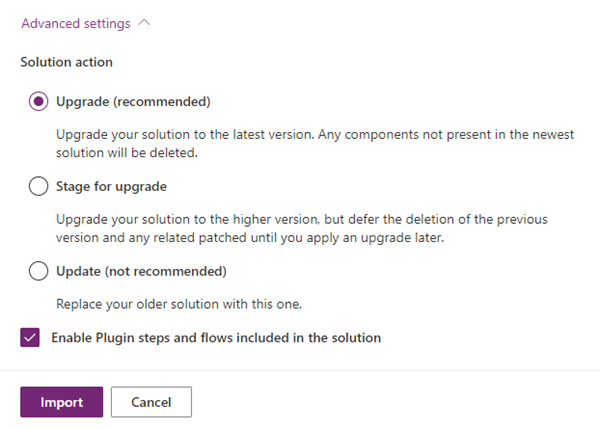
Step 5: Uncollapse Advanced settings, select the recommended and default options and click Import.
Step 6: A notification appears that the import was successful.

When upgrading from version 6.1 or later, the following notification is displayed instead:
Step 7: Make sure to publish all customizations.

For version specific upgrade information please refer to Features and Limitations.