Installation
Before proceeding with the installation, please consult the Pre-requisites and Limitations page to learn about pre-requisites and limitations of Salesforce Service Cloud
Install and Configure b+s Connects for Service Cloud Voice
When a Service Cloud Voice for Partner Telephony license is obtained, the Partner Telephony Setup page becomes visible in the Setup menu.
Further information can be found in the Salesforce official reference (direct link).
1. Open Partner Telephony Setup page
From Setup, enter Partner Telephony Setup in the Quick Find box,
then select Partner Telephony Setup

2. Enable Service Cloud Voice
Enable Turn on Voice with Partner Telephony

The Partner Telephony Contact Centers page appears in the Setup menu.

3. Install b+s Connects for Service Cloud Voice
Please request a link from b+s to install the package into your Salesforce organization. If you have received a link to the package, follow the link to start the installation. Currently there is no possibility to install the package directly from AppExchange https://appexchange.salesforce.com/appxListingDetail?listingId=a0N3u00000PGPWWEA5
Note: If you plan to deploy the package in a Salesforce sandbox, replace the login.salesforce.com portion of the installation link with test.salesforce.com. Note that this package is removed from your sandbox organization whenever you create a new sandbox copy.
To install the package:
- Open the provided link of the package to start the installation.
- Login to the Salesforce organization where the package should be installed.
- In the installation wizard, choose the security option "Install for Admins Only" (1) and click Install (2).
Note: It will be necessary to decide which users get certain permissions to the objects and components that come with the b+s Connects for Service Cloud Voice package. In addition, granting them these permissions (which is aided by the Permission Sets that come with the b+s Connects for Service Cloud Voice package) is also needed.
Package installation wizard – Welcome screen

4. Assign Contact Center Permission Sets
Give the following permission sets to at least one user, so you can create the Contact Center:
Contact Center Admin (Partner Telephony)

To let your agents use Voice, give them the Contact Center Agent (Partner Telephony) and the b+s CNX SCV Agent permission set.

We do not recommend choosing the "Install for All Users" option, as this will grant all permissions (read, create, edit and delete) on the package components and objects to any user who uses a custom User Profile.
5. Assign Package License to Users
Before your users can work with Connects for Service Cloud Voice they need a package license to be assigned.
- Click Setup | Apps | Packaging | Installed Packages
- Click Manage Licenses next to the recently installed Connects for Service Cloud Voice
- Click the Add Users button
- Select the user or users to assign the license to and click Add

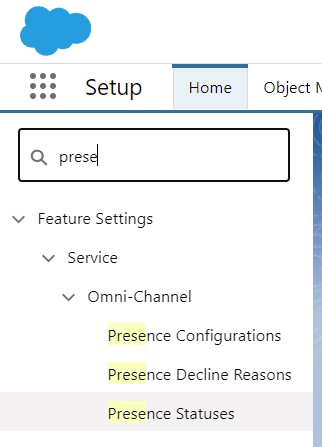
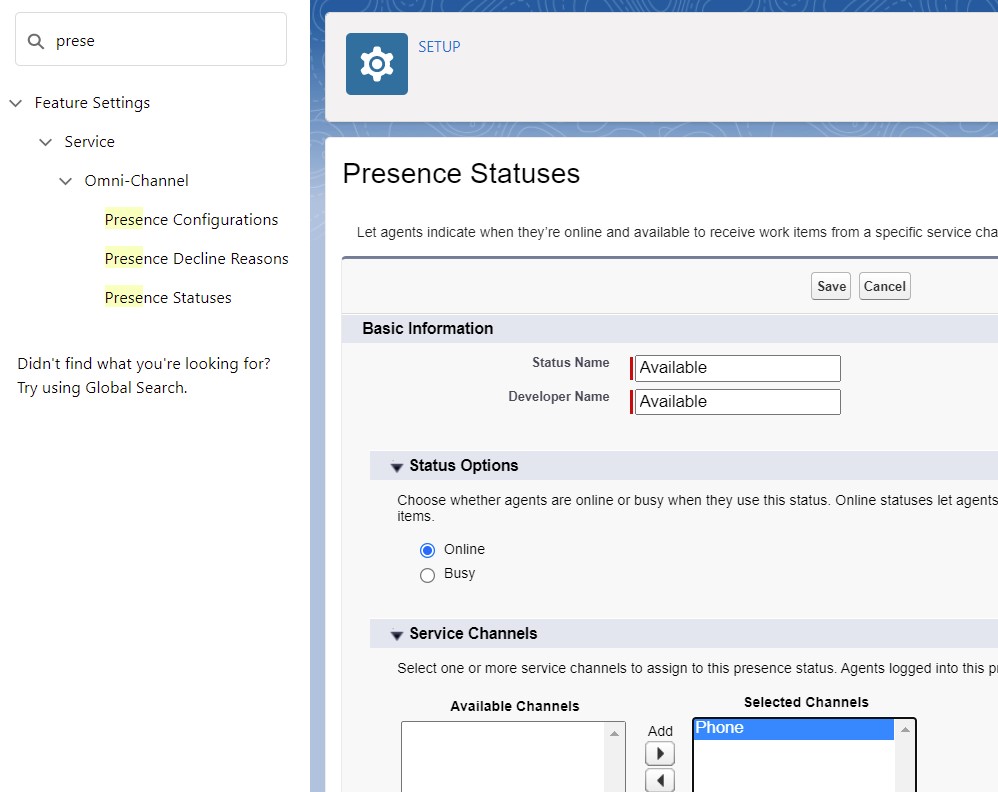
6. Create the Presence Statuses
Create the Presence Statuses to define which service channels are assigned to difference statuses. Agents can sign into Omni-Channel with different statuses depending on the types of work that they’re entitled to receive.
From Setup, enter Presence Statuses in the Quick Find box, then select Presence Statuses
Click on the New button.
Create at least one status for "Online" and one for "Busy"
Assign the presence status(es) to agents
- From Setup, enter Permission Sets in the Quick Find box, then select Permission Sets.
- Click to open
Partner Telephony Permission Set. - Click Service Presence Statuses Access.
- Click Edit.
- In the Available Service Presences list, select the presence status(es) previously created and click Add to associate them with the permission set. Agents who are assigned to this permission set can sign into Omni-Channel with any of the presence statuses made available to them.
- Click Save.
- Click on "Manage Assignments" and assign the Permission Set to the required Users.
7. Add Service Cloud Voice URL as Remote Site
Service Cloud Voice uses an external domain to operate with the VoiceCall record.
The following URLs must be added to the "Remote Site Settings" in Setup (click here to open the official documentation):
https://YOUR_INSTANCE_URL.my.salesforce-scrt.com
https://YOUR_INSTANCE_URL--cnxscv.my.salesforce-scrt.com
Example:
Origin org URL: https://bucher-suter.lightning.force.com
URLs to add:
https://bucher-suter.my.salesforce-scrt.com
https://bucher-suter--cnxscv.my.salesforce-scrt.com
8. Add the Omni-Channel and b+s CNX SCV Bridge utility items to your Lightning Service Console
Both, the Omni-Channel and b+s CNX SCV Bridge utility items, are required in the Lightning Service Console App for the agent to use Service Cloud Voice.
- From Setup, enter Apps in the Quick Find box, then select App Manager.
- Click the dropdown next to the Service Console app you want to use, then click Edit.
- Under App Settings, click Utility Items (Desktop Only).
Add the b+s CNX SCV Bridge utility item
- Click Add Utility Item.
- In the modal window, search for b+s CNX SCV Bridge.
- Click b+s CNX SCV Bridge.
Add the Omni-Channel utility item
- Click Add Utility Item.
- In the modal window, search for Omni-Channel.
- Click Omni-Channel.
- Click Save and exit the App Manager.
The official reference from Salesforce can be found by clicking on the "Let's Do This" button that opens the Configure the Agent Experience for Service Cloud Voice with Partner Telephony page in Salesforce Help Portal (direct link).
9. Create Your Contact Center
b+s Connects for Service Cloud Voice provides a Contact Center definition file included in its package. Follow the instructions related to your Cisco Contact Center Deployment.
10. Disable Respect Agent Capacity for Voice Calls
From Setup, enter Partner Telephony Setup in the Quick Find box,
then select Partner Telephony Setup
Scroll down to section 5 More Voice Settings
Disable the Respect Agent Capacity feature.

11. Disable Enhanced Omni-Channel Routing
From Setup, enter Omni-Channel Settings in the Quick Find box,
then select Omni-Channel Settings.
Disable the Enhanced Omni-Channel Routing feature.

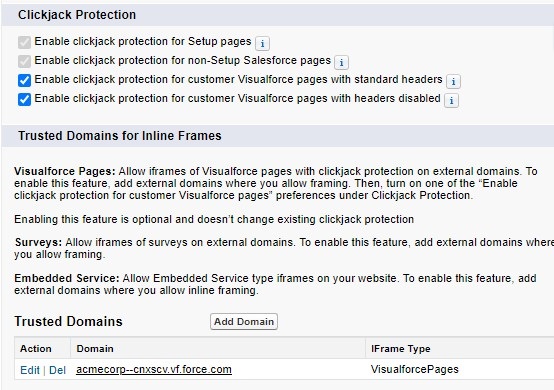
12. Clickjack Protection (Optional)
In order to Enable clickjack protection for Visualforce pages with headers disabled while working with the softphone in Lightning Experience, you will need to add the domains the softphone and custom toolbars are loaded from as trusted domains, in addition to the Salesforce instance url.
These settings and the Trusted Domains list can be found under Setup | Security | Session Settings
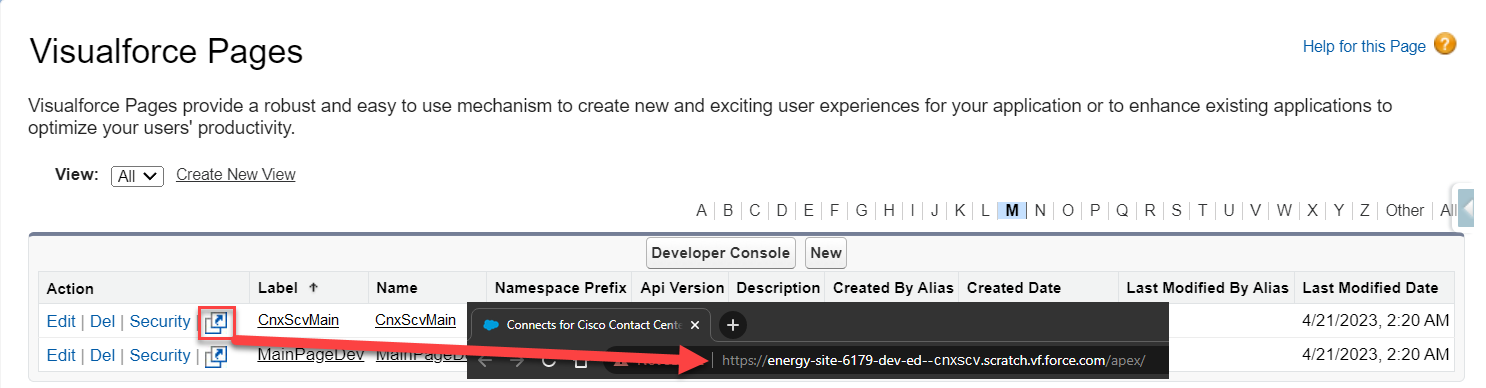
To retrieve the correct Visualforce domain, navigate to Setup | Custom Code | Visualforce Pages
and click on the Preview button for CnxScvMain. Salesforce may automatically redirect to a different URL, depending on
the Salesforce ORG's configuration. Copy the URL and add it to the Trusted Domains for Inline Frames list selecting "Visualforce Pages" as IFrame Type.
Example: MyDomainName--cnxscv.vf.force.com
To get the Salesforce Instance domain, copy the URL displayed in the browser URL bar and add it to the Trusted Domains for Inline Frames List list
selecting "Visualforce Pages" as IFrame Type.
Example: MyDomainName.lightning.force.com

If you don’t have a My Domain deployed in your org, your URL format is different. If you have a My Domain deployed and enhanced domains aren’t enabled in your org, your URL format is different. If enhanced domains aren’t enabled, the Stabilize URLs in Visualforce, Experience Builder, Site.com studio, and content files My Domain setting also affects this format. For details, see My Domain URL Formats in Salesforce Help.
Clickjack Protection and Trusted Domains settings for Lightning Experience