Cisco UQ for Ext MRI v2.5.1
Ext MRI v2.5.1 is deprecated. Upgrade to v3.0 as soon as possible.
3rd Party Host System Requirements
For third-party host system requirements for all involved Cisco components, as well as information regarding hardware and software requirements of CCE/CCX, refer to the Hardware and System Software Specification (Bill of Materials): Cisco ICM/IPCC Enterprise & Hosted Edition which is accessible from:
Host System Performance Requirements for Case Routing Add-on (CCE only)
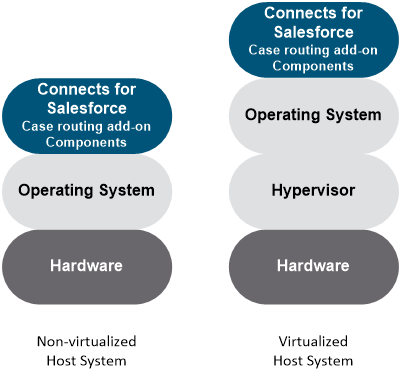
The Case Routing Add-on Components of Connects for Salesforce – CCE Edition can be deployed on an Operating System that runs either directly on the server hardware or on a bare-metal virtualization solution.
Host System Deployment Options
General Host System Classification
b+s classifies host systems for its software solutions regardless of whether they are deployed on a virtualized or non-virtualized operating system as followed:
| Host System Class | CPU Cores | RAM | Disk Space requirements for b+s product |
|---|---|---|---|
| Small | 2 | 4GB | 40GB |
| Medium | 4 | 4GB | 40GB |
| Large | 4 | 8GB | 40GB |
The numbers above give the requirements for a b+s product and not the overall host system (requirements for the operating system are not included).
General Virtualization Requirements
b+s provides predefined OVA-Templates for all host system classes listed in the table above. The templates contain essential hardware specifications which are required for quick deployment of a virtualized host system (i.e. number of CPU sockets, number of CPU cores, memory size etc.). Be aware that additional configuration options like network adapter settings will still have to be configured manually by a system administrator. The same applies for the installation and configuration of the host system operating system.
If b+s software is deployed on a virtualized Windows Server operating system, the following restrictions apply:
- Only VMware ESX or ESXi bare-metal virtualization (type 1 hypervisor) software is supported. For co-residency of b+s software components with Cisco Unified Communications (UC) software refer to the official Cisco co-residency policy and the general Cisco UC virtualization guidelines.
- In case of a non-co-resident deployment of Cisco UC and b+s software, it is permissible to deploy 3rd party software on a separate VMware instance on the same server (blade server or normal rack server) as long as the VMware instance where b+s software is installed receives the required hardware resources from the host system at all times.
Product Deployment and Scalability Considerations
The following table shows which host system class is suited to which deployment of b+s Connects for Salesforce – CCE/CCX Edition:
Host System Class: Medium
Purpose: Normal Deployments
Maximum incoming tasks/sec across all Channels: 5
Maximum incoming tasks/hour across all Channels: 15000
Comments: For normal production deployments
Important notes
The numbers “Maximum tasks limits” above only apply to the b+s RoutingAdapter Ext-MRI. For Cisco CCE/PCCE and the Salesforce Edition, additional limits may apply.
For the maximum number of agents supported for Cisco Universal Queue, the Cisco CCE and Cisco Finesse limits apply.
For CCE and PCCE Sizing and Configuration Limits, please consult the Cisco CCE/PCCE Solution Design Guide which corresponds to your CCE/PCCE version.
Cisco Packaged Contact Center Enterprise Product Specifications document.
On Salesforce, the max number of tasks that can be routed per day depends on our Salesforce Edition
-> The maximum number of delivered event notifications within a 24-hour period, shared by all CometD clients (Cisco Universal Queue consumes 4 events / routed task in average)
Please consult Salesforce Features and Edition Allocations.
PushTopic Streaming Allocations
The dimensioning guidelines above were tested in a lab testing environment that included a test Salesforce CRM system setup. The actual quality of service (delays, responsiveness, etc.) experienced by the agents might vary from the above dimensioning guidelines. These variations include structure and size of the Salesforce CRM database, message payload, transferred Salesforce CRM attached data, intensity of the contact processing workflow(s), as well as other Salesforce CRM configuration and topology variables outside of the scope of the product.
Installation Prerequisites
Microsoft .NET Frameworks
To install and run Routing Adapter UQ, Microsoft .NET framework version 4.7.2 is required. Newer versions of the Microsoft .NET framework are compatible.
The latest versions of the Microsoft .NET Frameworks can be downloaded from: https://dotnet.microsoft.com/download
Make sure to download the .NET Framework and not .NET Core.
Cisco Contact Center Configuration
The configuration steps for CCE and PCCE are slightly different.
- When using CCE, continue with section CCE configuration
- When using PCCE, continue with section PCCE configuration
After configuring CCE or PCCE, continue with section Multi Agent PG Configuration.
CCE configuration
For the configuration in CCE the following are needed
- Unified CCE Web Administration (web application) at https://\<FQDN>/cceadmin
- Configuration Manager on Unified CCE AW-HDS-DDS
- Script Editor on Unified CCE AW-HDS-DDS or Internet Script Editor
- Peripheral Gateway Setup on the Cisco Unified CCE PG server
The following configuration steps are required
- Configure Network VRU for Media Routing
- Configure Media Routing PG and Pim
- Set up the Media Routing PG and Pim
- Add Media Classes
- Media Routing Domains
- Define Application Path and add Application Path Members
- Configure Call Type
- Configure Dialed Number / Script Selector
- Configure Skill Group
- Labels
- CCE Script for Media Routing
Configure Network VRU for Media Routing
On Unified CCE AW-HDS-DDS open CCE Configuration Manager | Network VRU Explorer
Add new Network VRU
- Name:
MR_VRU - Type:
Type 2 - Description:
Network VRU for b+s Connects Media Routing Universal Queue
Configure Media Routing PG and Pim
On Unified CCE AW-HDS-DDS open CCE Configuration Manager | PG Explorer
Create a media routing Pim and routing client for the b+s Routing Adapter.
- Add PG
- Name:
Connects_UQ - Client type:
MediaRouting
- Add Peripheral
On the Peripheral tab
- Name:
Connects_RA_MRI - Client type:
MediaRouting - Check the Enable post routing check box.
On the Advanced tab
- Network VRU: select Network VRU configured in the previous step
On the Routing Client tab
- Routing Type:
NONE
Write down the Logical Controller ID and the Peripheral ID. These will be used when to set up the PG.
Set up the Media Routing PG and Pim
On the Cisco Unified CCE PG server: from Cisco Unified CCE Tools, select Peripheral Gateway Setup.
- On the Components Setup screen, in the Instance Components panel, select the PG Instance component, click Edit
- In the Peripheral Gateways Properties screen, click Media Routing, click Next
- Click Yes at the prompt to stop the service
- From the Peripheral Gateway Component Properties screen, click Add, select the next Pim, and configure with the Client Type of Media Routing as follows
- Check Enabled
- In the Peripheral Name field, enter
Media Routing - In the Peripheral ID field, enter the Peripheral ID for the unused Multichannel peripheral that you identified in previous step
- For Application Hostname (1), enter the hostname of the b+s Routing Adapter server A
- By default, the b+s Routing Adapter accepts the MR connection on Port 7021. The Application Connection Port (1) setting must match the port setting on the b+s Routing Adapter
- Configure Application Hostname (2) and Application Connection Port (2) for the b+s Routing Adapter server B, click OK
- Accept defaults and click Next until the Setup Complete screen opens
Add Media Classes
On Unified CCE AW-HDS-DDS open CCE Configuration Manager | Media Class List
- Add new Media Class
- Name:
MC_Connects_Ticket - Description:
Ticket routing integration for Connects - Life:
300 seconds - Start timeout:
5 seconds - Max duration:
432000 seconds(This entry describes the lifetime of the ticket on the PG)
- Add new Media Class
- Name:
MC_Connects_Chat - Description:
Chat routing integration for Connects - Life:
300 seconds - Start timeout:
5 seconds - Max duration:
432000 seconds(This entry describes the lifetime of the chat on the PG)
Media Routing Domains
On Unified CCE AW-HDS-DDS open CCE Configuration Manager | Media Routing Domain List
- Add new Media Routing Domain
- Name:
MRD_Connects_MRI_Ticket - Media routing domain ID: is assigned by the system
- Media class:
MC_Connects_Ticket - Task Life: (already filled with default from media class)
- Task Start timeout: (already filled with default from media class)
- Task Max duration: (already filled with default from media class)
- Calls in Queue Max:
10000 - Calls in Queue Max per call type:
10000 - Calls in Queue Max time in queue:
431000(This entry describes the lifetime on the Rogger) - Service level threshold:
30(default) - Service level type:
Ignore Abandoned Calls - Interruptible:
<selected> - Description:
<empty>
- Add new Media Routing Domain
- Name:
MRD_Connects_MRI_Chat - Media routing domain ID: is assigned by the system
- Media class:
MC_Connects_Chat - Task Life: (already filled with default from media class)
- Task Start timeout: (already filled with default from media class)
- Task Max duration: (already filled with default from media class)
- Calls in Queue Max:
10000 - Calls in Queue Max per call type:
10000 - Calls in Queue Max time in queue:
431000(This entry describes the lifetime on the Rogger) - Service level threshold:
30(default) - Service level type:
Ignore Abandoned Calls - Interruptible:
<not selected> - Description:
<empty>
Please take a note of the configured Media Routing Domain ID's. These IDs will later be used in software installation.
Add Application Path Members
On Unified CCE AW-HDS-DDS open CCE Configuration Manager | Application Path List
Select Application Path xxxx.UQ.Desktop which represents the Finesse desktop. xxxx is the “Logical Controller ID” or the voice PG. Example:
- Application Instance:
UQ.Desktop - Peripheral gateway:
CUCM_PG - Name:
5000.UQ.Desktop - Add Application Path Members (for all Media Routing Domains configured in the previous steps)
- Peripheral: \<select your voice Peripheral>
- Media routing domain:
MRD_Connects_MRI_Ticket
- Add Application Path Members (for all Media Routing Domains configured in the previous steps)
- Peripheral: \<select the voice Peripheral>
- Media routing domain:
MRD_Connects_MRI_Chat
Configure Call Type
On Unified CCE AW-HDS-DDS open CCE Configuration Manager | Call Type List. Click Add to create a new Call Type
Configure Dialed Number / Script Selector
On Unified CCE AW-HDS-DDS open CCE Configuration Manager | Dialed Number / Script Selector List. Click Add to create a new Script Selector
- Script selector for Ticket:
- Routing Client:
Connects_RA_MRI(Routing client configured in previous step) - Media Routing Domain:
MRD_Connects_MRI_Ticket(media routing domain configured in previous step) - Dialed Number String:
<dialed number string configured in RoutingAdapter.ini>
- Script selector for Chat:
- Routing Client:
Connects_RA_MRI(Routing client configured in previous step) - Media Routing Domain:
MRD_Connects_MRI_Chat(media routing domain configured in previous step) - Dialed Number String:
<dialed number string configured in RoutingAdapter.ini>
Configure Skill Group / Precision Queues
Configure either skill groups or precision queues.
a) Skill groups:
On Unified CCE AW-HDS-DDS open CCE Configuration Manager | Skill Group Explorer.
Click Add Skill group to create a new Skill Group.
- Then for the Media Routing Domain, select one of the Task Routing MRDs you created.
- Proceed to assign Agents to the skill group.
b) Precision queues:
Navigate to Unified CCE Administration | Manage | Attributes. Click New to create the required Attributes.
Navigate to Unified CCE Administration | Manage | Precision Queues. Click New to create a new Precision Queue.
- Then for the Media Routing Domain, select one of the Task Routing MRDs you created.
- Proceed to assign Attributes to your agents
PCCE configuration
For the configuration in PCCE the following are required
- Unified CCE Web Administration (web application) at https://\<FQDN>/cceadmin
- Configuration Manager on Unified CCE AW-HDS-DDS
- Script Editor on Unified CCE AW-HDS-DDS or Internet Script Editor
- Peripheral Gateway Setup on the Cisco Unified CCE PG server
The following configuration steps are required
- Determine the Peripheral ID for a Multichannel peripheral
- Set up the Media Routing PG and Pim
- Add the b+s RoutingAdapter server(s) as External Machine(s)
- Add Media Routing Domain
- Define Application Path
- Configure Call Type
- Configure Dialed Number / Script Selector
- Configure Skill Group
- Labels
- CCE Script for Media Routing
Determine the Peripheral ID for a Multichannel peripheral
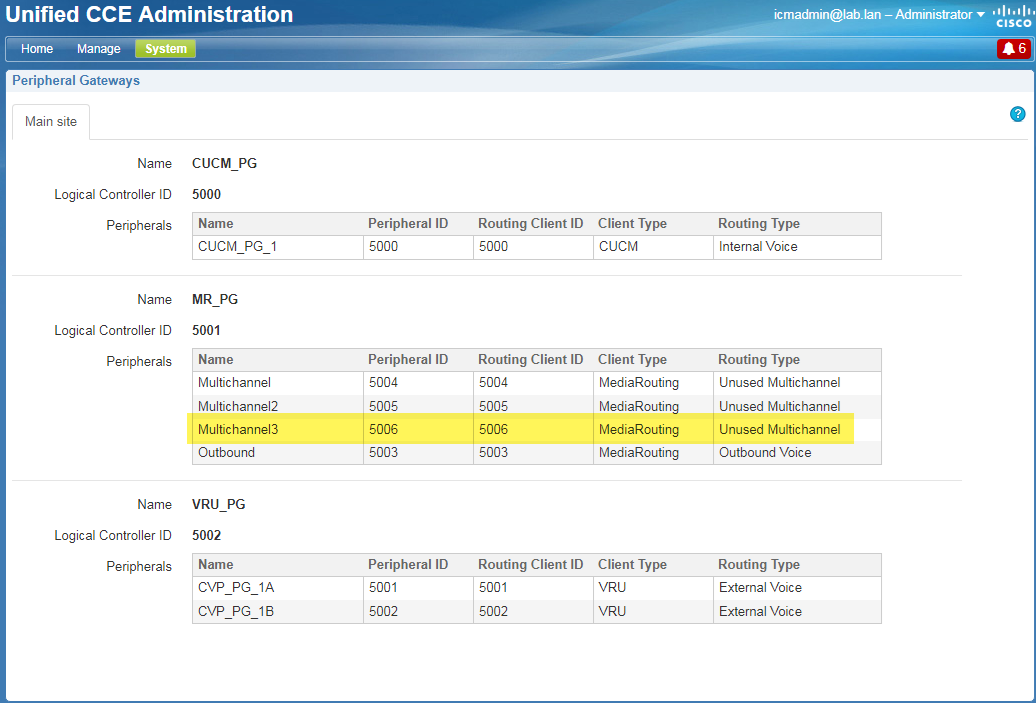
Navigate to Unified CCE Administration | System | Peripheral Gateways. Determine the Peripheral ID for a Multichannel peripheral that is unused.
Note
PCCE has three pre-defined MR Pims
- Multichannel -> pre-defined for ECE
- Multichannel 2 -> pre-defined for Social Miner
- Multichannel 3 -> pre-defined for 3rd party integration
For example, for b+s Media Routing, use Multichannel 3
Set up the Media Routing PG and Pim
On the Cisco Unified CCE PG server: from Cisco Unified CCE Tools, select Peripheral Gateway Setup.
- On the Components Setup screen, in the Instance Components panel, select the PG Instance component | Edit
- In the Peripheral Gateways Properties screen, click Media Routing | Next
- Click Yes at the prompt to stop the service
- From the Peripheral Gateway Component Properties screen, click Add, select the next Pim, and configure with the Client Type of Media Routing as follows:
- Check Enabled
- In the Peripheral Name field, enter
Media Routing - In the Peripheral ID field, enter the Peripheral ID for the unused Multichannel peripheral identified in the previous step
- For Application Hostname (1), enter the hostname of the b+s Routing Adapter server A
- By default, b+s Routing Adapter accepts the MR connection on Port 7021. The Application Connection Port (1) setting must match the port setting on the b+s Routing Adapter
- Configure Application Hostname (2) and Application Connection Port (2) for b+s Routing Adapter server B
- Click Ok
- Accept defaults and click Next until the Setup Complete screen opens.
Add b+s RoutingAdapter server(s) as External Machine(s)
Navigate to Unified CCE Administration | System | Deployment and add b+s Routing Adapter servers as External Machines (3rd Party Multichannel)
Add Media Routing Domain
Navigate to Unified CCE Administration | Manage | Media Routing Domains and click New.
Configure Name, for example “Case”, and select Interruptible if required.
- Add a new Media Routing Domain:
- Name:
MRD_Connects_MRI_Ticket - Media routing domain ID: is assigned by the system
- Media class:
MC_Connects_Ticket - Task Life:
1200 seconds - Task Start timeout:
5 seconds - Task Max duration:
432000 seconds - Max in Queue:
10000 - Max Time in Queue:
431000 - Service level threshold:
30(default) - Service level type:
Ignore Abandoned Calls - Interruptible:
<selected> - Description:
<empty>
- Add new Media Routing Domain:
- Name:
MRD_Connects_MRI_Chat - Media routing domain ID: is assigned by the system
- Media class:
MC_Connects_Chat - Task Life:
1200 seconds - Task Start timeout:
5 seconds - Task Max duration:
342000 seconds - Max in Queue:
10000 - Max Time in Queue:
431000 - Service level threshold:
30(default) - Service level type:
Ignore Abandoned Calls - Interruptible:
<not selected> - Description:
<empty>
Make a note of the configured Media Routing Domain ID's. These IDs will be used during software installation.
Add Application Path Members
On Unified CCE AW-HDS-DDS open CCE Configuration Manager | Application Path List
Select Application Path xxxx.UQ.Desktop which represents your Finesse desktop. xxxx is the Logical Controller ID or your voice PG. For example:
- Application Instance:
UQ.Desktop - Peripheral gateway:
CUCM_PG - Name:
5000.UQ.Desktop - Add Application Path Members (for all Media Routing Domains configured in the previous steps)
- Peripheral:
CUCM_PG_1 - Media routing domain:
MRD_Connects_MRI_Ticket
- Peripheral:
- Add Application Path Members (for all Media Routing Domains configured in the previous steps)
- Peripheral:
CUCM_PG_1 - Media routing domain:
MRD_Connects_MRI_Chat
- Peripheral:
Configure Call Type
Navigate to Unified CCE Administration | Manage | Call Types. Click New to create the new Call Type
Configure Dialed Number / Script Selector
Navigate to Unified CCE Administration | Manage | Dialed Number. Click New to create a new Script Selector
- Dialed Number String:
<dialed number string configured in RoutingAdapter.ini> - Routing Type:
3rd Party Multichannel - Media Routing Domain: media routing domain configured in previous step
- Call Type: Call Type configured in previous step
Configure Skill Group / Precision Queues
Configure either skill groups or precision queues.
a) Skill groups:
Navigate to Unified CCE Administration | Manage | Skill Groups. Click New to create a Skill Group for Media Routing
- Name:
<Name of Skill Group> - Media Routing Domain: For the media routing domain configured in the previous step
- Proceed to assign Agents to the skill group.
b) Precision queues:
- Navigate to Unified CCE Administration | Manage | Attributes. Click New to create required Attributes.
- Navigate to Unified CCE Administration | Manage | Precision Queues. Click New to create a new Precision Queue.
- For the Media Routing Domain, select one of the Task Routing MRDs you previously created.
- Proceed to assign attributes to your agents
Multi Agent PG Configuration
In some scenarios, it is required to configure media environment to work with multiple Agent PGs. In order to configure, you will need to follow the next steps:
Configure the new Agent PG.
Follow the instructions in Cisco guide in order to configure the new Agent PG.
Configure new SkillGroup for the new Agent PG agents.
Follow the steps described in section Configure Skill Group / Precision Queues (CCE) or Configure Skill Group / Precision Queues (PCCE) depending on your CCE or PCCE installation.
Make sure you use the same Media Routing Domain in the new SkillGroup.
Add the Application Path member to the Application Path configuration for the new Finesse Server.
Follow the steps described in section Add Application Path Members (CCE) or Add Application Path Members (PCCE) depending your CCE or PCCE installation.
CCE Script (CCE and PCCE)
Labels
With CCE it is possible to configure global predefined labels that can be used in the different CCE routing scripts. Alternatively, use Dynamic Labels in the CCE routing script.
With PCCE it is not possible to configure global predefined labels that can be used in the different PCCE routing scripts. For each routing script the labels must be configured directly in the script editor as a Dynamic Label.
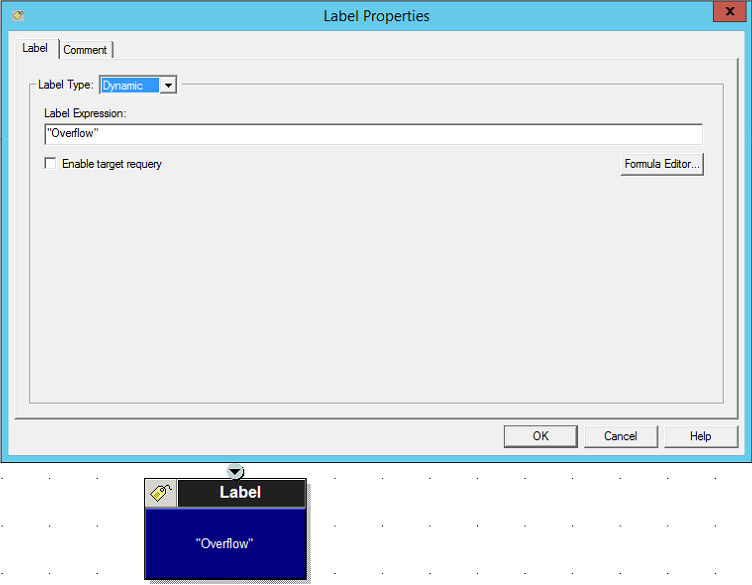
The RoutingAdapter is able to handle labels received from the CCE routing script.
Overflow
Too many tasks in queue – tasks will be rerouted after n seconds (configurable with the OverflowDefaultTimeInSec-parameter)
Overflow_<WaitTimeMin>
Too many tasks in queue – tasks will be rerouted after \<WaitTimeMin\>-minutes (e.g. OVERFLOW_90 initiates re-route after 90 minutes)
\<WaitTimeMin\> is decimal
Error
Routing error, cannot be recovered. This task will not be rerouted by the Routing Adapter. The Routing Adapter tries to change the case to the configured failure queue
Timeout
No agent found – task is rerouted immediately
Reroute Reasons
When rerouting a task, Routing Adapter UQ sets a reroute reason into a variable (Peripheral Variable or ECC variable) as configured in the field RoutingReasonVariable. See RoutingReasonVariable for configuration details.
Reroute reasons are case-sensitive. Possible values of the reroute reason:
- Rona: This reason is assigned when Salesforce Omni Push Timeout Timer has elapsed. See section RONA and Reject for details.
- Reject: Is assigned when the agent declined a task.
- Reroute: Is assigned if it is not clear why the task was re-routed.
- Restart: Is assigned if the tasks are recovered after a connection interruption or a restart of the Routing Adapter.
- Transfer: Is assigned if the chat was transferred to a chat button.
- Overflow: CCE routing script returned with the label
Overflow. - Timeout: CCE routing script returned with the label
Timeout.
CCE Script
Script Editor on Unified CCE AW-HDS-DDS or Internet Script Editor
Sample Script to route media tasks:
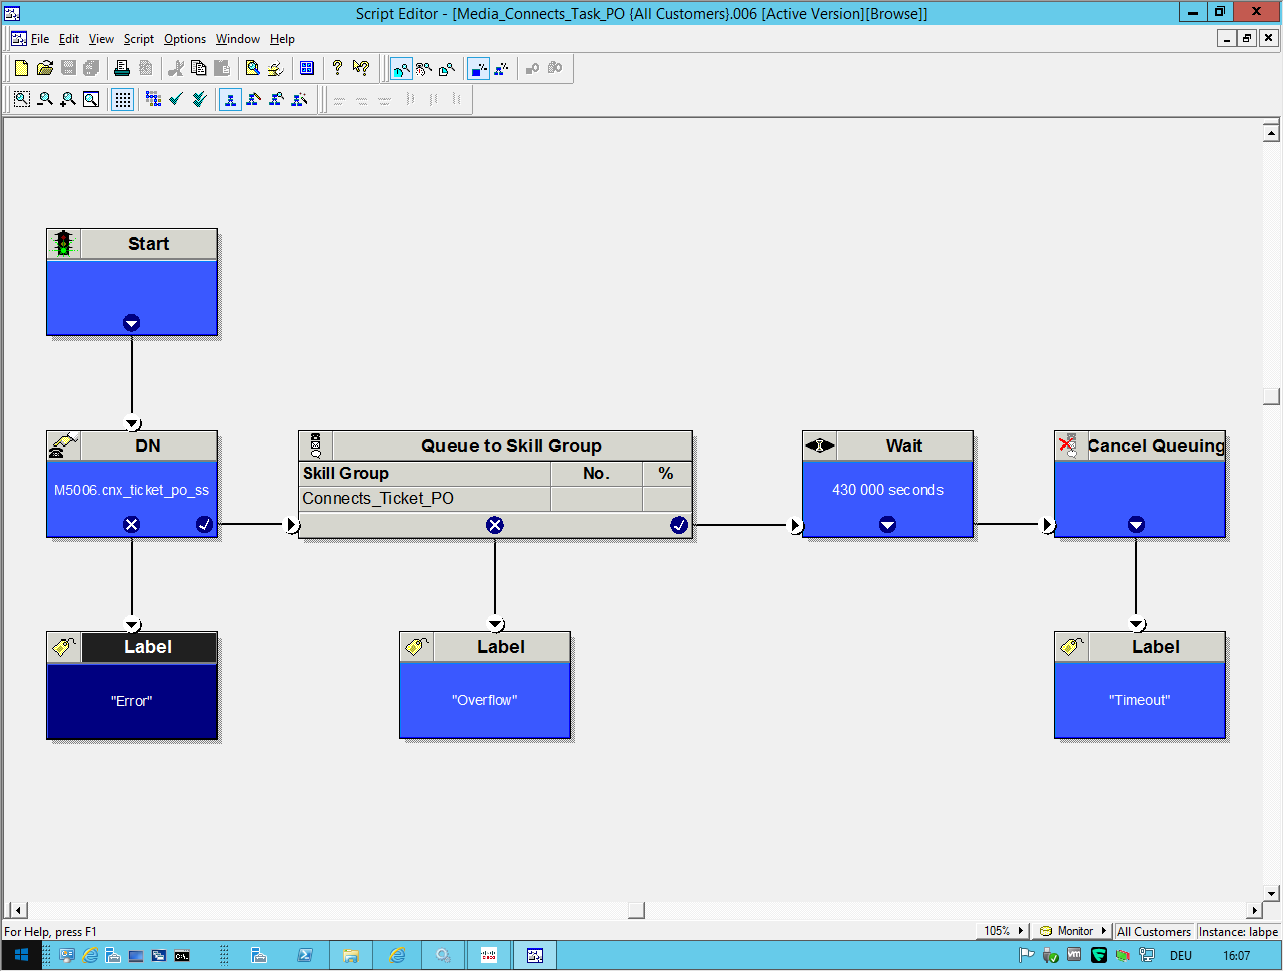
Time in Queue / CCE Script Wait node
After the task is queued, a Wait node is called with a time lower than the system limit (MaxTimeInQueue)
MaxTimeInQueue
The maximum duration of queued tasks of both Routers have to be increased from the default 3600 seconds up to 431,000 seconds (5 days) in the registry
(HLM\SW\cisco...\<instance>\RouterA\Router\CurrentVersion\Configuration\Queuing\MaxTimeInQueue)
The registry settings on the PGs are not relevant for this case and can be left as they are.
The Wait within the script before the task timeout has to be shorter than the MaxTimeInQueue and should be set to a maximum value of 430,000 to ensure the script returns with the Timeout label and is not terminated by the MaxTimeInQueue value.
MaxCalls & MaxCallsPerCallType
The maximum amount of calls and tasks summarized for all queues (MaxCalls) and the allowed amount of calls or tasks per CallType (MaxCallsPerCallType) may be easily exceeded with MediaRouting (default = 10,000) and cause overflows. To provide a fallback, these two settings can also be changed in the registry here:
HLMSW\cisco...\<instance>\RouterA\Router\CurrentVersion\Configuration\Queuing\....
Finesse User Signout Channel
A new Administrator CLI to address Media channels sign-out functionality has been introduced with the Finesse 11.5(1)ES06 and 11.6(1) ES04 releases.
The CLI utils finesse user_signout channel is used by the Administrator to configure the media channels from which the users will be signed out.
admin: utils finesse user_signout_channel type

1: signout user from voice channel.
2: signout user from voice and non-voice media channels configured for finesse.
a: signout from all media channels configured for the user.
q: quit.
It is recommended to use the option a: signout from all media channels configured for the user, or option 2: signout user from voice and non-voice media channels configured for Finesse. When the supervisor signs out the agent, the login mask will be displayed in the gadget.
When selecting option 1, the media channels will remain connected after the supervisor forces the agent logout.
Agent Desk Settings
Agents that are configured to use the MediaRouting Ext-MRI need to have their Logout inactivity time setting set to blank.
If the Logout inactivity time setting is not blank and agents exceed the Logout inactivity time in the voice MRD, they are logged out of the voice channel even if they are actively working on tasks from non-voice MRDs. To resume working on the voice channel, agents need first to log out and back in.
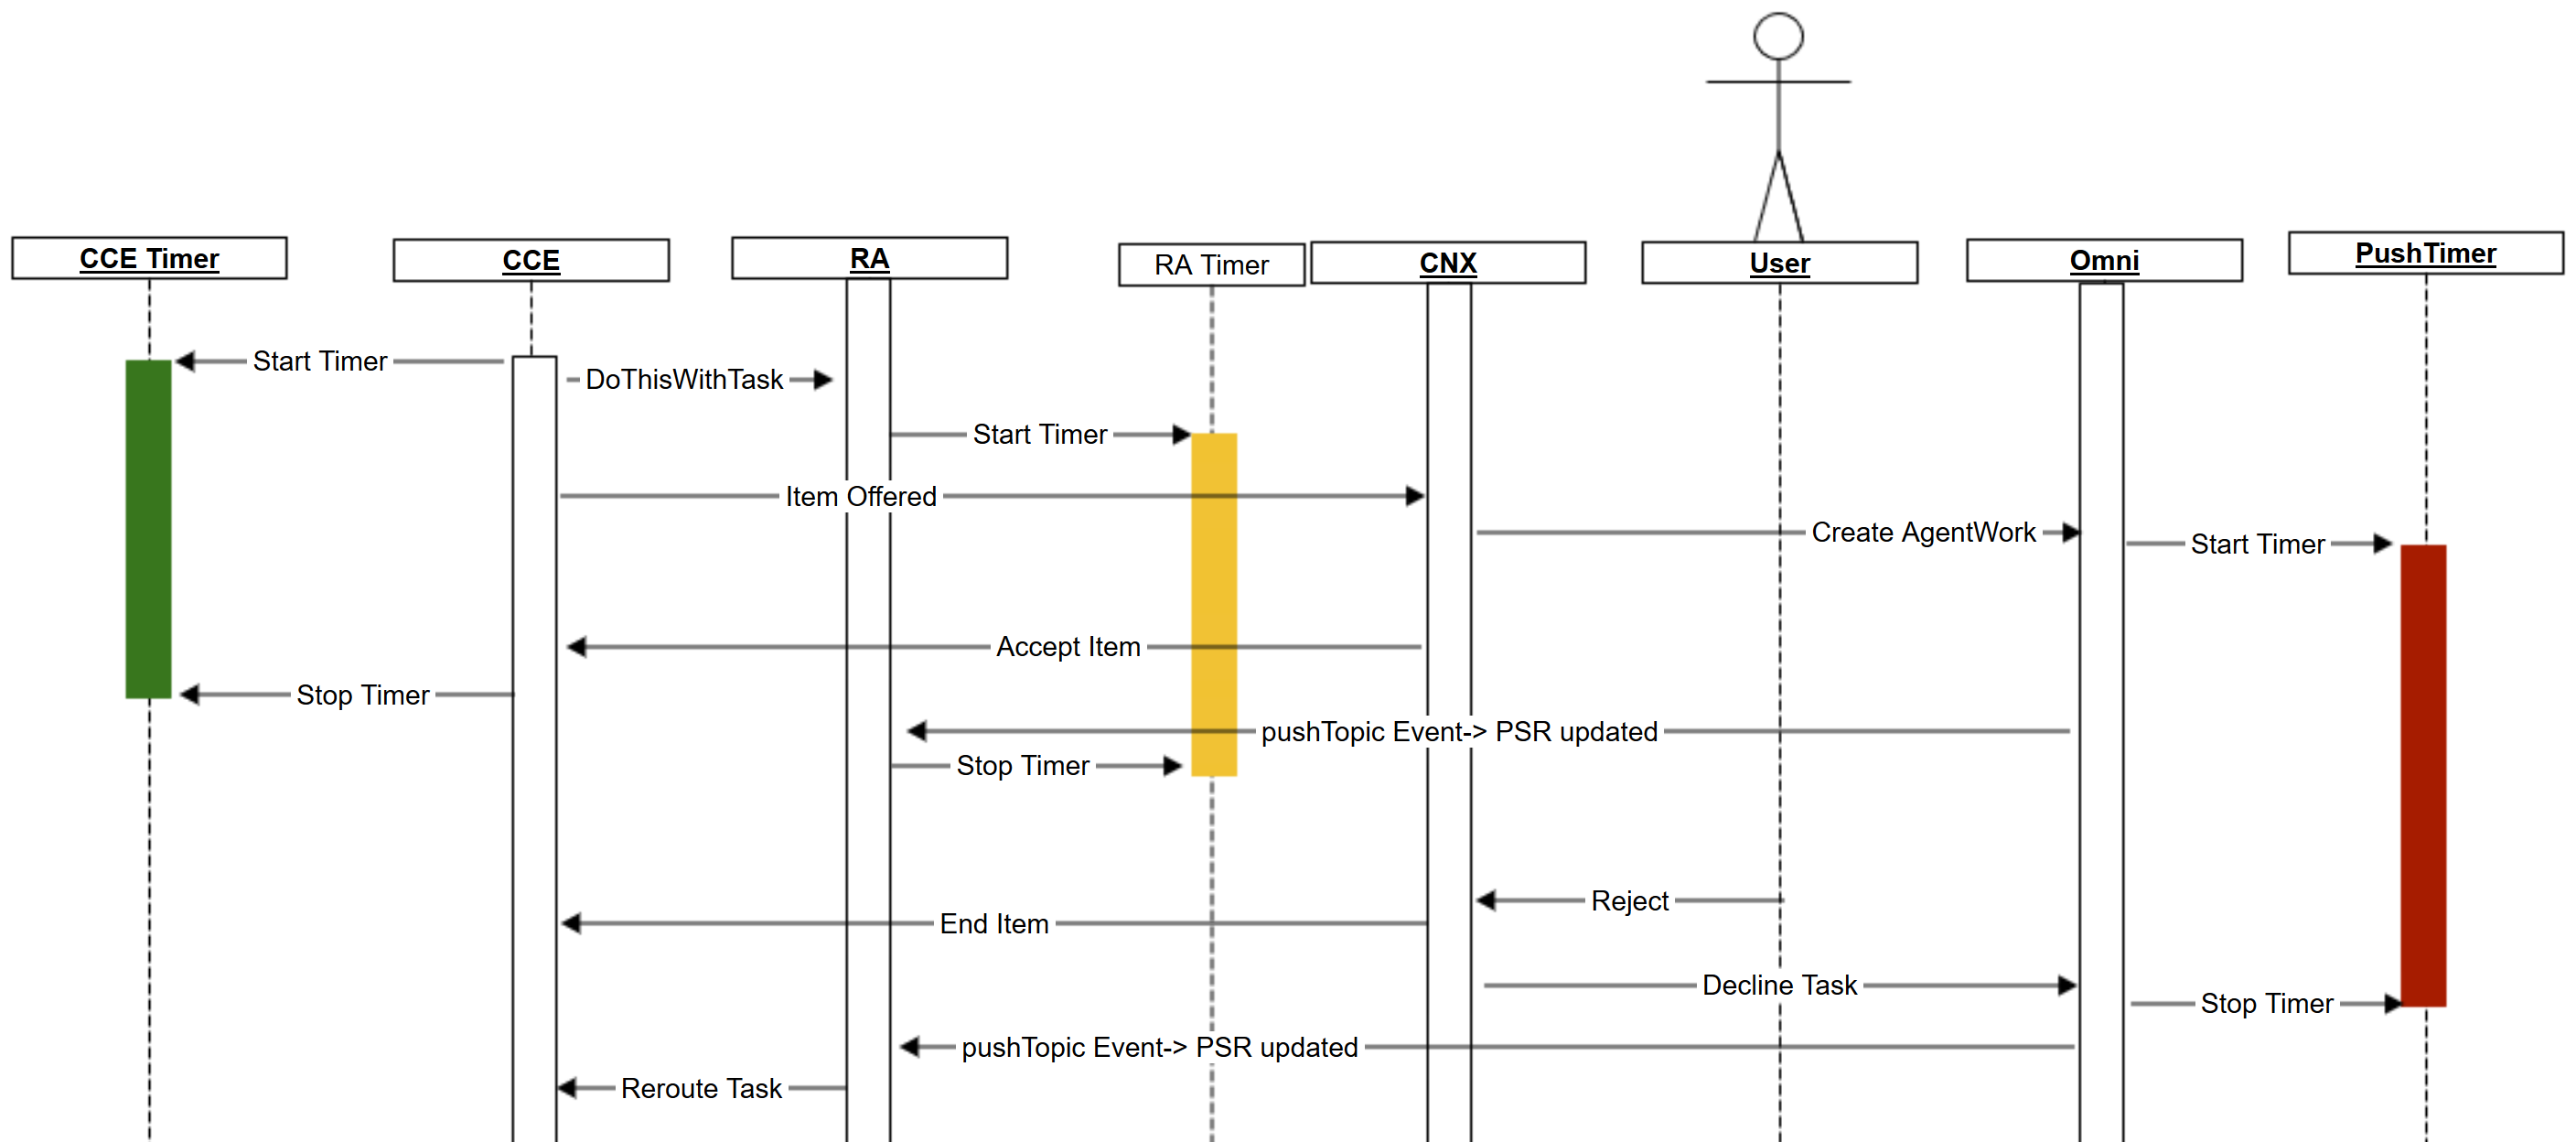
RONA and Reject
This chapter describes how RONA and reject works with the Routing Adapter UQ
Limitations
- If the agent gets a task and the gadget becomes inaccessible before the agent starts working on it, the agent state does not automatically switch to NOT_READY.
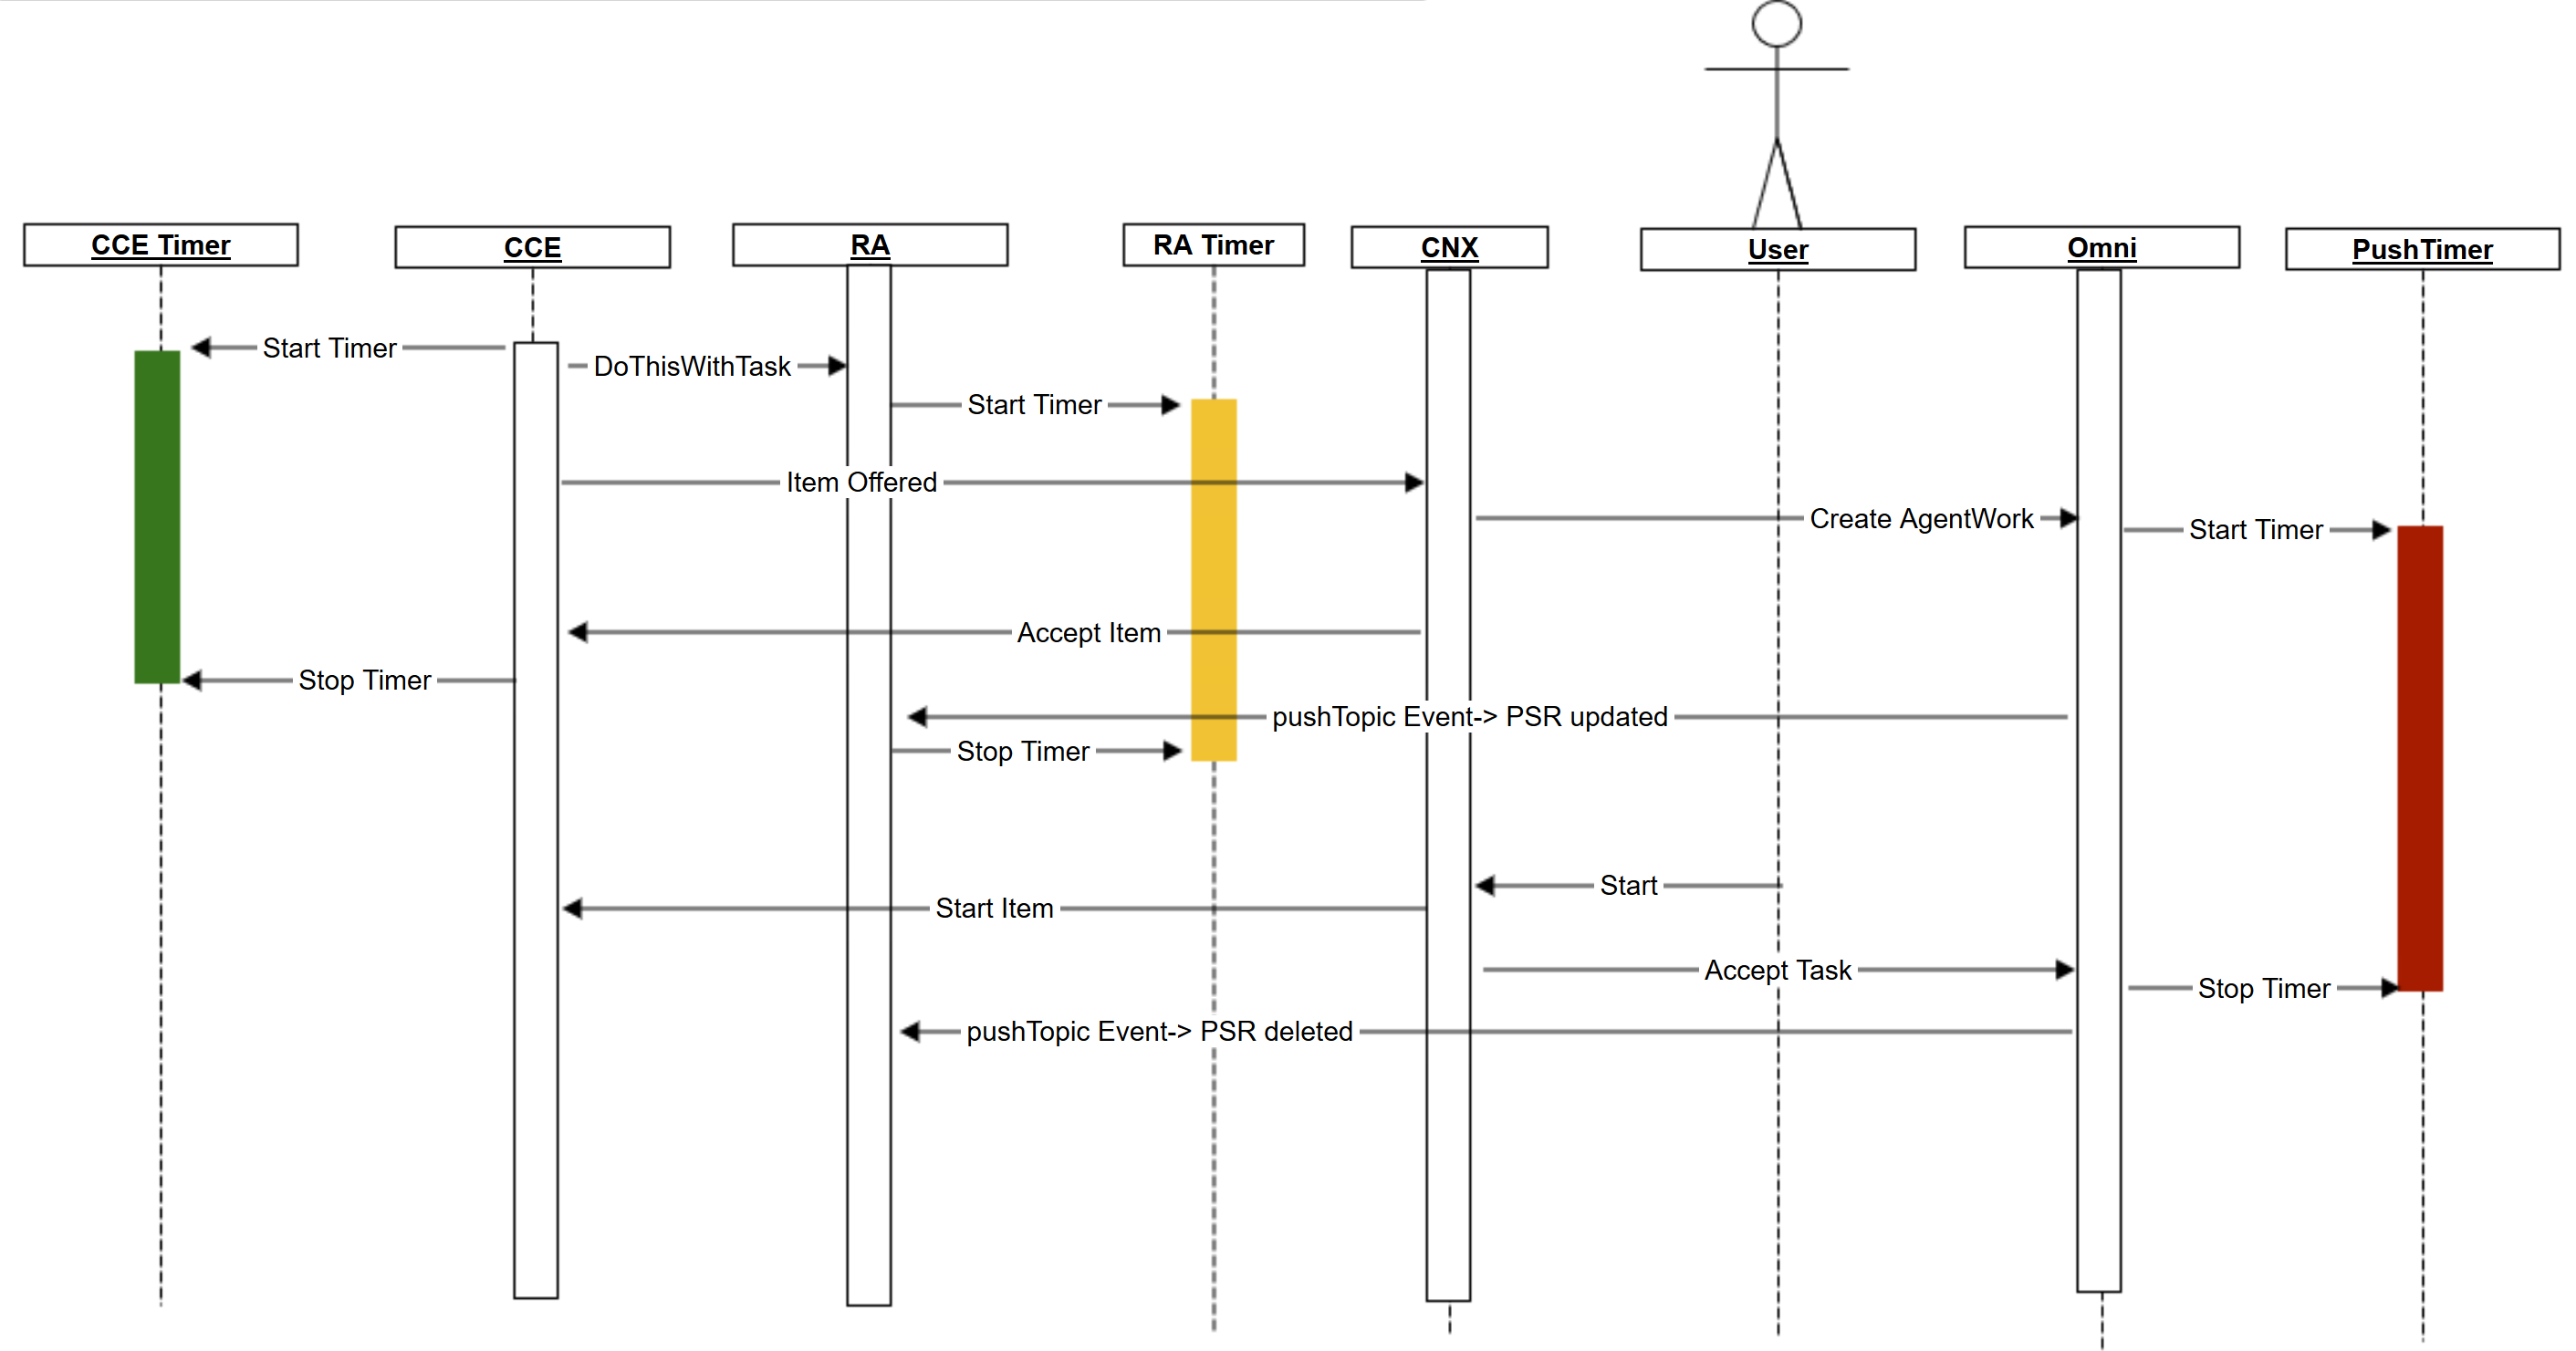
Timers
In order to support a robust environment this RONA Implementation contains three different timers. One for each involved system.
The following chapter requires a deeper, technical understanding of Salesforce and the CCE environment.
Finesse Start Timer
Defines the time span in which the gadget must receive the item. The timer starts after the CCE routing engine selects an agent. It stops after the b+s Connects for Salesforce Integration accepted the incoming Cisco item.
If the timer elapses, the agent changes to NOT_READY and every unaccepted item is removed. This is a system timer. This ensures that the agent doesn’t receive the rerouted task.
Must be smaller than the Routing Adapter Timer
Routing Adapter Timer
Defines the time span the gadget has to display a task to the agent. The timer starts after the routing engine selects an agent. The timer stops after the b+s Connects for Salesforce Integration created an Omni Channel AgentWork and Salesforce sends an update Event to the b+s Routing Adapter.
This timer is necessary to ensure that no task is lost if the gadget becomes inaccessible, and therefore no Omni Channel AgentWork can be created. If the timer elapses, the task gets rerouted.
The Routing Adapter Timer is set by the RerouteTimeInSec setting inside the Routing Adapter Configuration.
Must be greater than the Finesse Start Timer
Omni Push Timeout Timer
Defines the actual RONA time span. If the agent does not take an action on the task in the configured amount of time, their state changes to NOT_READY and the task gets removed.

Installation of Routing Adapter UQ
There is currently no installation wizard available so the installation of the Routing Adapter component has to be done manually.
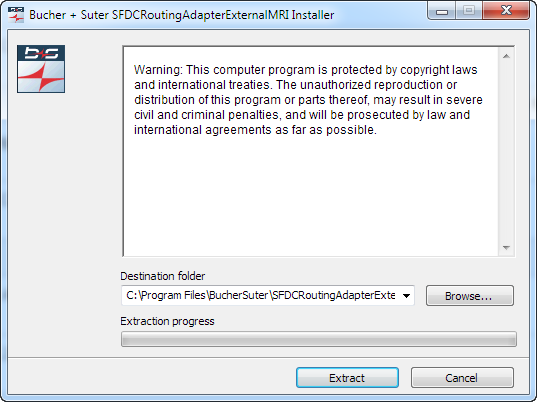
Installation
- Copy the selfextracting ZIP file BucherSuter_ SFDCRoutingAdapterExternalMRI_V-x-x-x-x-SFX.exe to the server
- Extract the ZIP file to:
C:\Program Files\BucherSuter\SFDCRoutingAdapterExternalMRI
- Move the following files:
SFDCRoutingAdapter_orig.ini (and rename to SFDCRoutingAdapter.ini)
install_service.bat
uninstall_service.bat
start_console.bat
To (create the folder if it does not exists already):
%PROGRAMDATA%\BucherSuter\SFDCRoutingAdapterExternalMRI
The self-extractable replaces the files in the selected destination folder with the new files in the self-extractable. This operation is performed without notification to the user.
Configuration
Edit the configuration directly in the SFDCRoutingAdapter.ini file (see Configuration of Routing Adapter UQ)
- [Gate_mri]: Change
TcpPortNumber,MediaUrlVariable - [Gate_sfdc]: Change
SfdcUserName,SfdcUserPassword,SfdcUserSecurityToken,SfdcOauthClientSecret,SfdcOauthClientIdandStreamingApiChannel
Service Setup
Edit the existing batch files install_service.bat, uninstall_service.bat and start_console.bat to install an instance name other than default.
-x "default" -> -x "your instance name"
Administrator privileges are required to execute the batch files.
Install the service by executing install_service.bat
(See file SFDCRoutingAdapter.InstallLog for more information about the executed service installation)
Uninstall the service by executing uninstall_service.bat
(See file SFDCRoutingAdapter.InstallLog for more information about the executed service uninstallation)
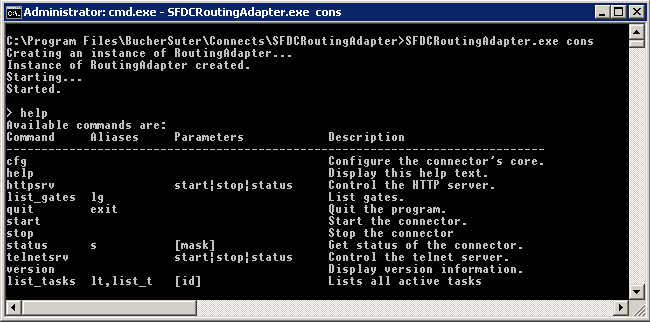
Run SFDCRoutingAdapter in console by executing start_console.bat.
Configuration of Routing Adapter UQ
Configuration file SFDCRoutingAdapter.ini
Core section
Please refer to the section Troubleshooting Routing Adapter | Logging for more information about the log file settings.
HttpServerPort: Port for HTTP-Server offering status info
Default: 9081
TelnetServerPort: Port for remote console telnet interface
Default: 9011
AutoStartHttpServer: Automatically start Http interface
Default: 0
AutoStartTelnetServer: Automatically start Telnet interface
Default: 1
HttpAllowedHosts (*): Hosts allowed accessing the http interface
Default: 127.0.0.1
TelnetAllowedHosts (*): Hosts allowed accessing the telnet console
Default: 127.0.0.1
LogFile: Log file path
Default: C:\ProgramData\BucherSuter\logfiles\SFDCRoutingAdapterExternalMRI.log
LogMask: Trace level of log files
Default: 0x8FFFFFF4
The last 4 bits are used for the log level: 1 Fatal, 2 Error, 3 Warn, 4 Info, 5 Debug
It is recommended to avoid using debug level in production. Using debug level under heavy load will reduce performance.
MaxLogFileSize (*): Specifies the maximum size of a log file
Default: 10000KB
MaxLogFileCount (*): Specifies the number of roll files that are used by the file logger
Default: 10
CertificateThumbprint: Provide a thumbprint of a valid certificate
Default: Empty
Mandatory for an encrypted MRI connection (PIM <-> Routing Adapter)
MRIGate section
ProtocolVersion: Specifies the MRI protocol version used to communicate with the MR PIM
Default: 1
RouteMessageSendRate: The maximum number of tasks sent per second. The maximum is 5
Default: 5
TcpPortNumber: Port number which is used to establish a TCP connection with MR PIM
Default: 7021
MaxQueuedTasks: The maximum number of tasks that can be queued in the Routing Adapter
Default: 5000
MaxQueuedTasksPrioReservation: The maximum number of queue positions which are reserved for priority tasks. The configured amount will be allocated from the MaxQueuedTasks setting
Default: 100
MediaUrlVariable: Call variable or ECC that is used for saving the task identifier
Range: PV1-PV10
Example: PV5
Example: ECC.user.VarName (Must always be prefixed with ECC.)
If you are using an ECC Variable for the Media URL, it must have a minimum length of 25 characters.
This setting has to match with the “Work Item Id Variable” setting in the b+s Configuration.
RoutingReasonVariable: Call variable or ECC that is used for saving the routing reason. This value can then be used to make decisions in the ICM Script. See section Reroute Reasons for a list of possible reasons.
Range: PV1-PV10
Example: PV5
Example: ECC.user.VarName (Must always be prefixed with ECC.)
If you are using an ECC Variable for the Routing Reason, it must have a minimum length of 10 characters.
OverflowDefaultTimeInSec (*): Defines the reroute timeout in seconds after an overflow
Default: 600
IsEncrypted: A true enables link encryption. Additional provide a certificate thumbprint
Default: false
(*) These configuration keys do not exist in the delivered INI-File. They use the described default value and may be added to the file on demand if another value should be used.
SFDCGate section
MediaUrlPrefix: Media URL prefix appended to every routed task in the correlator data field of the route request
Default: sfdc://
Entities: A comma-separated list of Salesforce Objects for which the Routing Adapter listens for Notifications
Supported types: Any Salesforce object type (built-in and custom)
If adding custom objects, make sure to use the API name (e.g. append __c to the name)
OauthLoginEndpoint: Endpoint to obtain an access token via the connected app.
Default (Production environments): https://login.salesforce.com/services/oauth2/token
Default (Sandbox environments): https://test.salesforce.com/services/oauth2/token
SfdcUserName: The name of the Salesforce user to connect the Streaming- and the Rest API
Default: Empty
SfdcUserPassword: The password of the Salesforce user to connect the Streaming- and the Rest API
Default: Empty
SfdcUserSecurityToken: The Salesforce user Security Token used to connect the Streaming- and the Rest API. This value must be obtained in Salesforce and will be emailed to the admin
Default: Empty
SfdcOauthClientId: The consumer ID of the Salesforce Connected App
Default: Empty
SfdcOauthClientSecret: The consumer secret of the Salesforce Connected App
Default: Empty
SfdcSessionTimeoutInMinutes: Holds the session timeout configured within Salesforce, in seconds. This configuration value is used to let the Routing Adapter calculate the interval in which the access token should be renewed
Default: 120
StreamingApiEndpointUri: The Endpoint where Routing Adapter will connect the Streaming API. This value is also used to determine the Streaming API Version to work with.
Default: /cometd/55.0
StreamingApiChannel: The name of the PushTopic entity to which the Routing Adapter will subscribe. All route requests will be received via this PushTopic
Default: /topic/PT_CNX_ExternalRouting
Do not remove the prefix “/topic/“ in front of the PushTopic name.
RestApiVersion: The Version of the Rest API which should be called by the Routing Adapter.
Default: v55.0
Do not remove the letter “v“ in front of the version information.
RestClientMaxQueryQueueSize: Value to determine the maximum size of the Rest API Query Request Queue. This configuration is used to prevent the Routing Adapter from overflowing in case there are too many requests to process.
Default: 2000
RestClientMaxConcurrentQueries: Determines how many Rest API Query Requests can be pending simultaneously.
Default: 20
RequestRerouteReason: If enabled there will be an additional request per re-routed task to the Salesforce REST API. This is done in order to determine if the task was RONA or rejected. The RoutingReasonVariable will either contain ‘Rona’ or ‘Reject’. If disabled the RoutingReasonVariable will always contain ‘Reroute’ on re-routed tasks.
Default: true
Every additional request counts against the Salesforce API limits. See section Rest API under API Limits for more information.
EnableWindowsEventLog: Determines if monitoring events are written into the Windows Event Log. For the log level see the WindowsEventLogLevel setting below.
See section Windows Event Logs for more information about the monitoring messages.
Default: false
WindowsEventLogLevel (*): Determines the log level of messages which are being written into the Windows Event Log. Needs the setting EnableWindowsEventLog to be true in order to work
Possible Values:
5Fatal4Error, Fatal3Warning, Error, Fatal2Info, Warning, Error, Fatal
Default: 4
(*) These configuration keys do not exist in the delivered INI-File. They use the described default value and may be added to the file on demand if another value should be used.
Remark for parameter SSL Server Certificates
Since the Routing Adapter is a client, and initiates the connection to Salesforce, there is no need to provide an SSL Certificate and configure the Certificate's Thumbprint in it.
Configuring the routed entities
The configuration section of the SFDCGate contains subsections for each entity that is listed in the configuration value “Entity”.
Section: [Gate_sfdc\<Salesforce entity>]
Identifier: This Identifier in the notification is used to identify the Salesforce Object that is sending this Notification. Make sure the Salesforce Outbound Message contains this Field
Default: Id
RecordIdPrefix: This value is needed in order to make the Routing Adapter aware of which Streaming API notification, belongs to which entity. For example, if the Adapter receives a notification that contains a WorkitemID starting with “ABC”, it will know that this notification belongs to the Salesforce Entity that has the RecordIdPrefix “ABC” configured.
A list of the Record ID Prefixes can be found here: Entity Key prefix decoder
Example: 500 (for Case)
Fields (*): A comma-separated list of Salesforce Fields to be fetched. The Fields have to be part of the Salesforce Object and have to be listed exactly the same as they are named in Salesforce.
This field list will be used to build a SOQL request like SELECT Id, <Fields> FROM <notification-item-type> WHERE Id = <notification-identifier-value>
Use the API Name and do not forget to add __c for custom Fields.
Example: casenumber,Contact.email,type,status, priority,ownerid,product__c,owner.name,subject
Sender: Sender of the routed item
Example: ${Contact.Email}
The content of this field will be also used for the data lookup configured in Salesforce Softphone Layout
PreferredAgentId: The agent who should receive the task before others
Example: ${ns_customfieldname__c}
Depending on the Queue to Agent Script Node configuration, it is possible to use different values (e.g. AgentID, AgentSkillTargetID etc.)
ScriptSelector: The script selector used for the <Salesforce entity>.
Example: ${ns_customfieldname__c}
Subject: Subject of the routed item
Example: ${subject}
PV01-PV10: Peripheral Variables 1 to 10
You can assign a static or a dynamic value. Peripheral Variables might be already used in an ICM Script. Make sure to pick an empty one.
ECCVars: Comma-separated list of names of ECC variables that you want to use to assign values to. It is possible to assign a static or dynamic value to any ECC variable on a routed item. See the line below for an example of how to configure the values that are to be filled in the individual ECC variables
Example: user.myeccvar1,user.myeccvar2
\<ECC var name>: For each ECC variable configured under the key ECCVars (see row above), create a configuration key with the name of the ECC variable.
The value that is to be assigned to the ECC variable is configured after the equals (=) sign
Example: user.myeccvar1=${status}
Example: user.myeccvar2=${subject}
FailureOwnerId: If a task cannot be routed, it gets assigned to this Owner (1). These errors are mostly ICM Script / PG or configuration errors. For example if you configure a non-existing script-selector or if you configure a field on Cases which does not exist.
Connection interruptions or component outages do not change the owner of a task.
The FailureOwnerId can be a 15 or 18 digit ID or empty. If no FailureOwnerId is configured, the routing error is logged and the task removed. However, after a recovery, all failed Tasks get routed again until you delete the PSR or change the Owner manually.
Example: 00G1v000005gTYv
This setting does not work for LiveChatTranscript.
(1) To find out the record ID, use Salesforce Workbench (https://workbench.developerforce.com)
SOQL query for queues: SELECT Id,Name FROM Group WHERE Type = 'Queue'
SOQL query for user: SELECT Id, Name FROM User
Priority: Tasks can be prioritized if they are queued in the Routing Adapter
Example: 1
Possible Values:
1Prioritized0Not prioritized
RerouteTimeInSec: If a task does not get routed to an agent after the configured time. The Routing Adapter reroutes the task again. See section RONA and Reject for more information
Example: 10
(*) All fetched Fields and also the name of the notification can be assigned to the Fields (Sender,…PV01-PV10) in the Table above by following this syntax: ${FIELDNAME}. E.g: Sender=${Email}
RequestFieldsOnReroute: If enabled there will be an additional request per re-routed task to the Salesforce REST API. This is done in order to get the field values of that task.
Default: false
Every additional request counts against the Salesforce API limits. See section Rest API under API Limits for more information.
Update Installation
Updating Routing Adapter UQ
Preparation
- Change the name of the current Routing Adapter configuration file to
SFDCRoutingAdapter_backup.ini. This prevents the configuration from being overwritten during the installation process. - Stop the SFDC RoutingAdapter service.
- For version 2.2 and above, make sure to install the .NET Framework 4.7.2. You do not need to uninstall .NET Framework 4.5.2.
- The latest versions of the Microsoft .NET Frameworks can be downloaded from: https://dotnet.microsoft.com/en-us/download/dotnet-framework
Make sure to download the .NET Framework and not .NET Core.
Update
- Proceed with the installation as described in section:
- Copy the configuration settings from
SFDCRoutingAdapter_backup.iniover toSFDCRoutingAdapter.ini. - Start the service and test to verify that the upgrade was successful
Migration from Routing Adapter Ext-MCAL (Legacy)
Create a new Push Topic
The new Routing Adapter UQ needs a Push Topic with update notifications enabled.
There are two ways to achieve this change:
Either create a new Push Topic as described in section Push Topic. Keep in mind using another pushTopic.Name as with Ext-MCAL 1.x.
Or change the existing Push Topic:
The easiest and most comfortable way of updating a Push Topic is to use the Salesforce Developer Console:

Inside the Developer Console, click Debug | Open Execute Anonymous Window or press CTRL+E.
Next, change the name value with the name of your push topic.
Then execute the following code snippet:
PushTopic pushTopic = [SELECT ApiVersion,
                       NotifyForOperationUpdate,
                       NotifyForOperationUndelete
                       FROM PushTopic
                       WHERE Name = 'PT_CNX_ExternalRouting'
                       LIMIT 1];

pushTopic.ApiVersion = 48;
pushTopic.NotifyForOperationUpdate = true;
pushTopic.NotifyForOperationUndelete = false;

update pushTopic;
Remove the old Routing Adapter
To migrate the configuration already in place, be sure to temporarily save the associated configuration files!
- Move to the following destination:
%PROGRAMDATA%\BucherSuter\SFDCRoutingAdapterExternalMRI - Run the script uninstall_service.bat
- Move to the following destination:
C:\Program Files\BucherSuter\SFDCRoutingAdapterExternalMRI - Delete the files from this destination.
Remove the old Agent Adapter
- Move to the following destination:
%PROGRAMDATA%\BucherSuter\AgentAdapter - Run the script uninstall_service.bat
- Move to the following destination:
C:\Program Files\BucherSuter\AgentAdapter - Delete the files from this destination.
Uninstalling MCAL
b+s MCAL can be uninstalled by choosing either one of the following possibilities:
- Using the Microsoft Windows “Add / Remove Programs” respectively “Programs and Features” tool:
- Open the “Add / Remove Programs” tool from the “System Properties” menu
- Select “Bucher + Suter Multichannel Application Link”
- Press “Remove Program” respectively “Uninstall/Change” to start the uninstallation process
- Manual Process:
- Open the installation folder of MCAL
- Double-click on the file “BucherSuter_MCAL-V_2_6_0_0-Installer.exe” and follow the instructions on the screen.
Install the new Routing Adapter
Install the new Routing Adapter as described in chapter Installation of Routing Adapter UQ
Configuration Migration
The new Routing Adapter UQ does not need a b+s MCAL, b+s MM or b+s AA. Some configuration values have to be transferred to the new RA configuration. As a reference, it is suggested to use the old RA configuration and change specific values to support the new routing.
Changed Fields Ext-MCAL – UQ
Configuration of the Core Section
Section: [core]
StreamingApiEndpointUri: Upgrade to new Version
Old Value: /cometd/40.0
New Value: /cometd/48.0
RestApiVersion: Upgrade to new Version
Old Value: v36.0
New Value: v48.0
PersistenceStoragePath: The Routing Adapter Ext-UQ does not need a storage file to recover items from Salesforce
Old Value: C:\ProgramData\BucherSuter\temp\SFDCRoutingAdapterExternalMRI
New Value: -
ReplayFromLastKnown: The Routing Adapter Ext-UQ does not need a storage file to recover items from Salesforce
Old Value: true
New Value: -
EnableWindowsEventLog: Determines if monitoring events are written into the Windows Event Log. For the log level see the WindowsEventLogLevel setting below See section Windows Event Log for more information about the monitoring messages.
Default: false
Old Value: -
New Value: false
Configuration of the routed entities
Section: [Gate_sfdc\<Salesforce entity>]
Priority: Tasks can be prioritized if they are queued in the Routing Adapter
Possible Values:
1Prioritized0Not prioritized
Example: 1
Old Value: -
New Value: 0
RerouteTimeInSec: If a task does not get routed to an agent after the configured time. The Routing Adapter reroutes the task again. See section RONA and Reject for more information.
Example: 10
Old Value: -
New Value: 10
FailureOwnerId If a task cannot be routed, it gets assigned to this Owner (2). The FailureOwnerId can be a 15 or 18 digit ID or empty. If no FailureOwnerId is configured, the routing error is logged and the task removed. However, after a recovery, all failed Tasks re routed again until the PSR is deleted or changed manually by Owner. Important: This setting does not work for LiveChatTranscript.
Example: 00G1v000005gTYv
Old Value: -
New Value: -
(2): To find out the record ID, use Salesforce Workbench (https://workbench.developerforce.com)
SOQL query for queues: SELECT Id,Name FROM Group WHERE Type = 'Queue'
SOQL query for user: SELECT Id, Name FROM User
Configuration of the MRI gate
The Gate_mri section replaces the Gate_mcal section.
There are a few new Fields which are described in chapter Configuration MRIGate
Multiple CCE Deployments
In a deployment using multiple CCEs, each one will require its own Routing Adapter.
Multiple Salesforce Organizations
In order to use multiple Salesforce Organizations with multiple CCEs, every Salesforce Organization will need its own Routing Adapter setup. This means every Salesforce Organization must connect to only one CCE.
Single Salesforce Organization
In order to use one Salesforce Organization with multiple CCEs, each CCE must have its own Routing Adapter to connect to the Salesforce Organization. Tasks can only be routed to one CCE at a time, to avoid multiple agents receiving the same task. Therefore each Routing Adapter requires its own unique PushTopic.
Setup in Salesforce:
- Create a queue per CCE with an external routing enabled routing configuration.
- Get the queue ids.
We recommend using the Salesforce Workbench (https://workbench.developerforce.com/)
SELECT Id, DeveloperName, Name, Type
FROM Group
WHERE Name = '<QUEUE-NAME>'
- Create a PushTopic for each queue with a query which filters for the queue id.
See section Create a New PushTopic.
SELECT Id,
    Serial,
    QueueId,
    WorkItemId,
    IsPushed,
    ServiceChannelId,
    LastDeclinedAgentSession,
    CreatedDate
FROM PendingServiceRouting
WHERE RoutingModel = 'ExternalRouting'
AND QueueId = '<QUEUE-ID>'
- Configure each Routing Adapter to subscribe to the correct Streaming API Channel (PushTopic).
If you want to move tasks from one CCE to another, they must first be assigned to a user or a queue without a routing configuration, before assigning them to another external routing queue. Do not assign Salesforce tasks directly from one external routing queue to another. This causes faulty behavior.
Windows Event Log
The Routing Adapter Ext-UQ writes the relevant error and info messages in the Windows Event Log, so the admin is able to monitor the Routing Adapter and can react fast on a system failure.
See configuration option EnableWindowsEventLog for enabling the Windows Event Log.
Information Messages
Waiting for MR PIM Connection
Event ID: 1
Meaning: The Routing Adapter is initially not connected to the MR Pim and is waiting for the Pim to open a connection. It can take up to 2 Minutes for the Pim to establish a connection
Fix:
- check the MR Pim config
- check the RA MRI Gate config
- restart the Routing Adapter
Connected to MR PIM
Event ID: 2
Meaning: The connection to the MR Pim could be established
Fix: n/a
Connecting to Salesforce Streaming API.
Event ID: 3
Meaning: Trying to connect to Salesforce
Fix:
- check the Salesforce config
- check the Salesforce Gate config
- restart the Routing Adapter
Routing Adapter is now active
Event ID: 4
Meaning: The Routing Adapter is online and ready to route
Fix: n/a
Warning Messages
Lost connection to MR PIM
Event ID: 5
Meaning: The Routing Adapter lost the connection to the MR Pim
Fix: n/a
Lost connection to MR PIM. Waiting for MR PIM to reconnect
Event ID: 6
Meaning: The Routing Adapter lost the connection to the MR Pim and is waiting for the Pim to reconnect. It can take up to 2 minutes for the Pim to establish a connection
Fix:
- check the MR Pim config
- check the RA MRI Gate config
- restart the Routing Adapter
Lost connection to Salesforce Streaming API
Event ID: 7
Meaning: Salesforce is unavailable. Trying to reconnect
Fix: n/a
Ping to Salesforce failed x times
Event ID: 8
Meaning: The Routing Adapter tries to reconnect to Salesforce. If the connection cannot be established, check Salesforce and Salesforce Gate config and restart the Routing Adapter
Fix:
- check the Salesforce config
- check the Salesforce Gate config
- restart the Routing Adapter
Error Messages
No valid entity configuration found, shutting down...
Event ID: 0
Meaning: The entity configuration is not correct
Fix:
- change the entity configuration
- Restart the Routing Adapter
Unable to get a valid SFDC AccessToken
Event ID: 0
Meaning: The Routing Adapter cannot get a valid SFDC AccessToken. Please check the Salesforce Gate config
Fix:
- check the Salesforce config
- check the Salesforce Gate config
- restart the Routing Adapter
No valid FailureOwnerId configuration found. FailureOwnerId must be 15 or 18 characters long.
Event ID: 0
Meaning: The FailureOwnerId is set but invalid
Fix:
- check the FailureOwnerId in the config file
- restart the Routing Adapter
Exception while parsing Query Response.
Event ID: 0
Meaning: The Data received from Salesforce is in an unexpected format. Please contact b+s Support
Fix: Install a newer version of the Routing Adapter
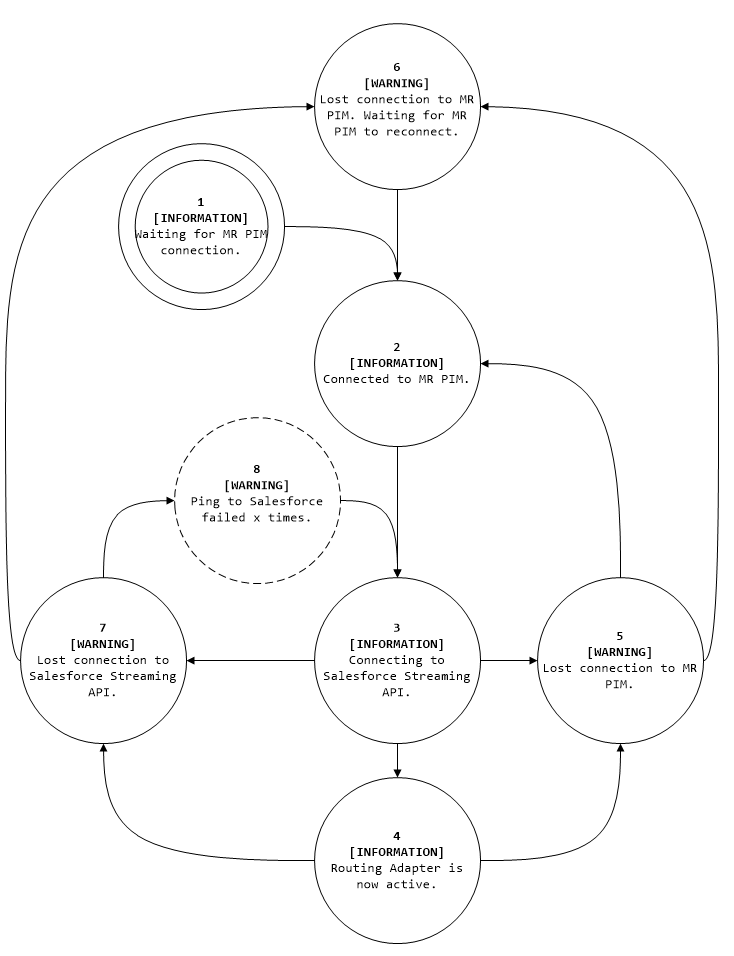
Windows Event Log State Diagram
The diagram below shows the flow of Windows Event Log messages. If the Routing Adapter loses connection to ether the MR PIM or the Streaming API we log a warning message. The other messages are for monitoring purpose. The Ping to Salesforce failed x times message is optional and appears only if the Routing Adapter cannot reconnect instantly
Securing the connections
The whole deployment of b+s Connects for Salesforce consists of several different components running on several servers.
Since modern browsers all block mixed content, and the Salesforce CRM is running securely, it is also necessary to run the b+s Connects Finesse Gadget securely.
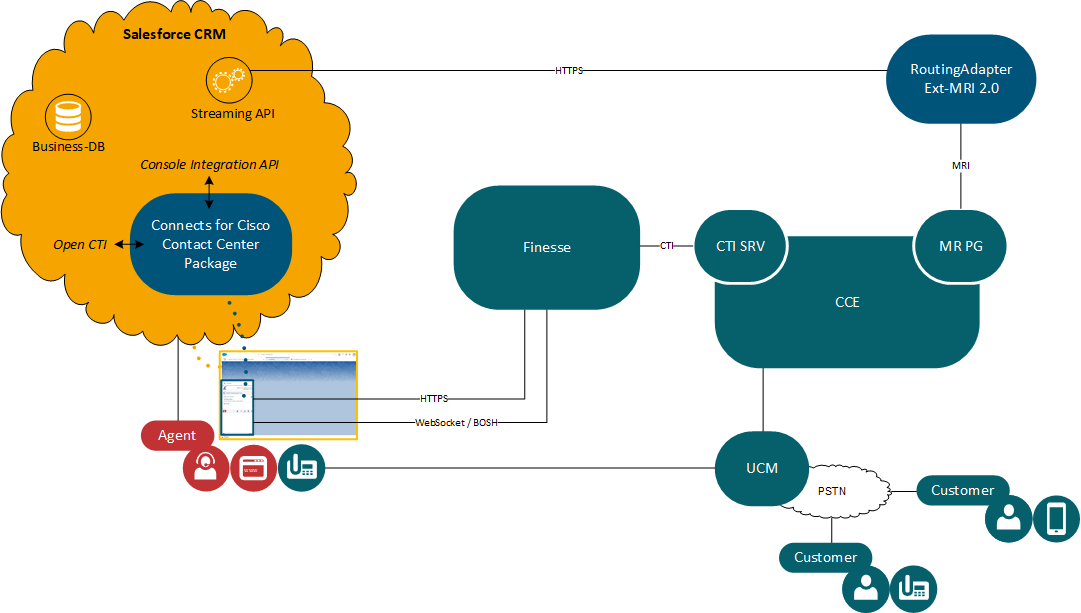
The following chapters show which configurations are needed to secure the individual connections.
Communication between Salesforce and b+s Components uses TLS 1.2. Please make sure it is enabled on the Component Servers. For more information visit Microsoft Technet url https://technet.microsoft.com/en-us/library/dn786418.aspx#BKMK_SchannelTR_TLS12
Securing the b+s Connects Finesse Gadget
To secure the b+s Connects Finesse Gadget, a trusted certificate has to be created (and validated against either an official or a company-wide trusted certification authority) and uploaded to the Cisco Finesse server.
Please refer to section Replace the self-signed Cisco Finesse Server Certificate for more information.
The Salesforce user browser has to trust the CA which has validated the certificate.
Securing the b+s Routing Adapter (MRI connection) – NEW in CCE 12
Not yet implemented: planned for future release.
Proxy Server
In order to add a proxy server
- Stop the Routing Adapter
- Open the following file
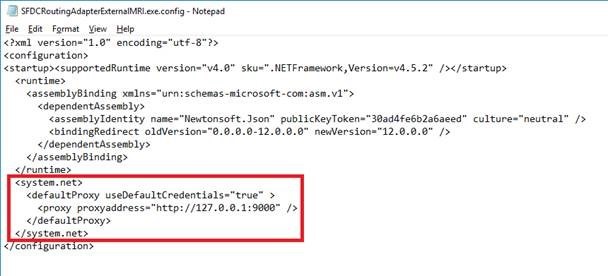
C:\Program Files\BucherSuter\SFDCRoutingAdapterExternalMRI\SFDCRoutingAdapterExternalMRI.exe.config
- In the <configuration> section, after
insert the following XML snippet.
<system.net>
  <defaultProxy useDefaultCredentials="true" >
    <proxy proxyaddress="http://127.0.0.1:9000" />
  </defaultProxy>
</system.net>
- Adapt the value of proxyaddress to the URL of your proxy.
- Save the file
- Restart the Routing Adapter