Calabrio On-Prem Recording Toolbar
In version 5.12 of the b+s Connects for Salesforce this feature will be removed (deprecation notice)
Introduction
This document provides information to install, configure, and manage the b+s Connects for Salesforce Recording Toolbar for Calabrio On-Prem, which integrates Salesforce CRM and Cisco Contact Center solution with the Calabrio On-Prem recording solution.
Compatibility
Supported versions
- Calabrio On-Prem 11.5
- Supported in Cisco CCE and CCX deployments.
- Recording feature must be enabled by b+s on request.
- This integration requires Calabrio ONE Authentication to be enabled.
- Gateway recording deployments are not supported.
Installation


The Recording Toolbar is integrated into the b+s Connects for Salesforce package as Add-on feature. Perform the steps in logical order in this chapter to correctly configure the Recording Toolbar.
Contact b+s to have the Recording Toolbar activated.
Due to a limitation in the Calabrio API it is not possible to show the current state of the recording inside the Recording Toolbar.
Configuration
Custom Toolbar
First add the Recording Toolbar to the b+s Connects for Salesforce gadget. You will need to + Add a new Custom Toolbar, select the Location of the new Custom Toolbar, select Add-On in the URL dropdown and select Calabrio On-Prem in the dropdown next to the URL one. Set the respective Height to 25.
Calabrio User Configuration
In order to be able to interact with Calabrio, apart from the API User, the Cisco Agent needs to be matched with the Calabrio User. If FirstName and LastName do not match, the Integration will not be able to find the recording of the current agent call.
Calabrio user can be set up in two modes:
- Hoteling User (shared desk)
- Fix Device assignment
Hoteling User (shared desk)
In Calabrio, the devices (agent phones) are not fix assigned to the agents (Calabrio users). In order to assign the device (agent phone) to the Calabrio user, the Calabrio user name must be provided. This can be done either by using a field from the Salesforce user object or by appending a suffix to the Cisco user name.
Required config for the Recording Toolbar:
- Use Hoteling User: Checked
- Salesforce User Field:
Field on Salesforce User - Appendix to Cisco Username:
Appendix

Please refer to the user configuration in the Calabrio ONE documentation to proceed in Hoteling User configuration.
Fix Device assignment
In Calabrio, the devices can be assigned directly to users, making the login process different. As soon as the Calabrio server detects a device (extension) that wants to login, it checks the configuration and proceeds accordingly. No User Login Required is needed in this deployment.
Required config for the Recording Toolbar:
- Use Hoteling User: Unchecked
- Salesforce User Field: :
empty - Appendix to Cisco Username: :
empty

Please refer to the user configuration in the Calabrio ONE documentation to proceed in Fixed Device assignment configuration.
Calabrio Server Configuration
Create an API User
This integration requires Calabrio ONE Authentication to be enabled and an API User configured properly. An API user is configured the same as a system administrator, but the purpose of this user is to enable third-party applications to authenticate with Calabrio ONE.
- Start Calabrio ONE and log in as a system administrator.
- Navigate to Application Management | Global | User Configuration | Users.
- Create a new user. Pay attention to the following options and fields:
- Roles:
default system Administrator - Select the Associated Groups and Teams that this account should have scoping over.
- In the WFM Views field, assign EnterpriseView as the main view.
Store the API User credentials in the fields On-Prem server Login Username and On-Prem server Login Password. These you will find in the Calabrio On-Prem Settings section of the b+s Configuration record.

Enable CORS
For On-Prem deployments, CORS (Cross Origin Resource Sharing) must be enabled on the Calabrio Server. See Annex I - CORS (Cross Origin Resource Sharing)
Write CRM ID to Calabrio Metadata
In order to save the CRM ID of the call activity to the Calabrio metadata, a type “text” metadata field has to be configured in the Calabrio Metadata Manager. You will have to specify the same key in the Recording Toolbar Settings Meta Data Keys field.
Recording Link Custom Field (Optional)
If you want to create a custom field on the task to write the recording link to.
Setup | Object Manager | Activity | Fields | New
Add a new field and choose the following options:
Data Type:
URL
Field Label:
your field label
Field Name:
your field name
Description:
optional
Required:
not checked
- Make sure that the Contact Center Agents have read and write access to the field.
- Add the newly created field to the Task object's Page Layouts in use.
- The API name of the new field can be found under Setup | Object Manager | Activity | Fields (needed below in the configuration of the custom toolbar)
b+s Configuration Integration Settings
User Login Required
If auto recording is disabled, this setting needs to be enabled. To define the login information for the user either configure “userIdField” or “userIdExtension”.
Default: false
Example Value: false
Salesforce User Field
Define the field on the user object that contains the Calabrio user ID, in order to login.
Default: Alias
Example Value: Alias
Appendix to Cisco Username
Instead of saving the Calabrio user ID in an extra field. The admin can configure an extension. This extension gets attached to the cisco username and the combination of both are used to login the user.
Default: empty
Example Value: @abc.com
On-Prem server Login Username
Default: empty
Example Value: <The Calabrio API User's Username>
On-Prem server Login Password
Default: empty
Example Value: <The Calabrio API User's Password>
Recording Link Field
Field name of the Salesforce Activity custom field where the recording link will be stored. If key is not present, the recording link will not be written.
Default: empty
Example Value: pfx__MyCustomField__c
Meta Data Key
Field name of the Calabrio server metadata field to store Salesforce Task Id. If key is not present, the metadata will not be written in Calabrio Server.
Default: empty
Example Value: sf-id-key
Recording Server
Specify the Calabrio Recording Server in the "Recording Server" field. It should contain the protocol (https) and the FQDN.
Example Value: https://FQDN
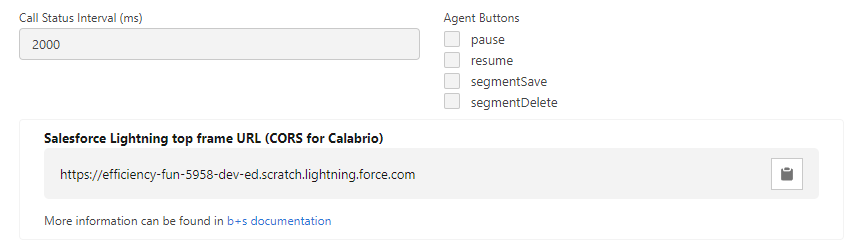
Call Status Interval
Sets the timeout between two callStatus requests against the Calabrio Server. The callStatus requests are getting send as soon as a call has started until we retrieve a contactId from Calabrio or the call has ended.
Default: 2000
Example Value: 2000
Agent Buttons
This list of checkboxes can be used to enable specific action buttons.
Default: all unchecked
Pause: Enables the Pause action during a call.Resume: Enables the Resume action during a call.Segment Save: Enables the Segment Save action during a call.Segment Delete: Enables the Segment Delete action during a call.
Chrome Browser Configuration
The Google Chrome 80 release changes the default cross-domain (SameSite) behavior of cookies.
SameSite is a reasonably robust defense against some classes of cross-site request forgery (CSRF) attacks, but developers currently need to opt in to its protections by specifying a SameSite attribute. In other words, developers are vulnerable to CSRF attacks by default. This change would allow developers to be protected by default, while allowing sites that require state in cross-site requests to opt in to the status quo’s less-secure model.
In On-Prem deployments, you will need to disable the SameSite policy. Go to chrome://flags and disable the "SameSite by default cookies". This will disable the treatment of cookies that do not specify a SameSite attribute as if they were SameSite=Lax.
Agent Guide
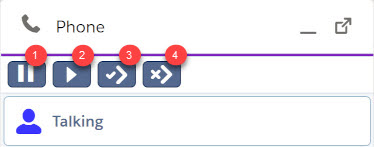
1. Pause Button
Clicking Pause on a call that is already paused does nothing. You must click Resume to continue recording. Pause does not affect live monitoring.
Calls are available for playback prior to reconciliation, with silence where Pause was applied.
2. Resume Button
If the call is not currently paused, Resume does nothing. If you do not click Resume, the point at which you paused the recording is the end of the audio recording.
During post-call processing, clicking Resume does not appear as a mutual silence event or talk over event.
3. Segment and Save Button
Clicking Segment and Save starts the audio recording of an active call. If QM does not automatically record the call (for example, the caller’s phone number is on the exclusion list, or the call does not meet workflow criteria for being recorded), this button lets you record it and treat it as a normal contact. Segment and Save overrides the exclusion list (configured in Calabrio One under Application Management > QM Contact Flows > Inclusion/Exclusion). If QM is currently recording an active call, Segment and Save does nothing.
4. Segment and Delete Button
Clicking Segment and Delete stops the audio and screen recording of an active call. The recording made up to that point is discarded immediately. The recording resumes after you click Segment and Delete and is saved according to workflow criteria as a new contact.
Troubleshooting
Limitation
Due to a Limitation from Calabrio, only a single 3rd party integration can be connected.
Error message is displayed on login
Symptom
After successfully logging in using the softphone, a "Could not login" error is displayed

Possible cause(s)
- Calabrio server is down
- Calabrio server connection is blocked
- Calabrio server certificates have expired or not trusted
Solution
- Check Calabrio server is up and running
- Check the client computer has access to the Calabrio server. Access to
https://<calabrioserver>from the same browser the agent uses to connect to Salesforce - Check Calabrio certificates are accepted by the client computer. Perform the same step as when checking the connection: Access to
https://<calabrioserver>from the same browser the agent uses to connect to Salesforce
Recording Control Buttons Do Not Show After Login

If the Recording Control buttons do not show up after logging the agent in to the b+s Connects for Salesforce gadget when the agent’s state is either "ready" or "not ready", it could be due to the following reasons.
Error: Invalid Extension with HD Login/Logout
Symptom
The Connects gadget shows an error: Invalid Extension with HD Login/Logout.
Possible cause(s)
The VoIP device is assigned to a specific agent on Calabrio server. To support this configuration the call center definition configuration needs the userLoginRequired setting.
The userLoginRequired setting must correspond with the Calabrio server configuration.
Error: No active recording found
Symptom After successfully loading the Calabrio toolbar (i.e. the recording buttons are visible and greyed out), when a call is accepted or connected, an error message is displayed below the recording buttons: "No active recording found".
Cause The Calabrio server cannot validate and match the Agent's firstname and lastname.
Solution Verify that the Agent's firstname and lastname are identical on both Calabrio and Cisco Finesse.
General Troubleshooting Tips
Make Sure you can still login with the API user in Calabrio ONE.
When using On-Prem deployments of Calabrio make sure your httpd.conf, registry and web.xml files are configured correctly.
Always check the Browser Console for additional information.
Annex I - CORS (Cross Origin Resource Sharing)
Preknowledge
The following documents can be consulted to help define the terms Cross-Origin Resource Sharing (CORS) and Cross-Site Request Forgery (CSRF) used in this documentation:
Cross-Origin Resource Sharing (CORS)
Allowing HTTP requests from Cross Site resources in Calabrio
Making the changes suggested in this guide will allow external resources to access Calabrio. Therefore, it is recommended to read the documents listed above beforehand. In addition, it is recommended that before making any changes, all configuration files are backed up for possible recovery.
The following changes may cause Calabrio Web Services to become unresponsive if not performed properly. Please note: This solution only applies to On-Prem deployments of Calabrio.
This will require restarting Calabrio Web Server services to apply the changes. It is recommended that you plan an outage window that gives you time to test your changes and sufficient time should you need to restore back to a previous configuration.
Allow CORS requests to Calabrio Application Server
In this example, the goal is to allow all CORS requests from the following sample url:
https:// <Your Instance Here>.lightning.force.com
Please replace this sample URL in your environment with the origin URL provided under b+s Configuration | Integrations | Calabrio On-Prem Settings, as shown in the image below:
- Back up your httpd.conf file. For a standard Calabrio installation, the file is located here:
C:\Program Files\Common Files\Calabrio ONE\Server\config
Find the XML tag for
<VirtualHost *:443>in the httpd.conf file. This section will allow us to set rules for all traffic that crosses the HTTPS protocol.Add the following re-write rules:
RewriteCond %{REQUEST_METHOD} OPTIONS
RewriteRule ^(.*)$ $1 [R=200,L]
This change will allow Pre-Flight requests to return with a Status of 200 allowing the application to send a follow up request.
- Add CORS rules to allow certain protocols and methods of access to the request. This should be specific to what your application is doing to ensure its limited to the minimum that you need.
Modify the following lines in your website's origin. This must include the http/https requirements.
Header always set Access-Control-Allow-Origin "https:// <Your Instance Here>.lightning.force.com"
Header always set Access-Control-Allow-Credentials "true"
Apache does not support multiple origins in this field or additional entries. Consult Apache Documentation for additional options if this method is not applicable.
Header always set Access-Control-Allow-Origin "https://<Your Instance Here>.lightning.force.com"
Header always set Access-Control-Allow-Credentials "true"
Header always set Access-Control-Allow-Methods "POST,GET,OPTIONS,DELETE,PUT"
Header always set Access-Control-Max-Age "3600"
Header always set Access-Control-Allow-Headers "X-Requested-With, Content-Type, Origin,
    Authorization, Accept, Client-Security-Token, Accept-Encoding"
Full example:
<VirtualHost *:443>
#Protocols h2 http/1.1
ServerName localhost
SSLEngine on
SSLCertificateFile "C:/Program Files/Common Files/Calabrio One/Server/config/localhost.crt"
SSLCertificateKeyFile "C:/Program Files/Common Files/Calabrio One/Server/config/localhost.key"
SSLUseStapling on

RewriteEngine On

#Disable TRACE and TRACK http methods
RewriteCond %{REQUEST_METHOD} ^(TRACE|TRACK)
RewriteRule .* - [F]

RewriteRule ^/$ https://%{HTTP_HOST}/index.html [R=301]
RewriteRule ^/login/index.html$ https://%{HTTP_HOST}/index.html [R=301]

RewriteCond %{REQUEST_METHOD} OPTIONS
RewriteRule ^(.*)$ $1 [R=200,L]

Header always set Access-Control-Allow-Origin "https://<Your Instance Here>.lightning.force.com"
Header always set Access-Control-Allow-Credentials "true"
Header always set Access-Control-Allow-Methods "POST,GET,OPTIONS,DELETE,PUT"
Header always set Access-Control-Max-Age "3600"
Header always set Access-Control-Allow-Headers "X-Requested-With, Content-Type, Origin,
    Authorization, Accept, Client-Security-Token, Accept-Encoding"
- Save the file, Restart The following Calabrio services:
- Calabrio ONE Application Server
- Calabrio ONE Web Server
Allow CSRF requests to Calabrio Application Server
This step will need to be applied to each Calabrio Application server in your stack.
- Backup the following registry section:
HKEY_LOCAL_MACHINE\SOFTWARE\Wow6432Node\Apache Software Foundation\Procrun 2.0\
    \ciWFOTomcat\Parameters\Java
- Modify the "Options" key to include the following line:
-Dsecondary.public.hosts={HOST MAKING REQUEST}
If you are using https://<Your Instance Here>.lightning.force.com to make your request, you would edit the request to look as follows:
-Dsecondary.public.hosts=<Your Instance Here>.lightning.force.com
To determine the value, you will need to issue a request and inspect the request headers for the "Origin" tag, for this particular origin it would be:
Origin: https://<Your Instance Here>.lightning.force.com
Example of Registry Change:

If you have more than one host you can separate the values with a comma.
- Restart The following Calabrio services:
- Calabrio ONE Application Server
- Calabrio ONE Web Server
Allow CORS requests to Calabrio Data Server
- Backup the following file: *Note: Your installation directory may differ.
C:\Program Files\Calabrio ONE\Data Server\Tomcat\conf\web.xml
- Append the following attributes to your web.xml file.
<filter>
  <filter-name>CorsFilter</filter-name>
  <filter-class>org.apache.catalina.filters.CorsFilter</filter-class>
  <init-param>
    <param-name>cors.allowed.origins</param-name>
    <param-value>*</param-value>
  </init-param>
  <init-param>
    <param-name>cors.allowed.methods</param-name>
    <param-value>GET,POST,HEAD,OPTIONS,PUT</param-value>
  </init-param>
  <init-param>
    <param-name>cors.allowed.headers</param-name>
    <param-value>Content-Type,X-Requested-With,accept,Origin,Access-Control-Request-Method,
        Access-Control-Request-Headers</param-value>
  </init-param>
  <init-param>
    <param-name>cors.exposed.headers</param-name>
    <param-value>Access-Control-Allow-Origin,Access-Control-Allow-Credentials</param-value>
  </init-param>
  <init-param>
    <param-name>cors.support.credentials</param-name>
    <param-value>true</param-value>
  </init-param>
  <init-param>
    <param-name>cors.preflight.maxage</param-name>
    <param-value>10</param-value>
  </init-param>
</filter>
<filter-mapping>
  <filter-name>CorsFilter</filter-name>
  <url-pattern>/*</url-pattern>
</filter-mapping>
- Restart the following Calabrio service:
- Calabrio ONE Data Server Web Services
Testing
This test can be used to validate that the filter is blocking/allowing traffic from specific origins. In this example CSRF and CORS traffic is allowed from the origin https://jsfiddle.net/
- Navigate to
https://jsfiddle.net/ - Paste the following code into the "Javascript" window:
var settings = {
  "url": "https://yourCalabrioAddress/api/rest/authorize",
  "method": "POST",
  "timeout": 0,
  "headers": {
    "Content-Type": "application/json"
  },
  "data": JSON.stringify({"userId":"yourUser@email.com","password":"YourPassword","locale":"en"}),
};

$.ajax(settings).done(function (response) {
  console.log(response);
});
- Modify the script to point to your Calabrio deployment with a valid username/password. (This will allow us to test that we can send a POST request to the Calabrio server and authenticate an API session -- you can perform other API calls after this step if you so choose).

- Modify the settings of JSFiddle to point to the proper JavaScript frameworks to support this code snippet: Select the drop down for a menu. Note: This setting is in the pane for "Javascript" on the site. (You can see this same option in Step 3's screenshot in the top left corner).

- Open Developer console of your browser -- and press the "Run" button for Jsfiddle.

If your test was successful you should see Status "200" back on your authentication (Network tab) and session details logged to the console.

You will see two authorize events as one is the "Pre-Flight" request to validate what the server allows where the other is the actual payload with our javascript request.
Your developer console will show:

How to determine your "Origin"
To capture your "Request-Origin" you will need to inspect the payload you are sending -- All HTTP Requests will have "Request Headers" set -- The browser will automatically set this particular header for us.
Inspecting the request in Developers tools will show us a "Request Headers" Section under the "Headers" pane. The "Origin" is the element of interest.

Annex II - SameSite
SameSite is a cookie attribute. The Recording Toolbar sends an authorize request to the Calabrio application server and it responds with a token that is stored into a cookie (set-cookie response header). Whenever a request is sent to the Calabrio domain, the cookie gets attached to the request and the Calabrio server can validate the token. With the latest browser versions, all cookies without a SameSite=None attribute are defaulted to 'lax' which prevents the browser from sending the cookie in a cross-domain request.
The solution is to inject SameSite=None to the cookie attributes from the On-Prem Calabrio Application server.
Open the previously modified httpd.conf file located in the standard Calabrio installation folder
C:\Program Files\Common Files\Calabrio ONE\Server\config from the Calabrio Application server and check that
LoadModule headers_module modules/mod_headers.so is added to the LoadModule list.
Check that it does not have a # at the beginning of the line.
Add the following chunk of code after the LoadModule list:
<ifmodule mod_headers.c>
    Header always edit Set-Cookie (.*) "$1; SameSite=None"
    Header onsuccess edit Set-Cookie (.*) "$1; SameSite=None"
    Header edit Set-Cookie ^(.*);\s?SameSite=None;?\s?(.*);\s?SameSite=None;?\s?(.*)$ "$1; $2; $3; SameSite=None"
    Header edit Set-Cookie ^(.*);\s?;\s?(.*)$ "$1; $2"
</ifmodule>
Restart the Calabrio One Application Server and the Calabrio One Web Server services.
Annex III - Private Network Access Preflight
The following document can be consulted to help define the term Private Network Access (PNA) preflight used in this documentation:
https://developer.chrome.com/blog/private-network-access-preflight/
Private Network Access (formerly known as CORS-RFC1918) restricts the ability of websites to send requests to servers on private networks.
The specification also extends the Cross-Origin Resource Sharing (CORS) protocol so that websites must now explicitly request a grant from servers on private networks before being allowed to send arbitrary requests.
Private network requests are requests whose target server's IP address is more private than that from which the request initiator was fetched. For example, a request from a public website (https://example.com) to a private website (http://router.local), or a request from a private website to localhost.
In order to keep the Calabrio integration working, two chenges will need to be done in the On-Prem Calabrio Application server.
Open the previously modified httpd.conf file located in the standard Calabrio installation folder
C:\Program Files\Common Files\Calabrio ONE\Server\config from the Calabrio Application server and adapt the code so it looks like the following:
[...]
Header always set Access-Control-Allow-Methods "POST,GET,OPTIONS,DELETE,PUT"
Header always set Access-Control-Max-Age "3600"
Header always set Access-Control-Allow-Private-Network "true"
Header always set Access-Control-Allow-Headers "X-Requested-With, Content-Type, Origin,
    Authorization, Accept, Client-Security-Token, Accept-Encoding, Access-Control-Request-Private-Network"
[...]
Changes: the line Header always set Access-Control-Allow-Private-Network "true" is new and the Access-Control-Request-Private-Network was added to the Access-Control-Allow-Headers list.
Restart the Calabrio One Application Server and the Calabrio One Web Server services.