Custom Integrations
Scope
This page helps you to start using the Integration API functionality in order to add custom code to b+s Connects, by providing examples and ideas.
For more information please refer to the Integration API documentation.
Limitations
In order to send requests/receive events from b+s Connects, the Custom Integration code must be hosted on the same domain as b+s Connects.
Requirements
In order to start implementing custom code the following requirements must be met:
Create an HTML web resource (e.g. bs_cust_int_example.html)
The
cnx_connectsIntegrationLibrary.min.jsscript must be included. It is located on your Dynamics instance: https://<yourorg>.crm<num>.dynamics.com/WebResources/cnx_connectsIntegrationLibrary.min.js (you may also include it by using a relative URL).Provide a callback function as argument to the
initIntegrationmethod on theConnectsIntegrationLibraryclass (property on window object). The provided callback will be called once the Integration API is ready to be utilized.
Interface overview
The methods to invoke and subscribe to the Integration API are exposed by the class ConnectsIntegrationLibrary.
Requests
All requests on the ConnectsIntegrationLibrary return a promise. The data returned by the promise has the following structure:
| Field | Description |
|---|---|
| success | Boolean indicating whether the request was successful or not |
| response | Object containing the data as outlined in the overview |
Events
Multiple event handlers can be registered for the same event. The event data is described in the overview.
Custom Integrations
Example Integration
Step 1: Create an HTML file and insert the following code (adjust [reason code], [phone number], [template name] and [template parameters] with respective values).
<!DOCTYPE html>
<html lang="en">

<head>
  <meta charset="utf-8">
  <title>Example of a Custom Integration</title>

  <script src="cnx_connectsIntegrationLibrary.min.js"></script>

  <script>

    const cil = ConnectsIntegrationLibrary;

    console.warn(`message: waiting for initIntegration`);

    cil.initIntegration(() => {
      console.warn(`message: initIntegration ready`);
      cil.onError((error) => console.warn(`message: onError data: ${JSON.stringify(error)}`));
      cil.onAgentStateChange((data) => console.warn(`message: onAgentStateChange, data: ${JSON.stringify(data)}`));
      cil.onWorkitemCreate((data) => console.warn(`message: onWorkitemCreate, data: ${JSON.stringify(data)}`));
      cil.onWorkitemConnect((data) => console.warn(`message: onWorkitemConnect, data: ${JSON.stringify(data)}`));
      cil.onWorkitemPause((data) => console.warn(`message: onWorkitemPause, data: ${JSON.stringify(data)}`));
      cil.onWorkitemResume((data) => console.warn(`message: onWorkitemResume, data: ${JSON.stringify(data)}`));
      cil.onWorkitemEnd((data) => console.warn(`message: onWorkitemEnd, data: ${JSON.stringify(data)}`));
    });

    async function getChannel() {

      const result = await cil.getChannel('voice');

      console.warn(result);

      console.warn(`message: getChannel result ${JSON.stringify(result)}`);

      return result;

    }

    async function setAgentState(newState, reasonCode, requestId) {

      const channel = await getChannel();

      console.warn(channel);

      const response = await cil.setAgentState(channel.response.channel.id, newState, reasonCode, requestId);

      console.warn(`message: setAgentState ${JSON.stringify(responseData)}`);

    }

    async function dialOrConsult(phonenumber, requestId) {

      cil.dialOrConsult(
        'voice',
        phonenumber,
        requestId
      ).then((data) => {
        console.warn(`message: dial ${JSON.stringify(data)}`);
      });
    }

    async function directTransfer(phonenumber, requestId) {

      cil.directTransfer(
        'voice',
        phonenumber,
        undefined,
        requestId
      ).then((data) => {
        console.warn(`message: directTransfer ${JSON.stringify(data)}`);
      });
    }

    async function singleStepConference(phonenumber, requestId) {

      cil.singleStepConference(
        'voice',
        phonenumber,
        undefined,
        requestId
      ).then((data) => {
        console.warn(`message: singleStepConference ${JSON.stringify(data)}`);
      });
    }

    async function getCustomSettings() {

      const result = await cil.getCustomSettings();

      console.warn(result);

      console.warn(`message: getCustomSettings result ${JSON.stringify(result)}`);

      return result;
    }

    async function openNewSession(templateName, templateParameter) {

      const result = await cil.createSession(
        templateName,
        templateParameter
      );

      console.warn(result);

      console.warn(`message: createSession result ${JSON.stringify(result)}`);

      return result;
    }


  </script>
  <style>
    body {
      margin: 0;
    }

    .wrapper {
      padding: 2px;
      display: flex;
      flex-wrap: wrap;
    }

    button {
      width: calc(50% - 4px);
      margin: 0 2px 2px 0;
      background-color: #fff;
      color: #333;
      border: 1px solid #777;
      cursor: pointer;
    }
  </style>
</head>

<body>
  <div class="wrapper">
    <button onclick="openNewSession('[template name]', [template parameters])">Open New Session</button>
    <button onclick="getChannel()">GetChannel</button>
    <button onclick="setAgentState('notready', '[reason code]', 'some rid1')">NotReady (Lunch)</button>
    <button onclick="setAgentState('logout', '[reason code]', 'some rid2')">Logout () </button>
    <button onclick="setAgentState('ready', undefined, 'some rid3')">Ready</button>
    <button onclick="dialOrConsult('[phone number]', 'some rid4')">Call/Consult</button>
    <button onclick="directTransfer('[phone number]', 'some rid5')">SST</button>
    <button onclick="singleStepConference('[phone number]', 'some rid6')">SSC</button>
    <button onclick="getCustomSettings()">Get custom settings</button>
  </div>
</body>

</html>
Step 2: Add the HTML document as a webresource (e.g. bs_ci_example.html) to a new or an existing solution.
Step 3: Save and publish the customization.
Step 4: Configure the Custom Integration in the Service Layout. For detailed instructions please refer to: Custom Integration.
Enhanced Federation
Requirements
This custom integration requires that Microsoft Dynamics and b+s Connects are enabled and configured for federation.
More information regarding the federation feature can be found here.
Description
After the completion of the phone call the presence status in Microsoft Dynamics will be reset to Available if it was Available before the call was established.
The agent state in Cisco will be reset to Ready when the presence status changed from BUSY or BUSY - DND to Available, if the agent state was Ready before b+s Connects changed it automatically because of a presence change.
If one of the states is changed manually while the agent has a call or an interaction, the states will not be reset.
Limitations
- Reloading Dynamics or b+s Connects during a call or an interaction prevents the states from being reset to
AvailableorReady. - If at some point the integration is unable to retrieve information needed for proper execution, it will be stopped. In this case an error message is logged to the console. The Custom Integration can then be restarted by reloading b+s Connects.
- If the presence status cannot be retrieved within 20 seconds after the start up of the custom integration, the custom integration will be stopped.
Setup
Step 1: Download the HTML document. Make sure to save the file as .html and not .txt before using it.
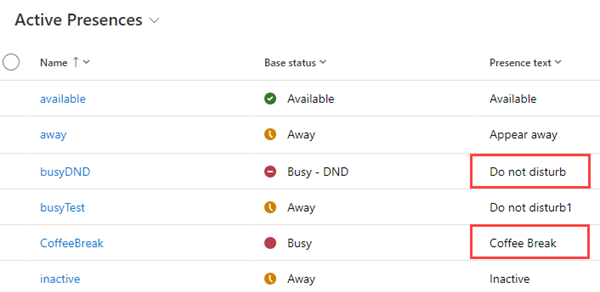
Step 2: Determine all active presences with base status BUSY and BUSY - DND and get the presence texts.

Step 3: Add the presence texts separated by comma in ['Busy', 'Do not disturb']and remove not needed entries.
Example:
const busyPresenceStatuses = ['Do not disturb', 'Coffee break'];
Step 4: Save the HTML document and add it as a webresource (e.g. bs_ci_enhanced_federation.html) to a new or an existing solution.
Step 5: Save and publish the customization.
Step 6: Configure the Custom Integration in the Service Layout. For detailed instructions please refer to: Custom Integration.