Configuration
Not Ready Reason Codes
Summary
This part provides information about how to customize Not Ready Reason Codes to be used within b+s Reports for CUIC and CCBI. It covers the possibilities of grouping the existing codes to be shown as 20 categories of the "Not Ready Reason Time" within historical data. Additionally, this document also includes how Not Ready Reason categories can be set to be productive (e.g. back office) or non-productive (e.g. break). The configuration is part of the system setup and needs to be specified prior to the setup. This part should help to understand the functionality and can be shared with the end customer and the operational organization.
Configuration
Reason Code Mapping
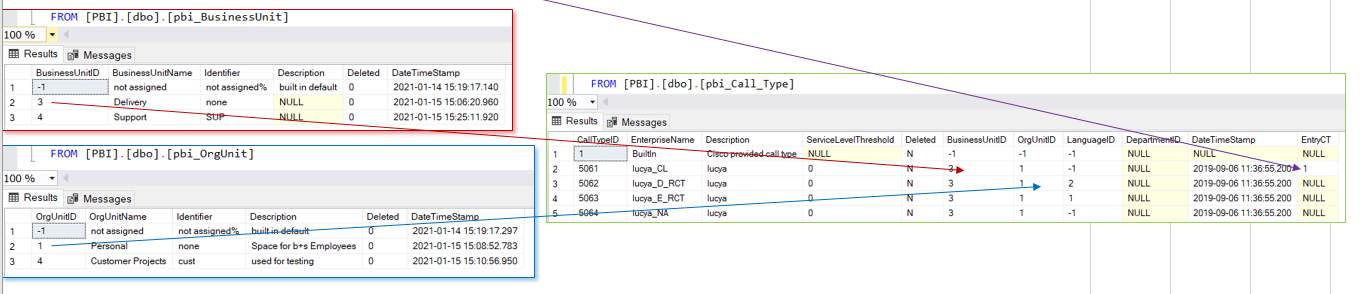
Start with discovering the existing Reason Codes of the CCE configuration by selecting them from table "t_Reason_Code" of the Reporting database:
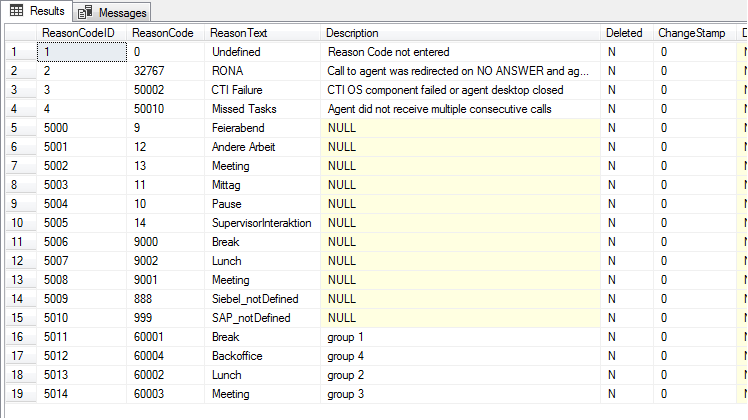
Also open table "t_Reason_Code_Category" to display the 20 categories that get implemented by default and might have been modified already:

Specify those categories as far as needed by entering a meaningful CategoryName and leave the unused categories with their default name "Reason_<CodeID>".
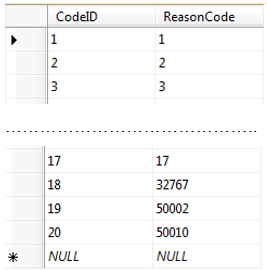
Now you can configure which ReasonCodes from table "t_Reason_Code" should belong to which CodeID of table "t_Reason_Code_Category".
Here for you have to edit the table "t_Reason_Code_Mapping" and fill in all required ReasonCodes. This table already covers a default mapping for ReasonCodes 1-17 and the existing system codes:
Edit this table by following those steps:
- Overwrite ReasonCode 1 with the number of your first ReasonCode that should belong to the first category. Add a new record with CodeID = 1 and the ReasonCode for all ReasonCodes that should also belong to the first category.
- Overwrite ReasonCode 2 with the number of your first ReasonCode that should belong to the second category. Add a new record with CodeID = 2 and the ReasonCode for all ReasonCodes that should also belong to the second category.
- Repeat the same procedure for all other categories that need to be configured.
- Remove the default mapping for those Reason Codes 1-17 that are already assigned to another category by entering 99999 as a placeholder. Do not delete any of the 20 default records.
The remaining ReasonCodes that are not mapped to any category will be reported as "NoReason".
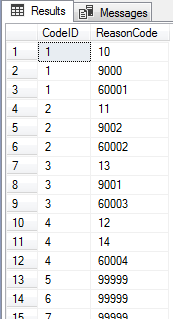
If all records have been entered into the table "t_Reason_Code_Mapping", you should check the configuration with a "Select Top 1000 Rows", which will show a better sort order:
Make sure that you have entered the same ReasonCode only once (except placeholders).
If the mapping of this table is changed, this historical data needs to be reloaded again (export_id 13: Agent-State-Interval-Export for Basic-Interface).
Productivity Settings
Each Reason Code category can be configured to be productive (e.g. back office) or non-productive (e.g. break). By default, all categories are set to non-productive. In order to change categories to be productive, the table "t_Reason_Code_Category" has to be edited:
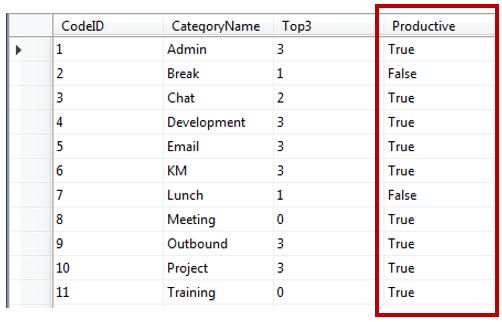
If a code group should be counted as productive, edit the column "Productive" and enter "True", or alternatively the digit "1". To change a code group back to non-productive, enter "False", or the digit "0".
If the Productive flag of this table is changed, this historical data needs to be reloaded again (export_id 13: Agent-State-Interval-Export for Basic-Interface).
Adjustments for data retention periods
The default settings will delete CCBI data after 400 days.
Modify the "retaindays" within table "t_purge_settings" of the Reporting database for the following tables, if any change is required for CCBI:
- t_acd_inbound_history
- t_agent_state_interval
- t_calltype_detail
- t_calltype_handled_detail
- t_calltype_unhandled_detail
- t_dn_calls
- t_mr_inbound_history
Data size limitation for Power BI
Depending on the Power BI licensing, you have different limits on the maximum size of the pbix files that you can publish to the Power BI Service. This is 1 GB per file for a Pro license today. If more historical data is available in the Reporting database than what is allowed to upload, you have to limit the days of data within CCBI.
You can achieve this by changing the value of the "PowerBI historical depth days" within table t_system-settings of the PBI database.

Edit this table and enter the number of retain days for CCBI. This setting will make historical data available through the views of the PBI Database.
Enter a value of 99999 to have no limitation in Power BI and just to take all available data from the Reporting Database.
After changing this setting and refreshing the data within the Power BI Desktop, you can verify the size of the local pbix file. Adjust the setting until the file size does not exceed the limitation anymore, with a reserve of at least 10%.
CCBI Dimensions
General description
CCBI Dimensions are additional objects to group or filter data in Power BI. They are optional and must be defined with the customer before the implementation. As soon as they are configured, the CCBI Dimension IDs have to be assigned to all CCE Dimensions in the PBI Database. Next to this, CallTypes that are not Service Level relevant should be separated (excluded) within the "Focus-Filter" of the CCBI Report. This is done by flagging the field "EntryCT" in the table pbi_Call_Type.
A CCBI Configuration Template (Excel sheet) is available and describes the process and the available methods to assign the CCBI Dimensions in detail. Use this sheet to document the existing CCE Dimensions and to discuss and specify the assignments together with the customer.
The following steps gives you an overview of the implementation process.
Design
Review the existing CCE objects and specify the useful and required BusinessUnits, OrgUnits, Languages and Locations. The best way is to extract the CallTypes, Agents and Agent-Teams into the corresponding blue tabs of the Excel sheet for this discussion with the customer. Adding new CCBI Dimensions is a simple task but you have to keep in mind that they have to be assigned to the existing CCE objects. For operational purposes, this should be possible in an automated way and should apply to new objects as well.
There are several methods to get the assignment done:
a. An "Identifier" is filled into the CCBI object and the assignement is done, if the Identifier is part of the EnterpriseName of the CCE object (naming conventions required).
b. A custom script must be developed to do the existing assignements, in hope that this will also work for new objects.
c. The assignment is done manually by the customer inside the Excel sheet after the CCBI Dimension are implemented in the system and extracted again to get the IDs given by the system.
For all methods, start to define the CCBI Dimensions BusinessUnit, OrgUnit, Language and Location within the green tabs of the Excel sheet. There you can also see the default values that are pre-filled already. Also specify the rules based on the CallType names on how to select the Entry-CallTypes and other non Service Level relevant objects.
Configure CCBI Dimensions
Configure the CCBI Dimensions directly in the PBI tables. The easiest way is to edit the tables and to fill in the values manually. This also works with the copy/paste function from the Excel Sheet into the Edit Table mode of the Management Studio.
If the list of CCBI Dimensions gets larger than 200 rows or if you cannot open the Excel file, the Import Wizard will help to load the files, if they are saved in separate CSV files.
Import the data into staging tables and use the queries from sheet "Manual configuration" from the "CCBI_Data_Source_Implementation_x-y.xlsx" to insert this data.
Update CCE Dimensions - Identifier method
If the Identifier method is used to assign the CCE objects, the SQL procedures will update the CCBI Dimension ID where the Identifier is part of the CCE EnterpriseName (comparing both values in lower case). The agent assignment is done based on the agent name first and if no match was found based on the team name. The where clause uses the "LIKE" operator and you also have to apply the wildcards (%) in your identifier string. Be careful with underscore (_), this is also a wildcard within the "LIKE" filter and needs to be escaped with square brackets [] if used as a filter criteria (like %[_]en to filter objects that ends with "_en".
- If the identifier can be somewhere in the EnterpriseName, add the wildcard at the begin and at the end of the identifier like %IdentifierString%
- If the EnterpriseName must start with the identifier, add the wildcard only at the end of the identifier like IdentifierString%
- If the EnterpriseName must end with the identifier, add the wildcard only at the beginning of the identifier like %IdentifierString
All available assignment procedures are disabled within the nightly SQL Server Agent job called "CCBI: Assign CCBI Dimensions to CCE Configuration - Identifier method" by default. Enable them if needed after the implementation process. To assign the flag for Entry CallTypes and other non Service Level relevant objects, there is a script at the end of the job step. Modify this script with the rules that should be applied to new objects automatically.
Make sure that you filled the Identifier fields and execute the procedures manually. Verify the assignments in the tables pbi_Agent and pbi_Call_Type.
If multiple identifiers (CCBI Dimensions) match with the same EnterpriseName of the CCE object, the first CCBI Dimension (smallest ID) is assigned. As soon as a CCBI Dimension ID is assigned to a CCE object, this CCE object will be ignored for further automated assignments and must be modified manually if required.
If objects are deleted in the CCE database, they are excluded from the assignment, because they sometimes get renamed during the deletion process. To include deleted objects as well for the initial assignment, the procedures can be executed with the parameter @include_deleted_objects = 1
If there are still some objects containing the default id (-1), the identifier did not match with a single naming convention. You might need to change the identifier within the corresponding CCBI Dimension tables and running the job several times to apply all existing rules. Make sure to leave the table with the final identifier that should be used for new objects and written into the operational handbook.
Update CCE Dimensions - Custom script method
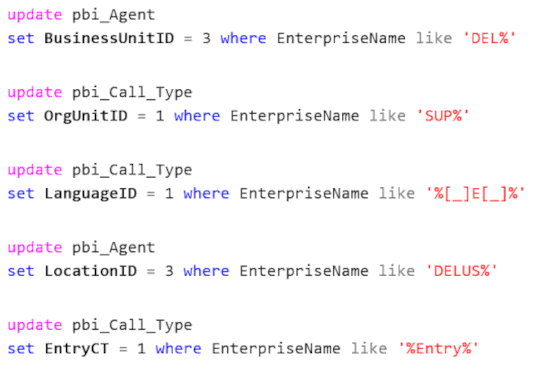
Write a query for every CCBI Dimension that will fill the CCBI Dimension ID into pbi_Call_Type and pbi_Agent tables for all corresponding objects – based on the rules you found. Take the sheet "Custom script" from the "CCBI_Data_Source_Implementation_x-y.xlsx". There you will find some sample queries for these assignments.
Here are some sample queries to illustrate the assignments:
Update CCE Dimensions - Manual assignment in the template sheet
If it is not possible to assign the CCE objects by using a few identifier per CCBI Dimension or if there are too many rules needed, it might be easier to do the assignment directly in the Excel sheet and to copy it into the system afterwards. Be aware that the IDs of the CCBI Dimensions are created from the database. So you have to fill the Dimensions into the system first and then to extract the data again before doing the assignments. This way you can also assign some objects with the methods above already what will reduce the manual assignment work afterwards. After the pre-assignment is done, copy the data from the system into the CCBI Dimension tabs and the green tabs pbi_Agent and pbi_Call_Type. Then let the customer fill the IDs of your CCBI Dimensions into the orange columns manually. This way, the customer can filter the data within the green tabs based on his rules/knowledge and copy the correct IDs.
Once the template sheet is completed, b+s can import the missing assignments directly into the system. Import the data into two staging tables ag and ct and use the queries from sheet "Manual configuration" from the "CCBI_Data_Source_Implementation_x-y.xlsx".
Primary Queues
Primary Queues are used to determine if calls to a certain service (CallType) are actually handled by the responsible resources (skill groups or Precision Queue; hereafter referred to as Queue). As soon as the Primary Queues have been assigned to the CallTypes in the Reporting database, this analysis can be done in the CCBI data model as well.
This administration is part of the administrative reports within b+s Reports for CUIC. If this product is not available, this configuration needs to be implemented and maintained by a technical resource directly in the Reporting database based on request.
Publishing and Refresh
The CCBI solution will be published to the customer's workspace, using a customer license for Power BI. The data set is separated from the reports and both are normally uploaded into a golden workspace. This allows the customer to copy the original report to any workspace that are used by the reporting users, while keeping a single dataset in the golden workspace.
The refresh of data including configuration changes is driven by the gateway schedule, administrated in the customer's workspace. The refresh normally runs once at night. Please note, that there will always be a delay of 2-3 hours until data is available in the Reporting database.