Configuration
Not Ready Reason Codes
Summary
This part provides information about how to customize Not Ready Reason Codes to be used within b+s Reports for CUIC and CCBI. It covers the possibilities of grouping the existing codes to be shown as 20 categories of the REASON CODE Dimension. Additionally, this document also includes how Not Ready Reason categories can be set to be productive (e.g. back office) or non-productive (e.g. break). This part should help to understand the functionality and can be shared with the end customer and the operational organization.
Configuration
Reason Code Mapping
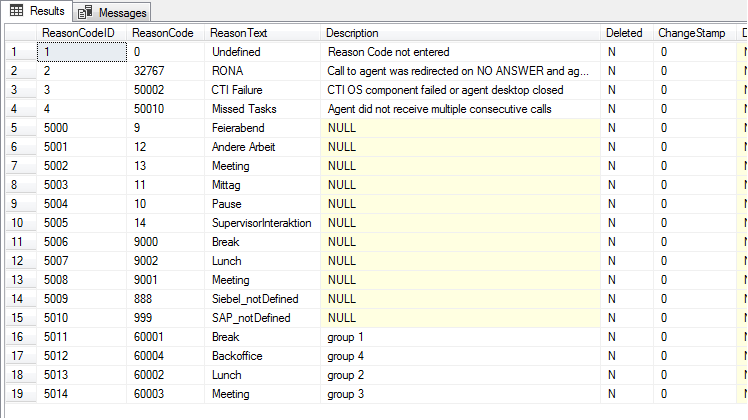
Start with discovering the existing Reason Codes of the CCE configuration by selecting them from table "t_Reason_Code" of the Reporting database:
Also open table "t_Reason_Code_Category" to display the 20 categories that get implemented by default and might have been modified already:

Specify those categories as far as needed by entering a meaningful CategoryName and leave the unused categories with their default name "Reason_<CodeID>".
Now you can configure which ReasonCodes from table "t_Reason_Code" should belong to which CodeID of table "t_Reason_Code_Category".
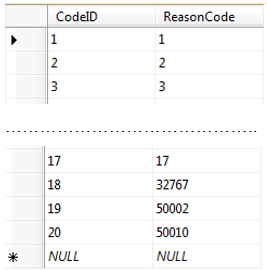
Here for you have to edit the table "t_Reason_Code_Mapping" and fill in all required ReasonCodes. This table already covers a default mapping for ReasonCodes 1-17 and the existing system codes:
Edit this table by following those steps:
- Overwrite ReasonCode 1 with the number of your first ReasonCode that should belong to the first category. Add a new record with CodeID = 1 and the ReasonCode for all ReasonCodes that should also belong to the first category.
- Overwrite ReasonCode 2 with the number of your first ReasonCode that should belong to the second category. Add a new record with CodeID = 2 and the ReasonCode for all ReasonCodes that should also belong to the second category.
- Repeat the same procedure for all other categories that need to be configured.
- Remove the default mapping for those Reason Codes 1-17 that are already assigned to another category by entering 99999 as a placeholder. Do not delete any of the 20 default records.
The remaining ReasonCodes that are not mapped to any category will be reported as "NoReason".
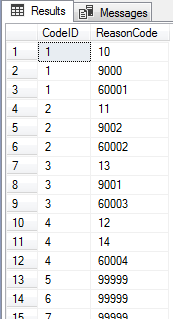
If all records have been entered into the table "t_Reason_Code_Mapping", you should check the configuration with a "Select Top 1000 Rows", which will show a better sort order:
Make sure that you have entered the same ReasonCode only once (except placeholders).
Productivity Settings
Each Reason Code category can be configured to be productive (e.g. back office) or non-productive (e.g. break). By default, all categories are set to non-productive. In order to change categories to be productive, the table "t_Reason_Code_Category" has to be edited:
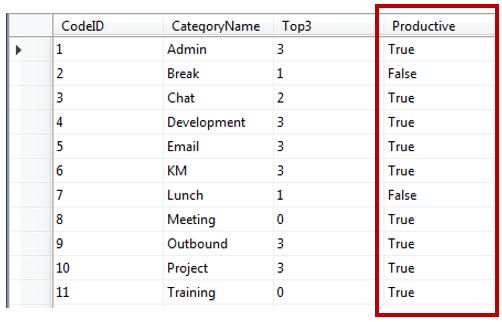
If a code group should be counted as productive, edit the column "Productive" and enter "True", or alternatively the digit "1". To change a code group back to non-productive, enter "False", or the digit "0".
Adjustments for data retention periods
The default settings will delete CCBI data after 400 days.
Modify the "retaindays" within table "t_purge_settings" of the Reporting database for the following tables, if any change is required for CCBI:
- t_Agent_Event_Detail
- t_acd_inbound_history
- t_agent_state_interval
- t_calltype_detail
- t_calltype_handled_detail
- t_calltype_unhandled_detail
- t_dn_calls
- t_mr_inbound_history
Data size limitation for Power BI
Depending on the Power BI licensing, you have different limits on the maximum size of the pbix files that you can publish to the Power BI Service. This is 1 GB per file for a Pro license today. If more historical data is available in the Reporting database than what is allowed to upload, you have to limit the days of data within CCBI.
You can achieve this by changing the value of the "PowerBI historical depth days" within table t_system-settings of the PBI database.

Edit this table and enter the number of retain days for CCBI. This setting will make historical data available through the views of the PBI Database.
Enter a value of 99999 to have no limitation in Power BI and just to take all available data from the Reporting Database.
After changing this setting and refreshing the data within the Power BI Desktop, you can verify the size of the local pbix file. Adjust the setting until the file size does not exceed the limitation anymore, with a reserve of at least 10%.
CCBI Dimensions
General description
CCBI Dimensions are additional objects to group or filter data in Power BI. They are optional and must be defined with the customer before the implementation. As soon as they are configured, the CCBI Dimension IDs have to be assigned to all CCE Dimensions in the PBI Database. Next to this, CallTypes that are not Service Level relevant should be separated (excluded) within the "Focus-Filter" of the CCBI Report. This is done by flagging the field "EntryCT" in the table pbi_Call_Type.

Implementation process
A CCBI Configuration Template (Excel sheet) is available and describes the process and the available methods to assign the CCBI Dimensions in detail. Use this sheet to document the existing CCE Dimensions and to discuss and specify the assignments together with the customer.
The following steps gives you an overview of the implementation process.
Design
Review the existing CCE objects and specify the useful and required BusinessUnits, OrgUnits, Languages, CallTypeGroups, Locations and AgentGroups. Adding new CCBI Dimensions is a simple task but you have to keep in mind that they have to be assigned to the existing CCE objects and are also used for row level security (RLS). Data segregation for users with restricted data permissions is only available for their own affiliation to the Dimension. As an example, a restricted user can only see data of his own BusinessUnit.
Configure CCBI Dimensions
Save each of the dimension tabs as a csv file and then paste the files into the "Import" directory of the database server. An SQL Server Agent job will then insert and update all records available in the csv files and then move the files into an archive folder.
Update CCE Dimensions
The configuration and assignments are done manually by the customer inside the Excel sheet. The csv file of each tab can then be imported into the system.
Verify CCE Dimensions & Assignments
You can find the active configuration stored as csv files within the "Export" directory of the database server, if the "CCBI: File import/export.." nightly job is enabled. As soon as data got refreshed in the Power BI Service, you can verify the configuration and assignments by using the "DimensionConfiguration" report. You can also create csv files with the active configuration using this report. See the instructions directly inside the report itself. By using this report, a customer can extract the current configuration and prepare the necessary adjustments in a file for the import itself.
Operation process for new CCE objects
You have to repeat this configuration process for all newly created CCE objects. You can find them by using the "DimensionConfiguration" report or within the pbi_Agent and pbi_Call_Type tables, having id = -1 assigned.
If the customer would like to import/export the csv files from/to an SFTP service, this can be achieved by installing WinSCP and to implement and activate some batch files that will copy the files from the local Import/Export directories to the SFTP service. Those extra steps must be enabled in the SQL Server Agent Job and the automation scheduled at least on a nightly base.
Don't forget to update the operational process to make sure that the CCE implementation changes are also properly adapted into CCBI.
Dynamic row level security (RLS)
If Power BI users should not have access to all data, you can configure the users and their affiliation to the CCBI Dimensions. There is a security role available for each category and the user gets data permissions only for his own affiliation of the assigned role.
The configuration of the rls_User table is also included in the CCBI configuration template/DimensionConfiguration report and works the same way as the import/export of the dimensions and assignments. New users covered in the import file are inserted into the rls_User table and configuration changes are applied to existing users. If existing users should not have access anymore, you can simply remove the affiliation for those users or you have to remove the permissions on the workspace and the dataset. Same as for the dimension configuration, you can’t delete any users from the rls_User table.
To test the current RLS configuration for every user, you can use the Dynamic RLS report page which is part of the Data analyst report.
Customer specific dimensions
There are 5 Dimensions available in CCBI that are generated out of the FACT INBOUND variables of your choice (VARIABLE 1, VARIABLE 2, VARIABLE 3, VARIABLE 4 and VARIABLE 5).
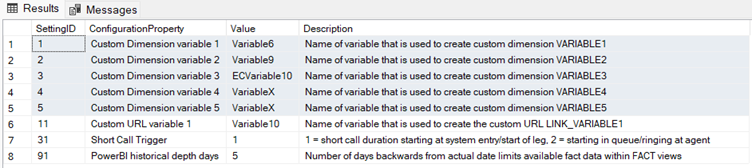
This allows to store additional content in a variable within the call flow or at the agent desktop and to have this content automatically available as a dimension in CCBI. Edit the table t_system_settings and update the "Value" of the Custom Dimension variables (SettingID 1-5) with the name of the call variable (Variable1 – Variable10) or the name of the expanded call variable (ECVariable1 – ECVariable10):
Data for those 20 variables are coming from the t_calltype_detail and t_calltype_handled_detail tables of the Reporting database. See the following section on how to map the ECC variables to one of the 10 ECVariables: https://docs.bucher-suter.com/reports-for-cuic/docs/configuration.html#mapping-of-ecc-variables-callbycall-only
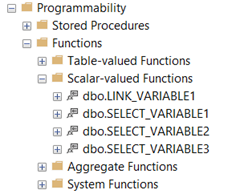
To be more flexible on what content should be used from the variable content, the selection of those variables is taken by a Scalar-valued Function called "SELECT_VARIABLE1-5":
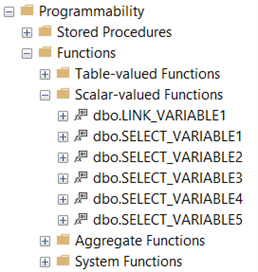
By default, the first 40 characters are taken from each variable. You can alter those functions and change the select query, if needed.
Customer specific URL
There is a field "LINK_VARIABLE1" with the format of an URL available within the "Call Details" report as part of the FACT INBOUND table. This URL allows you to access a 3rd party system from each call detail record, depending on the general URL content and the variable content of the record. Edit the table t_system_settings and update the "Value" of the Custom URL variable 1 (SettingID 11) with the name of the call variable (Variable1 – Variable10) or the name of the expanded call variable (ECVariable1 – ECVariable10):

Data for those 20 variables are coming from the t_calltype_detail and t_calltype_handled_detail tables of the Reporting database. See the following section on how to map the ECC variables to one of the 10 ECVariables: https://docs.bucher-suter.com/reports-for-cuic/docs/configuration.html#mapping-of-ecc-variables-callbycall-only
To select the variable content and to create the general content of the URL, the selection of the variable is taken by a Scalar-valued Function called "LINK_VARIABLE1":
By default, the function returns NULL for this field. You can alter this function and change the select query to enable it based on the requirements for the URL.
Customer specific time zones
General description
From CCBI version 2.1, the fact data is not filtered directly from DATE and TIME dimensions anymore. There is a new TIME ZONE dimension, and those 3 dimensions filter the calendar for the selected time zone inside a new bridge table. The bridge table contains the calendar with the converted offset for every available date, time and time zone combination. The bridge table finally filters the data from the fact tables.
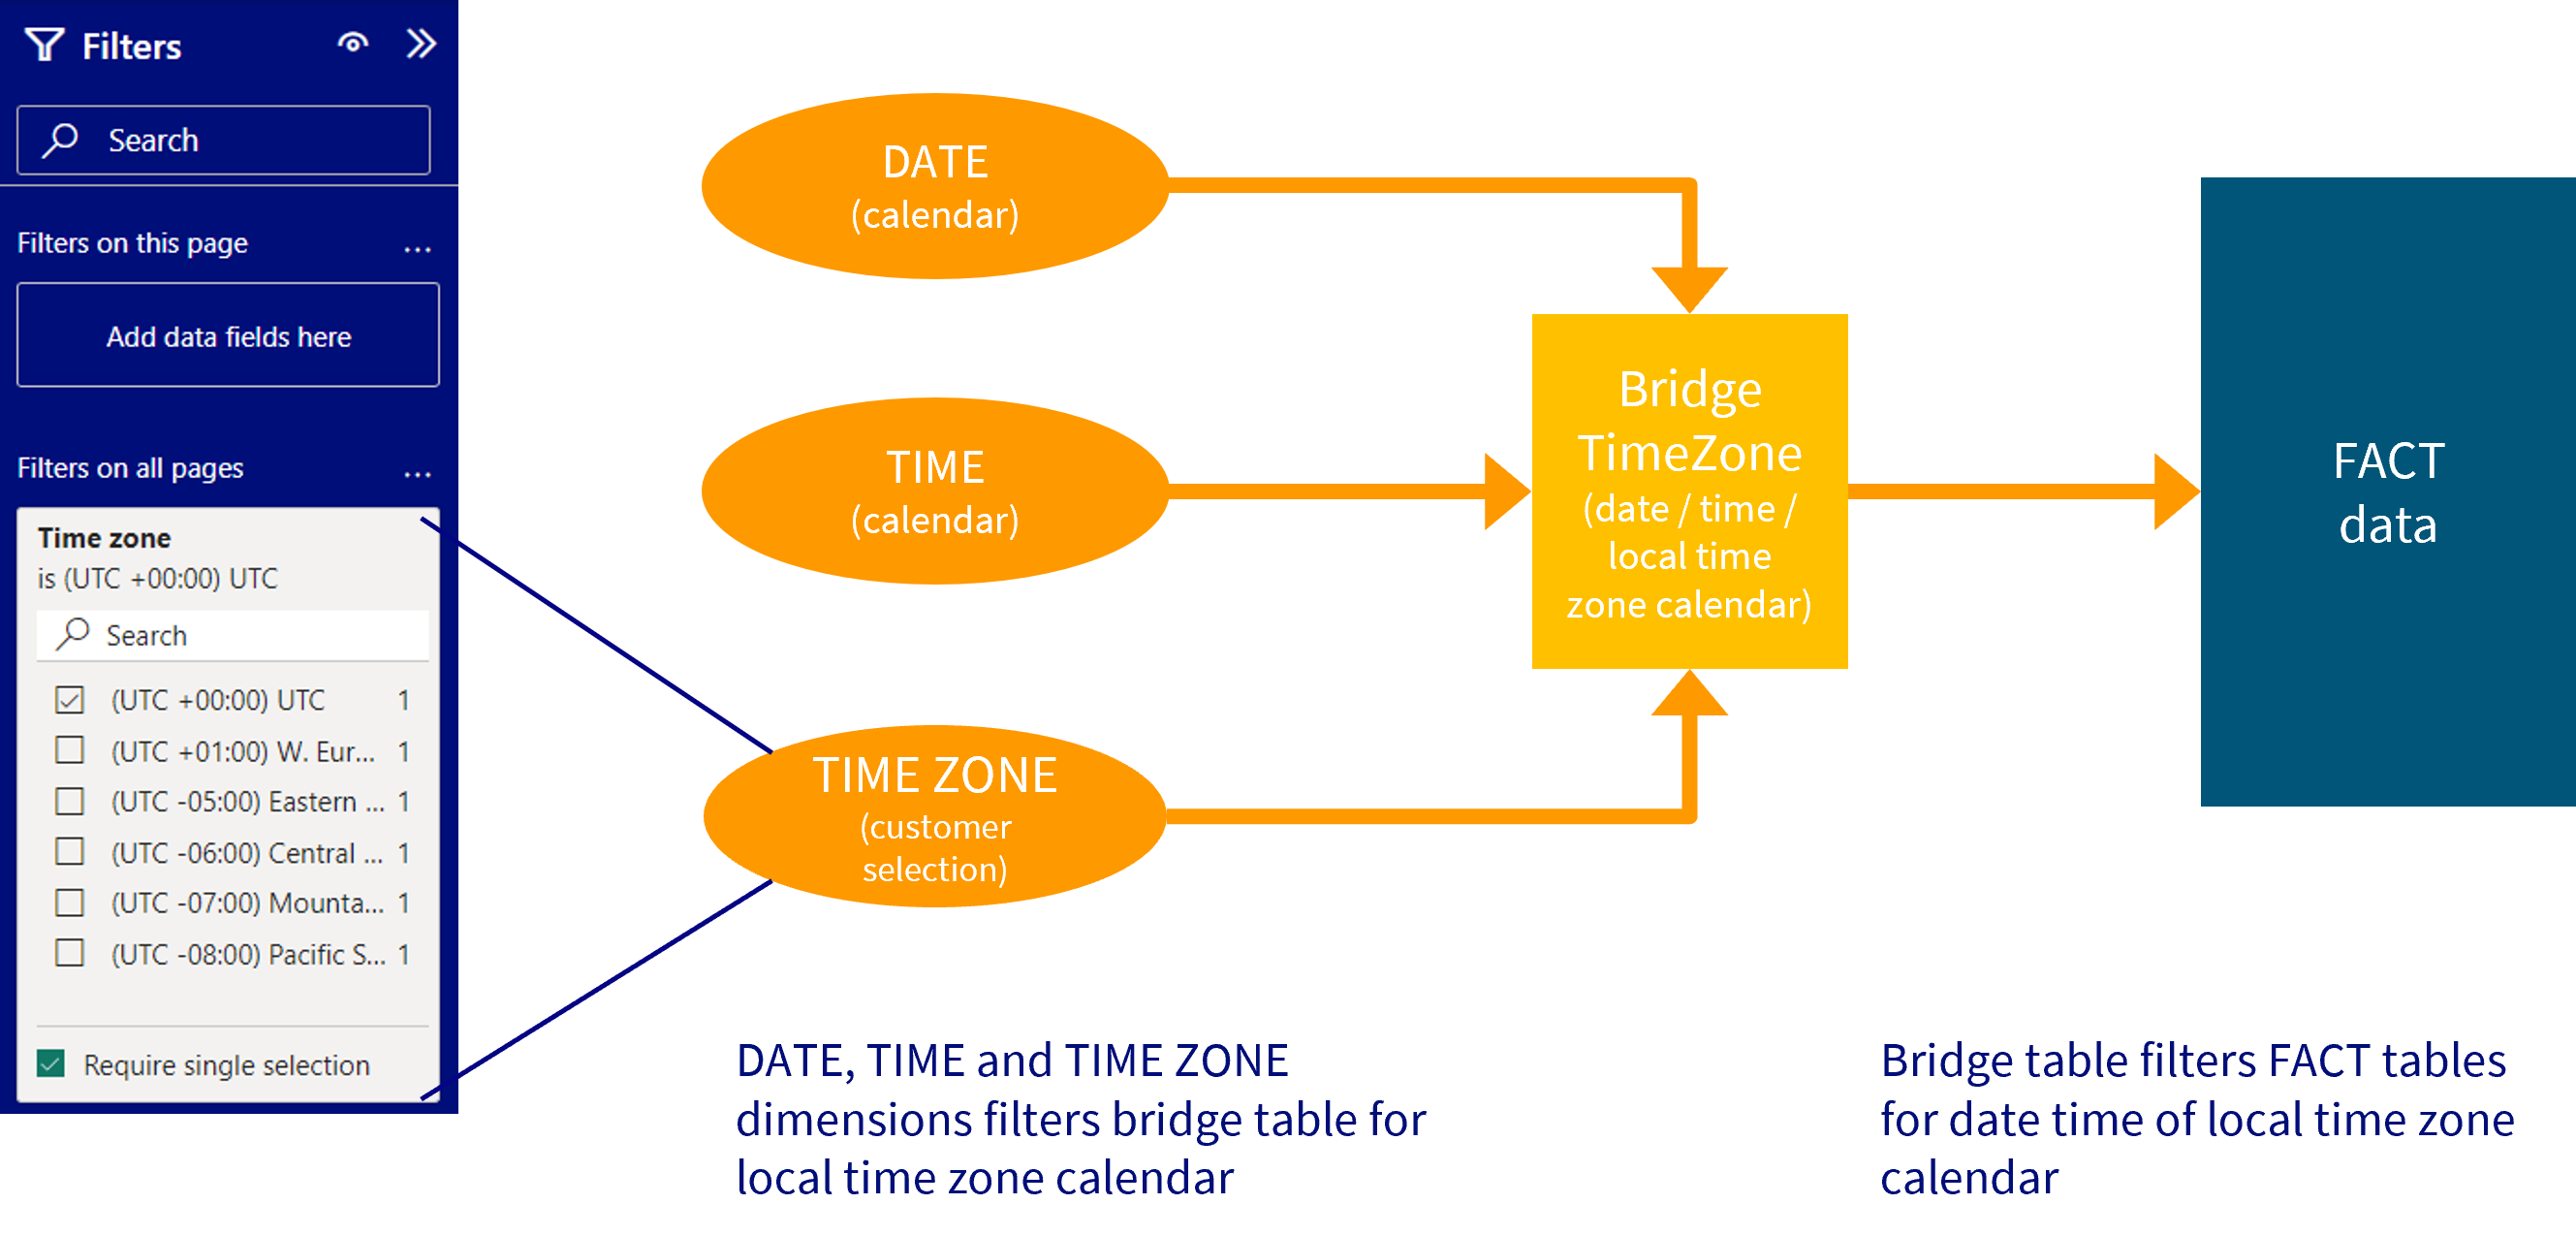
The customer can choose which time zones should be available for the users. The TIME ZONE dimension is present in the normal "Filters" and filters all pages by default. Having multiple time zones deployed in the system requires a single selection of one time zone!
By default, the system setup is done by having the default time zone set to UTC and having UTC implemented as the only time zone. This way, UTC is the only present time zone within the TIME ZONE dimension and it's not required to care about it in the reports. All data in CCBI is available as it's stored (for its original time zone) without any conversion.
Configure time zones
No configuration change is necessary if no time zone conversion for the data is required!
The table dim_TimeZone is created and updated based on the available time zones from MS SQL Server "AT TIME ZONE" conversion functionality:

timezoneCode is the primary key of the master.sys.time_zone_info table.
timezoneName is the display name within CCBI and holds the actual offset to UTC.
defaultZone must be true for the time zone in which the data is stored (default = UTC).
active must be true for all time zones that should be available in CCBI (default = UTC only).
If your data is not stored in UTC, you must change the defaultZone from UTC to your time zone. Make sure that you only have one defaultZone enabled.
Enable additional time zones by updating the active field to true. Remove time zones by updating the active field to false. Make sure to have at least one time zone in active state!
As soon as the SQL Server Agent Job "CCBI: Update Time Zone Calendar" is executed, the time zone calendar will be replaced based on the new configuration settings. This requires keeping this job running on a nightly base to create the upcoming calendar including all changes and time zone updates.
Primary Queues
Primary Queues are used to determine if calls to a certain service (CallType) are actually handled by the responsible resources (skill groups or Precision Queue; hereafter referred to as Queue). As soon as the Primary Queues have been assigned to the CallTypes in the Reporting database, this analysis can be done in the CCBI data model as well.
This administration is part of the administrative reports within b+s Reports for CUIC. If this product is not available, this configuration needs to be implemented and maintained by a technical resource directly in the Reporting database based on request.
Short Call Trigger
The short call trigger works together with the Short Call Threshold and specifies whether the duration of an abandoned call is measured from the system entry or when resources are allocated for the call (when the call type changes).
In UCCE reporting, the same configuration is available as a registry key in the router:
HKEY_LOCAL_MACHINE\SOFTWARE\Cisco Systems, Inc.\ICM\inst1\RouterA\Router\CurrentVersion\Configuration\Global\ServiceLevelShortCallOption
If the value is 0 (default), the abandoned call time begins at the time when the call comes into the router.
If the value is 1, the abandoned call wait time is reset only for the Service Level when the call type changes
If the value is 2, the abandoned call wait time is reset when the call type changes
Configure the same logic for CCBI by editing table "t_system_settings" and change the "Value" of Id 31 to the number 1 or 2:
1 = short call duration is measured from system entry (default)
2 = short call duration is reset when sending a call to a queue/agent