Configuration

Time zone functionality
The time zone configuration is used to align ECE data to the same time zone as CCE within the data load procedures and to convert all data to a specific time zone within the reports.
Time zones are configured in the table t_time_zone. This table contains the source and target time zone. By default, both values for source and target are set to UTC, meaning that CCE data is stored in UTC (same as ECE) and there is no time zone conversion active within the reports:
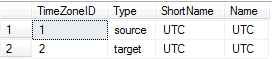
The first row (source) represents the time zone, in which the data are stored in CCE. The second row (target) determines the time zone, to which the data will be converted to. A full list of all available time zones and their offset to UTC can be shown by executing the following query:
USE master
GO

SELECT * FROM sys.time_zone_info
To adapt the time zone settings, either use the "Edit Top 200 Rows" option or change the following query according to your needs:
UPDATE t_time_zone
SET [ShortName] = 'CEST', [Name] = 'Central European Standard Time'
WHERE [Type] = 'source'

UPDATE t_time_zone
SET [ShortName] = 'PST', [Name] = 'Pacific Standard Time'
WHERE [Type] = 'target'
This query sets the source time zone to CEST, meaning the data in the Cisco CCE database are stored in CEST. The target time zone is PST, implying that these settings were made for a user on the west coast of the United States.
To align ECE data (which is always stored in UTC) with CCE data, ECE data gets converted to the same source time zone as configured for CCE within the load procedures and then both to the configured target time zone within the reports.
If you have ECE data available and CCE does not store data in UTC, you have to have a proper time zone configuration in place before loading ECE data. Otherwise you will have an offset between CCE and ECE data. Reloading all ECE data is required if you change the source time zone afterwards.
The "ShortName" is meant as an abbreviation of the time zone and has no influence on the functionality. However, the "Name" has to be exactly identical to the name in the "sys.time_zone_info" table on the "master" database.
The target time zone has to be the same as the CUIC server. In the example described above, the time zone of the CUIC server would be PST.
Mapping of ECC Variables (CallByCall only)
Specify up to 10 Expanded Call Variables that should be included within the CallByCall Reports.
This can be achieved by editing the table "t_Expanded_Call_Variable" and entering the numbers 1 to 10 within the field "ReportMapping":
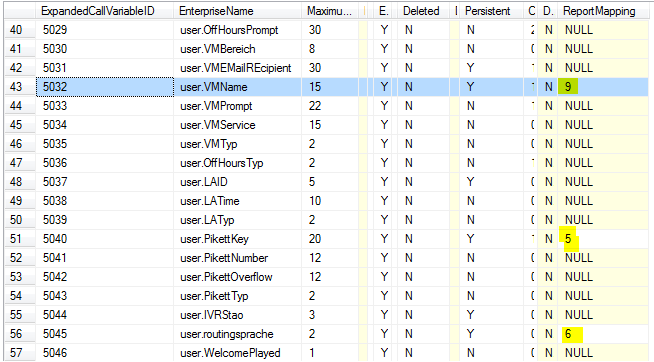
This will join for example the variable "user.VMName" (containing "9") to the datafield "ECVariable9" within the CallByCall reports.
Reloading all data of the CallByCall Interface is required to get the changes of this variable mapping in place.
Adjustments for data retention periods
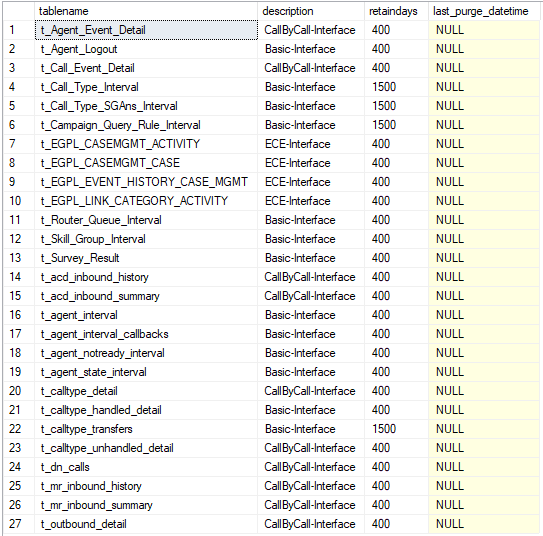
The default settings will delete CallType and Campaign interval data after 1500 days and all other data after 400 days.
Modify the "retaindays" within table "t_purge_settings" if any change is required.
Not Ready Reason Codes
Summary
This part provides information about how to customize Not Ready Reason Codes to be used within b+s Reports for CUIC. It covers the possibilities of grouping the existing codes to be shown as 20 categories of the "Not Ready Reason Time" within historical and real time reports. It also covers how to configure 3 groups out of the categories to be displayed within the agent state count pie charts. Additionally, this document also includes how Not Ready Reason categories can be set to be productive (e.g. back office) or non-productive (e.g. break). The configuration is part of the system setup and needs to be specified prior to the setup. This part should help to understand the functionality and can be shared with the end customer and the operational organization.
Functionality within Reports
Historical and Real Time Grid Reports
Agent/Team State Reports (335, 336, 346, 435, 436, 438, 439, 446, 466) and the report 411 Team Real Time State Counts uses 20 data fields (columns) where the duration and 20 data fields where the percentage of different Not Ready Reason Codes can be measured. Those fields are representing a category summary of several individual Not Ready Reason Codes because the number of configured codes can be much higher. Either because the same code meaning exists in different languages or the set and order of available codes differs between organizations.
Depending on the productivity configuration of the 20 categories, the reports separates the Not Ready Time in productive or non-productive time and provides several productivity KPIs.
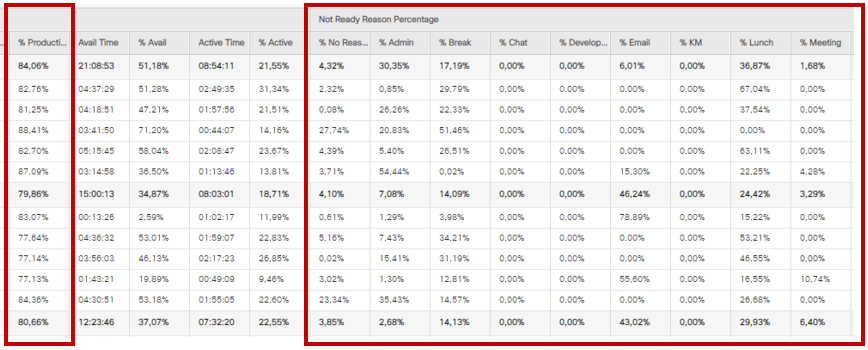
This is an example of Report "346 Agent State Voice Daily" where the Not Ready Reason Percentage of the categories "Admin", "Break", "Chat" etc. and the "% Productive Time" can be seen:
The column names of the 20 categories are dynamically taken from table "t_Reason_Code_Category" where the categories are configured.
Real Time Displays
Real Time State Counts Graph Reports (312, 313, 314, 412, 413, 414) show how many agents are within one of these states and provides the summary of 3 Not Ready Reason groups. All other reasons or where no reason was set is summarized as "Not Ready – Other".
These 3 Not Ready Reason groups are configured out of the 20 categories by assigning them to one of the top 3 categories within table "t_Reason_Code_Category".
This is an example of Report "314 Agent Real Time State Counts Graph - simple" where the count of agents with Not Ready Reason category groups "Break", "Lunch", and "Meeting" can be seen separately:
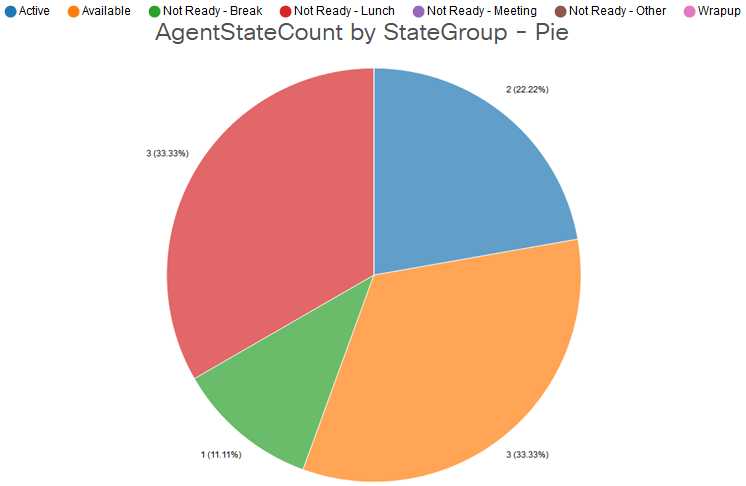
The name of the total 4 reason category groups used within the pie charts need to be configured once for the whole system within table "t_Agent_State_Group".
Configuration
Grouping codes within UCCE
From version 3.2 there are no extra reason codes required to be configured in CCE for grouping purposes. The whole grouping and categories are configured within database "bs_Reporting".
Reason Code Mapping
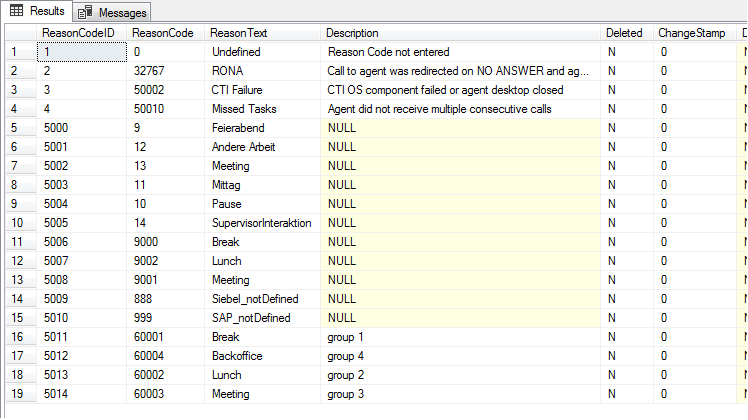
Start with discovering the existing Reason Codes of the CCE configuration by selecting them from table "t_Reason_Code":
Also open table "t_Reason_Code_Category" to display the 20 categories that get implemented by default and might have been modified already:
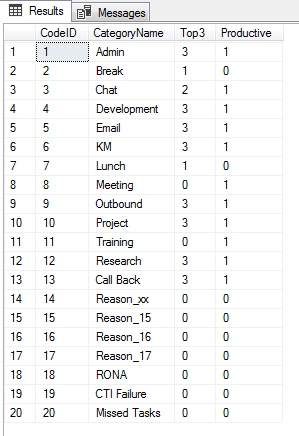
Specify those categories as far as needed by entering a meaningful CategoryName and leave the unused categories with their default name "Reason_<CodeID>".
Now you can configure which ReasonCodes from table "t_Reason_Code" should belong to which CodeID of table "t_Reason_Code_Category".
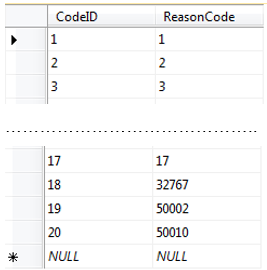
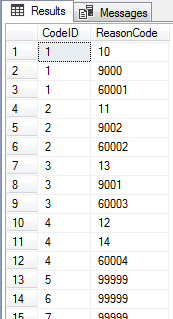
Here for you have to edit the table "t_Reason_Code_Mapping" and fill in all required ReasonCodes. This table already covers a default mapping for ReasonCodes 1-17 and the existing system codes:
Edit this table by following those steps:
- Overwrite ReasonCode 1 with the number of your first ReasonCode that should belong to the first category. Add a new record with CodeID = 1 and the ReasonCode for all ReasonCodes that should also belong to the first category.
- Overwrite ReasonCode 2 with the number of your first ReasonCode that should belong to the second category. Add a new record with CodeID = 2 and the ReasonCode for all ReasonCodes that should also belong to the second category.
- Repeat the same procedure for all other categories that need to be configured.
- Remove the default mapping for those Reason Codes 1-17 that are already assigned to another category by entering 99999 as a placeholder. Do not delete any of the 20 default records.
Note: The remaining ReasonCodes that are not mapped to any category will be reported as "NoReason" within Grid Reports and "Other" within pie charts.
If all records have been entered into the table "t_Reason_Code_Mapping", you should check the configuration with a "Select Top 1000 Rows", which will show a better sort order:
Note: Make sure that you have entered the same ReasonCode only once (except placeholders).
If the mapping of this table is changed, this historical data needs to be reloaded again (export_id 13: Agent-State-Interval-Export for Basic-Interface).
Top 3 Groupings for pie charts
Another setting that can be made in the table "t_Reason_Code_Category" is to determine the top 3 groups that should be displayed in the Real Time State Counts Graph Reports (312, 313, 314, 412, 413, 414). By default, the first 3 categories (Code IDs 1, 2 and 3) are configured as top 3 groups.
It is also possible to combine multiple Reason Code categories to be displayed as a summary in the mentioned reports. For that purpose, the same number (1, 2 or 3) can be set multiple times in the "Top3" column. In the screenshot of table "t_Reason_Code_Category" above, the two categories "Break" and "Lunch" are summarized as the first group (the column "Top3" is set to "1" for these two categories). The second group ("2" in the "Top3" column) is represented by the "Chat" category and several back office categories (e.g. "Admin", "Project", etc.) are all set as part of the third group, as the column "Top3" is set to "3". All other Reason Code categories that are not part of this top 3 are also summarized into a group called "Not Ready - Other".
Display Name for pie charts
The default name for the Not Ready Reason Code groups that are displayed within the pie charts of the Real Time State Counts Graph Reports have to be replaced manually.
Edit the table "t_Agent_State_Group" and rename the "EnterpriseName" of all three models:
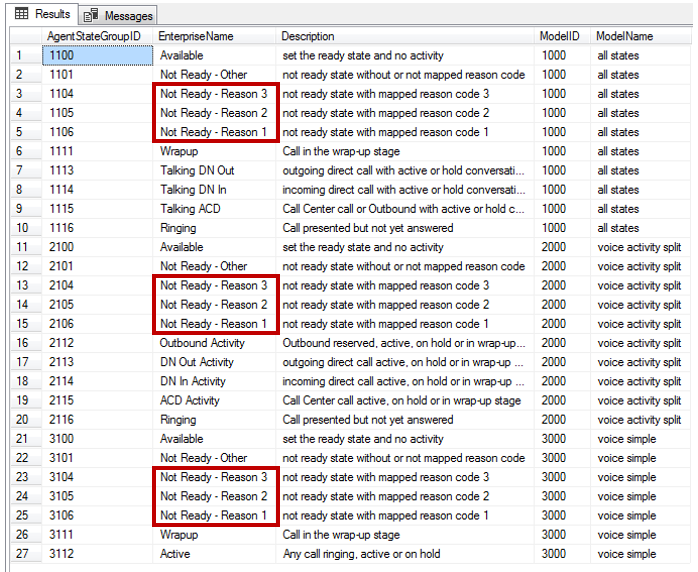
Replace the name part "Reason x" with a meaningful name for those groups configured as top 3.
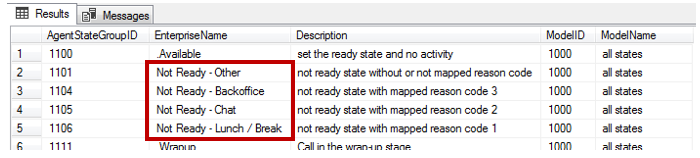
In our example, the two Reason Code categories "Lunch" and "Break" have been defined as the first group, so the name could be "Lunch / Break". Several back office categories (e.g. "Admin", "Project", etc.) have been set as part of the third group, hence the name could be "Backoffice". The modified table should then look like this (only the first model is shown, but this has to be done for all three models):
Productivity Settings
Each Reason Code category can be configured to be productive (e.g. back office) or non-productive (e.g. break). By default, all categories are set to non-productive. In order to change categories to be productive, the table "t_Reason_Code_Category" has to be edited:
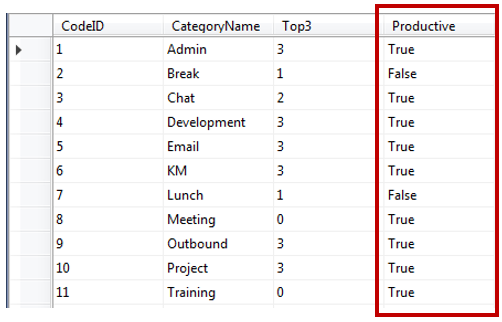
If a code group should be counted as productive, edit the column "Productive" and enter "True", or alternatively the digit "1". To change a code group back to non-productive, enter "False", or the digit "0".
If the Productive flag of this table is changed, this historical data needs to be reloaded again (export_id 13: Agent-State-Interval-Export for Basic-Interface).
Verifying the Configuration
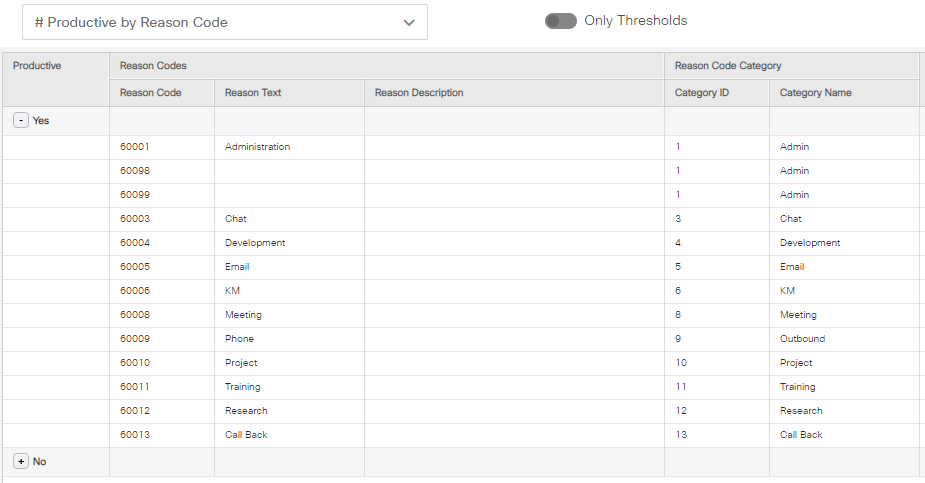
Use the report "990 NotReadyReasonCode Configuration" to verify the configuration. This report provides several views to get a quick overview of which Reason Codes belong to which category and have been set to be productive or which ones are set to be displayed in the top 3 categories of the pie charts:
The following view can be used to check what reason codes are set to productive and non-productive respectively:
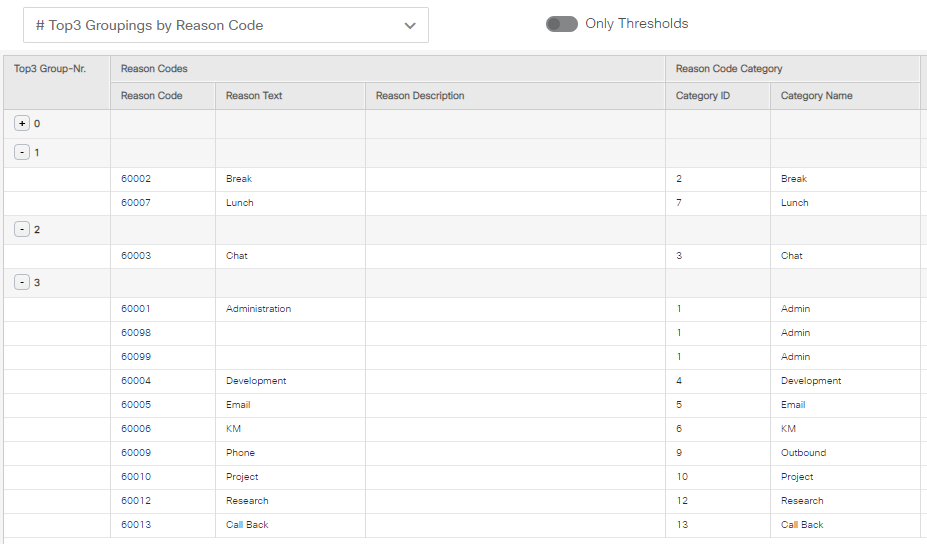
The following view can be used to check what reason codes belong to which of the top 3 groups:
Outbound Skillgroups
In order to separate the Outbound SkillGroups from Inbound SkillGroups, you have to set the value 1 within the field "SkillGroupType" of the local table "t_Skill_Group"
There are several possibilities of doing this:
- Edit the Top 200 Rows if the table does not contain many SkillGroups
- Edit the rule of the where clause for the naming convention and run the following script (adapt the name, if necessary):
update t_Skill_Group
set SkillGroupType = 1
where EnterpriseName like '%Outbound%'
- Use the Outbound SkillGroup Configuration Reports 591, 592 and 593 from the Admin folder within CUIC if they already exist.
If you change the configuration of the Outbound SkillGroups later on, you need to reload this historical data again (export_id 12: Agent-Interval-Export for Basic-Interface).
Media Mapping
You can specify which existing non-voice Medias should be mapped to agent reportings that are called "Chat" and "Email" within our standard templates. Simply edit the table "t_Media_Mapping" and add the ID of the Mediarouting domain into the field CCE_MRDomainID for the corresponding two rows (Description is optional):

To find out which Mediarouting domains exist in the system, perform a "Select TOP 1000 rows" on the view "Media_Routing_Domain".
If you change the media mapping later on, you need to reload this historical data again (export_id 12: Agent-Interval-Export for Basic-Interface).
Mapping of custom activity fields (ECE only)
In order to include custom activity fields in the ECE Dept. Activity Details Reports, you have to edit the table "t_custom_activity_fields" and enter the required field names of the available columns at the end of view "EGPL_CASEMGMT_ACTIVITY" within the field "fieldname":
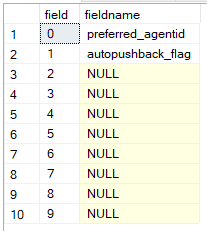
This will join for example the custom field "preferred_agentid" to the data field "custom0" within the ECE reports.
Make sure that the name inside the "fieldname" is exactly identical to the name inside the view EGPL_CASEMGMT_ACTIVITY, otherwise the corresponding load procedure will throw an error.
If you change the configuration of the custom activity fields later on, you need to reload this historical data again (export_id 32: CASEMGMT-ACTIVITY-Export for ECE-Interface).
System settings
The following settings can be changed at any time and will instantly affect the data output. Re-loading data is not required. The parameters are located in the table t_system_settings and need to be modified there by editing the field "Value" for the corresponding "ConfigurationProperty".
AgentName Display
You can change how the agent names are displayed within the reports. As per default and as documented within the field descriptions, this field displays the concatenation of the AgentLastName and the AgentFirstName (Value = 0). This can be changed so that it displays the EnterpriseName (Value = 1).

Value List Query for bs_Agent (PCCE only)
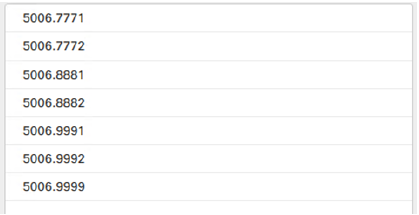
In PCCE environments, the EnterpriseName of the agents is generated automatically (combination of PeripheralID and PeripheralNumber) and cannot be changed manually. As our value list "bs_Agent" uses the EnterpriseName as display name, the agents are displayed as follows:
There are several options, how this can be changed. In the following chapters, three of them will be presented.
Do not remove or change the field "ID". The ID always has to be the SkillTargetID from the table t_Agent.
Option 1: agent's last name and first name
To display the agent's last name and first name, edit the value list "bs_Agent" and change the Value List Query:
SET ANSI_NULLS ON
SET ANSI_WARNINGS ON
SELECT
a.SkillTargetID AS ID,
p.LastName + ', ' + p.FirstName AS VALUE
FROM t_Agent a (nolock)
INNER JOIN t_Person p (nolock) ON p.PersonID = a.PersonID
WHERE a.Deleted = 'N'
ORDER BY p.LastName ASC
Display example: Doe, John
Option 2: Team, last name, first name
This query will display the agents per team. Agents with no team assigned are displayed at the end of the list.
SET ANSI_NULLS ON
SET ANSI_WARNINGS ON
SELECT
a.SkillTargetID AS ID,
COALESCE(agt.EnterpriseName  + '.' + p.LastName + ', ' + p.FirstName, p.LastName + ', ' + p.FirstName) AS VALUE
FROM t_Agent a (nolock)
INNER JOIN t_Person p (nolock) ON p.PersonID = a.PersonID
LEFT OUTER JOIN t_Agent_Team_Member (nolock) agtm ON agtm.SkillTargetID = a.SkillTargetID
LEFT OUTER JOIN t_Agent_Team agt (nolock) ON agt.AgentTeamID = agtm.AgentTeamID
WHERE a.Deleted = 'N'
ORDER BY CASE WHEN agt.EnterpriseName IS NULL THEN 1 ELSE 0 END, p.LastName
Display example: Sales.Doe, John
Option 3: Agent's login name
To display the agent's login name and his ID, the following query may be used:
SET ANSI_NULLS ON
SET ANSI_WARNINGS ON
SELECT
a.SkillTargetID AS ID,
p.LoginName + ' (' + a.PeripheralNumber + ')' AS VALUE
FROM t_Agent a (nolock)
INNER JOIN t_Person p (nolock) ON p.PersonID = a.PersonID
WHERE a.Deleted = 'N'
ORDER BY p.LoginName ASC
Display example: doej (1235)